In this article, you'll learn four easy ways to add clients to your Zanda account.
In this article:
- Adding New Clients via Quick Actions (➕ Icon) Menu
- Adding New Clients With New Appointments
- Creating New Client Profiles
- Importing Existing Clients Data
- Copying Client Profiles From Another Zanda Account
- Registering Clients Via The Client Portal
- FAQs
Adding New Clients via Quick Actions (➕ Icon) Menu
You can quickly add a new client profile to your Zanda account from anywhere.
- Click the ➕ icon in the app bar.
- Select Client.
- The Add New Client modal will appear (this is the same form used in People > Add).
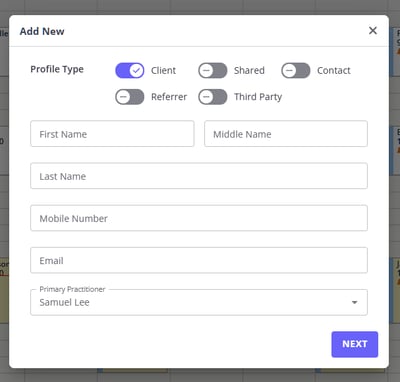
- Enter the required client details and click Next.
💡 Tip: You can also select a toggle to create another type of profile, for example, Contact, Shared Profile, Third Party, etc.
On a successful save, the modal closes, and you are moved to the new profile Details page. The new profile is immediately available in client search fields.
Adding New Clients With New Appointments
Use this method when you need to add a new client to your system and you have already agreed on booking an appointment for them:
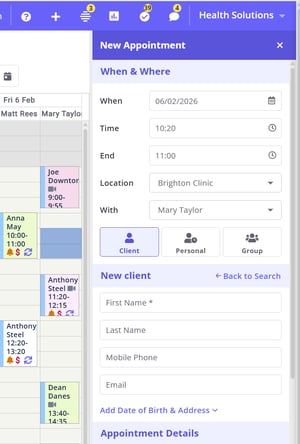
1. Click on the desired time block where you want to schedule an appointment for the new client.
2. On the appointment panel, click the + New Client button.
3. Add the client's details and other details of the appointments (services, products, appointment flag, etc.) and click Save.
Creating New Client Profiles
This method can be used when you are taking in a new client, regardless of whether you have agreed on an appointment with them yet or not. This would allow you to create their profile and record any client data that has already been provided.
1. On the left-hand sidebar, navigate to People > Add.
2. On the Add New Client modal, add the client's details. Click Next.
3. The client profile will be created, and opened for you on the 'Details' page. Fill in the other details of the client and click Save Changes.
Importing Existing Clients Data
Important
Please be aware that we are able to assist with importing data into your Zanda account as a once-off complimentary service. This is usually organized at the time when you are joining Zanda and would like to transfer your client data from the previous client management system you had been using. There are no charges associated with the import. You can find detailed information about this process in the article "Importing Your Data" here.
The instructions below illustrate how you could upload your existing client files via your Zanda account for the future import that our Data Import team would organize for you.
1. Navigate to User Menu > Account Settings > Practice > Data Import.
2. Fill out and submit the Pre-Import Enquiry Form available on that page.
3. Click Browse Files and upload the file containing your client profile info. (Or simply drag and drop the files on the page).
4. Add any special instructions or information in the notes section that you want our team to be aware of - and click Submit.
Copying Client Profiles From Another Zanda Account
We offer a complimentary one-time service to copy clients (and other data) from one Zanda account to another when you’re moving clinics, restructuring, or starting fresh. See full details here.
To request a data copy from one Zanda account to another, please follow these steps:
-
Confirm Account Permissions
-
Make sure you are the Master User of the Source account (the account data is being copied from). If you aren't, obtain the Master User's permission to proceed with the data copy.
-
-
-
If you are not the Master User of the Destination account (the account data is being copied to), obtain permission from that account’s Master User.
-
-
Prepare Practitioner and Account Details
-
Ensure all relevant practitioners already exist in the Destination account (they are not created automatically during the data copy).
-
Decide whether you want all clients, clients linked to a particular practitioner, or a specific list of clients copied.
-
If you are requesting a selected list, prepare a CSV file of client numbers.
-
-
Confirm the Data to Copy
-
Review what is copied by default (e.g., client profiles, appointments, notes, communications, referrals).
-
Specify if you want additional items (such as invoices, payments, services, or communication templates) included.
-
Be clear if you want to exclude any data.
-
-
Send Confirmation Emails
-
Both the Source Zanda Account Master User and the Destination Zanda Account Master User must send confirmation emails.
-
These emails must come from the email addresses associated with each account’s Master User.
-
In the email, clearly state:
-
The Source and Destination account details
-
The Practitioner name(s) or CSV list of client numbers
-
The specific data you want copied
-
Example email from the Source Account Master User:
I hereby provide my consent for data to be copied from [Source Account Name] to [Destination Account Name].
Please copy the following data: Client profiles and appointments for all clients linked to Practitioner [Name]. -
-
Submit Your Request
-
Once both confirmation emails are prepared, send your request to support@zandahealth.com.
-
Our Data Import Specialists will review the details and confirm the next steps.
-
Registering Clients Via The Client Portal
Zanda offers a Client Portal feature where you can allow clients to register, book and cancel their appointments, book a place in classes, and pay their invoices. When a new client registers via your Client Portal link, this will create a Client Profile in your Zanda account. See below where to find your Client Portal link and feel free to share it via your preferred method of communication with clients.
1. Navigate to User Menu > Account Settings > Schedule > Client Portal.
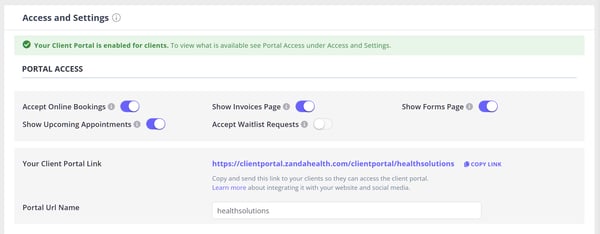
2. Go to the 'Access and Settings' tab.
3. Enable the client portal by turning on the 'Clients can manage their appointments' switch.
4. Adjust the client portal settings in accordance with your business processes, and save the changes.
5. Copy your client portal URL to share with your new (and existing) clients.
That's it. Your new clients will be able to use the Client Portal to register in your account and book an appointment with you.
FAQs
- Can I add my own fields to the client details page? - Yes, you can add custom client profile fields via User Menu > Account Settings > Clients > Custom Profile Fields. See detailed guide here.
- Why is the (Medicare/DVA/BUPA/other) insurance field not showing up on the clients' details page? - The insurance field only shows up on those client profiles that have insurance added in their profile under Billing > Insurance.
- What should I do with a new client profile when someone registered online but doesn't make a booking?- While this is a personal preference, many practices email such clients to see if they had an issue using the client portal and if they meant to book an appointment. If there is no response, the practice follows up with a phone call and if they decide not to book the team will archive the client profile.