Claim Submission and Payment Process (US-only)
This article provides a detailed explanation of the claim submission and payment process through Zanda integration with APEX
Overview
Customers who have completed the APEX enrolment and have a valid Vendor ID gain access to additional features in the Sales > Insurance menu, including:
- Claims
- Claim Payments
- Eligibility

In this article:
- Steps to Submit a Claim
- Claim Statuses
- Viewing Claims
- Fetching Claim Status Updates
- Viewing Claim Payments
- Explanation of Benefits (EOB)
- Automatic Payment Allocation
Steps to Submit a Claim
-
Generating a Claim:
- Open an invoice edit page via an appointment panel or a client profile.
- Click 'Create Claim' button

-
- A claim in a 'Draft' status will be created, and a CMS - 1500 form. Check the claim details and fill in any additional required details.
- Click 'Submit Claim'.

-
Pre-Validation:
- When submitting a claim, the Zanda system performs pre-validation checks to ensure all required data is filled. The fields missing the required information will be highlighted red. Enter the information and try submitting the claim again.

- When submitting a claim, the Zanda system performs pre-validation checks to ensure all required data is filled. The fields missing the required information will be highlighted red. Enter the information and try submitting the claim again.
-
Claim Submission:
- If all data is valid, the claim is submitted to Apex.
- If Apex identifies missing or incorrect data, the claim is marked as Failed. Additional errors will be displayed at the top of the claim form.
-
Resubmitting Failed Claims:
- Correct the errors directly on the form.
- Hit Submit Claim again. No need to create a new claim.
Note:
- Claims that are rejected in Zanda need to be resubmitted within the Zanda system with the necessary updated information. If a claim is processed directly in Apex rather than through Zanda, it will not transfer back to Zanda.
- It’s not possible to include multiple invoices in a single Medicare claim. However, you can submit multiple claims for the same invoice if needed.
Claim Statuses
- Draft: Claim prepared from invoice ##
- Failed: Claim submitted and validations failed
- Denied: Claim submitted and validations failed
- Accepted: Claim passed validation
- Submitted: Claim submitted and is ready to be processed by the clearing house
- Paid: Claim approved and paid
Viewing Claims
- To view and manage your claims, navigate to the Sales > Insurance > Claims menu. Here, you can utilize the available filters to generate a list of claims that match your specified search criteria.

- The generated list of claims will include the following information:
- Claim #
- Date Created
- Status
- Date Updated
- Client Name
- Insurer
- Practitioner
- Amount
- Invoice#
- Note: claim note, if any made
- Actions: the actions menu allows to make edits, delete or resubmit the claim and view its submissions history

- You can add or remove columns from the claims list by clicking the 'Choose Columns' button above the list and checking or unchecking the required columns:

- To see the deleted claims, enable the 'Show Deleted' switch below the filter, before you run the search:

Fetching Claim Status Updates
-
Manual Updates:
Users can click the Fetch Status Updates button to retrieve updates for claims that are Submitted but not yet paid, denied, or rejected.

-
Automatic Updates:
Status updates are retrieved automatically every day at noon (Mountain Standard Time).
Viewing Claim Payments
- Navigate to the Sales > Insurance > Claim Payments section to view details of claims that have been paid.
- Payments can be filtered:
- By Date Range
- By Client
- By Insurer

- Once you set the search criteria, click the 'Search' button to generate the payments list.

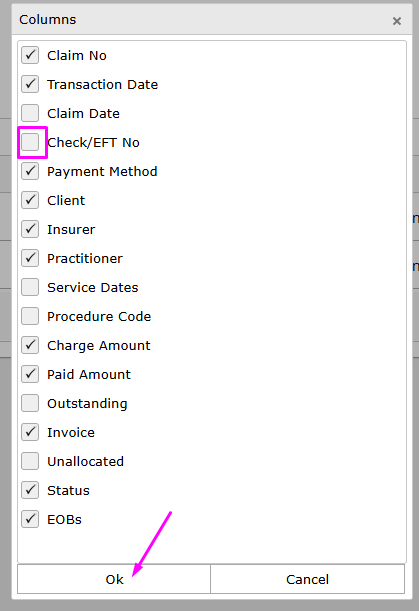
- Use the Choose Columns option to add or remove table columns:

Explanation of Benefits (EOB)
-
Each paid claim is associated with an EOB (Explanation of Benefits), which includes:
- Payment details (e.g., check or EFT number)
- A breakdown of claims covered under the payment
- Total amount paid
-
Multiple claims from the same client and payer can be grouped under one EOB. These payments are listed separately in the system for each claim.

Automatic Payment Allocation
- When a claim payment is received:
- The payment is automatically applied to the associated invoice.
- The invoice status will reflect a $0 balance, indicating it has been fully paid.
- Manual allocation is not required.
