Customising Your Invoices/Receipts
Customize Zanda invoices with your clinic's logo, business info, and personalized messages. Learn to add tax rates and create bills for insurance claims.
You can customise the invoices and payment receipts you send clients with your clinic’s logo – or any other branding image of your choice. You can also edit the information about your health clinic displayed in your invoices. Last but not least, you can add custom messages and additional information to your invoices as well.
In this article:
- Adding a Logo/Letterhead to Your Invoice
- Editing Your Invoice Layout
- Editing Business Information in Your Invoice
- Adding Custom Text to Your Invoices
- Adding Information that Appears on all Invoices
- Adding Information that Appears for a Particular Practitioner
- Adding Information that Appears for a Particular Client
Adding a Logo/Letterhead to Your Invoice
Here’s how you can add your logo/letterhead to your invoice:
1. On the left-hand menu of your Zanda dashboard, navigate to Settings > Billing > Invoices.
2. On the Invoice and Statement Layout section, click the Upload/Update Image button.

3. Your computer’s file explorer will open up. Browse and double-click on the logo/letterhead image that you want to upload. Once done, your new logo/letterhead will be displayed on top of your invoices.
Pro-tip 💡
1. If you want, you can always change/remove your logo/letterhead from the invoice as well. Just go to Settings > Billing > Invoices. Click on the Update button to choose a new image. Click on the Remove button to completely remove the image.
2. You may need to resize your Logo image for the best fit. There are some free online tools that you can use, for example, Adobe here. At the Resize step in the Resize For field, please select Custom from the dropdown, and then type the desired Width dimensions. The Height will update automatically.
Editing Your Invoice Layout
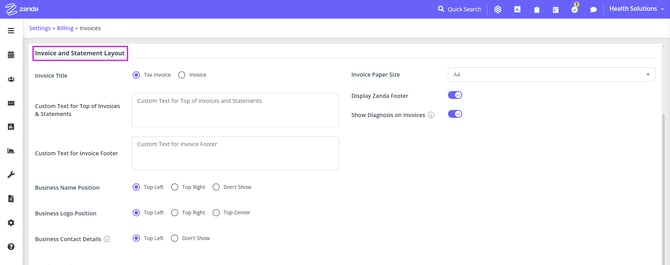
Your invoice displays various important information, such as your logo, business address, application of tax, invoice number and more. You can choose how this information is displayed.
Here’s how:
1. On the left-hand menu of your Zanda dashboard, navigate to Settings > Billing > Invoices.
2. On the Invoice and Statement Layout page, you will find the settings to add/remove information from your invoices.
3. Edit the settings and click Save on the bottom-right corner of your screen.

What Each Field Means
- Invoice Title: Select the invoice title from the available options: 'Tax Invoice' or 'Invoice'.
- Custom Text For Top Of Invoices And Statements: Add the text you want to display in your invoice header. You can also leave it blank. Once the text is saved here, it will appear on all generated invoices, including the already created past and future dated, when invoices are printed or emailed.
- Custom Text For Invoice Footer: Add in the text you want to display at the bottom of your invoice for Business Name Position. Once the text is saved here, it will appear on all generated invoices, including the already created past and future dated, when invoices are printed or emailed.
- Business Name Position: If you don’t have a logo, or if your logo doesn’t have your business name, you can use this setting to add your business name to your invoice.
- Your Logo Position: With this setting, you can choose the position of your logo on your invoice, or you can choose not to display it at all.
- Your Business Contact Details: If your business contact details or tax idea is already in your logo or pre-printed on your papers, set it to Don’t Show.
- Invoice Paper Size: Select your invoice paper size on which you’ll be printing out your invoices.
- Display Zanda Footer: Choose whether you want to display Zanda below your invoice.
- Show Diagnosis on Invoices: Allow the patient diagnosis to show and print on invoices, statements and receipts.
❗Important Note
Can I hide the "X of Y sessions used" line on invoices?
No. When a session pack is used to pay for or track a session on an invoice, the system automatically generates a line item description (e.g., "1 of 5 sessions used in [Pack Name]") to track usage.
This specific line cannot be hidden or removed from the invoice if you are using the session pack feature. It is a core system function designed to provide transparency to both the practitioner and the client regarding the pack's remaining balance.
Invoice Settings:

- Invoice Due Date: Select how many days after an invoice is created for it to be paid by. The invoice due date will be applied to all new invoices after selecting a due date. Look here for more details.
- How To Calculate Tax: If you’ll be charging additional tax to your clients, choose Price Includes Tax or Price Excludes Tax. If you won’t be charging tax, choose No Tax.
- Last Invoice Number: Enter the invoice number you would like the next invoice to follow. This is particularly useful when you are migrating from another system and need Zanda to begin from a specific invoice number in your new Zanda account, to ensure that there are no clashes when you export Invoices to Xero. Sometimes you may refer to this number as the 'invoice name'. You can update it to a different number if needed; however, you cannot use words or letters in your invoice numbers.
- Invoice Email Template: Choose an email template. Your invoices will be attached to this email template and will be sent according to the settings made in this template.
- Receipt Email Template: Choose an email template. Your receipts will be attached to this email template and will be sent according to the settings made in this template. When there is no template selected in this field, the system will use the default invoice email template when emailing receipts. A receipt is a fully paid invoice, that can be emailed to the payee from a Zanda account, or when clients pay for their invoices via the Client Portal and request to email the receipt to them.
Example Receipt Email Template💡
Here is a basic receipt email template that you can use to add to your Tools > Communication > Templates:
Message Type - Email
Name - Receipt Email
Description - This is the default email template that is used when you email receipts to your clients.
Email From Name - [your business email]
Email From Address - [your business email, where the replies will come]
Email Subject - {SystemDocumentName1}
Email Content:
Hi {ClientPreferredName},
Please find "{SystemDocumentName1}" attached. If you have any questions, please call us or reply to this email.
Regards,
{BusinessName}
{BusinessPhone}
Editing Business Information in Your Invoice
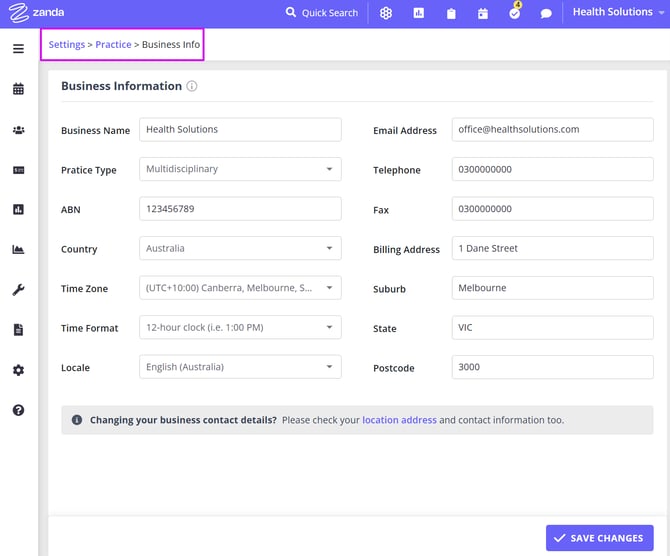
Zanda automatically adds your business details to every invoice you print. This includes critical information such as your business name, country and location. Here’s how you can change your business details in your invoices:
1. On the left-hand menu of your Zanda dashboard, navigate to Settings > Practice > Business Information.
2. Here you can make changes to your clinic name, ABN, country, time zone and locale.

3. Similarly, go to Settings > Practice > Locations.
4. Click on your location from the list. This will bring up a form using which you can edit your location info. This includes business name, physical address, postcode, contact information and colour (displayed on the calendar). Also, you can set the location as default, or deactivate it completely.

Any changes made will instantly be reflected in the new invoices you create for your clients.
Hint
- You may wish to display your business registration number (such as ABN, Tax ID, VAT number, etc.) separately from the provider information on client invoices. Here is how you can do this:
- In Settings > Billing > Invoices, set 'Your Business Contact Details' to 'Don't Show'. Save the changes.
- Add your business registration number and contact details in Settings > Billing > Invoices > 'Custom Text for Top of Invoices and Statements', save the changes.
This will display your business registration number and contact details in the top-right section of the invoice.
- Alternatively, you can
- Add your business details and registration number on your logo image;
- Upload it in Settings > Billing > Invoices,
- Set 'Your Business Contact Details' to 'Don't Show'. Save the changes.
This will display your business registration number and contact details on the logo image.
- You may need to display individual practitioners registration numbers on their invoices. To achieve this,
- In Settings > Billing > Invoices, set 'Your Business Contact Details' to 'Don't Show'. Save the changes.
- In Settings > Team > Practitioners > open a practitioner profile > Details, add the practitioners' registration numbers in the 'Custom Invoice Text' box, and save the changes.
This will display practitioner registration number under the provider name on their invoices.
Adding Custom Text to Your Invoices
You can add custom information to your invoices, and choose whether the information appears on invoices of specific clients, locations, calendars, or on all invoices. Find more on custom invoice text fields here!
Adding Information that Appears on All Invoices
Here’s how you can add additional information that appears on all your invoices:
1. Using the left-hand menu of your Zanda dashboard, navigate to Settings > Billing > Invoices.
2. In the Invoice and Statement Layout page, you’ll see two fields called Custom Text For Top Of Invoices And Statements and Custom Text For Invoice Footer.
3. Here, you can add extra information to the top and bottom of your invoice. The header text will appear on the top and the footer text will appear on the bottom of the invoices.
Hint 💡
The bottom of the invoice/receipt is a good place to add your payment terms and direct deposit banking information.
Adding Information that Appears for a Particular Practitioner
1. Using the left-hand menu of your Zanda dashboard, navigate to Settings > Team > Practitioners.
2. Select your practitioner.
3. Add your desired text to the Custom Invoice Text field.
4. Once done, click Save on the bottom-right corner of your screen.
Adding Information that Appears for a Location
Adding your desired text to the Location Custom Invoice Text field:
1. Navigate to Settings > Practice > Locations;
2. Click on the location to whose invoices you want to add custom text.
3. Enter the desired text under Extra Invoice Text.
4. Once done, click Save on the bottom-right corner of your screen.
Adding Information that Appears for a Particular Client
Go to the client's profile whose invoice you want to add additional information. From there, follow these steps:
1. Go to Billing > Billing Setup.
2. Enter the desired text under 'Extra Invoice Info'.
3. Once done, click Save on the bottom-right corner of your screen.