In this article, we will explain the process of exporting invoices and payments generated by Zanda to Xero, a widely-used cloud-based accounting platform for small and medium-sized businesses around the globe. We will also address common challenges you may encounter and provide effective solutions to overcome them. With a wealth of information available, feel free to utilize the table of contents to navigate directly to the sections that interest you most!
Important Note
- You will need a Xero account. Free trial accounts can be obtained from the Xero website.
- If you have an existing account and would like to try the Xero Export, you can create a new trial organization within your Xero account and use this to test.
- Xero Cashbook and Ledger plans are not able to receive invoices or bills from third-party apps, therefore, you won't be able to export approved invoices or payments to Xero if you are under these plans. You will need to upgrade your plan with Xero to enable the export of Approved invoices and payments.
In this article:
- Getting Started
- Connecting Your Zanda Account to Xero Account
- Exporting Clients and Invoices to Xero
- Exporting Payments to Xero
- Understanding the Export Process
- Understanding Xero Rules
- Error Messages
- Payment Reconciliation
- Frequently Asked Questions
- Related Articles
Getting Started
Before connecting your Zanda and Xero accounts, you might need to update the following settings in your Zanda account:
- User login and permissions requirements:
- Enable users 2FA authentication: starting Monday, 28th August 2023, all users accessing the Xero export must enable Two-Factor Authentication (2FA) and authenticate within the last 24 hours. 2FA adds an extra layer of security to your account. Need help setting it up? Check our guide: Activating 2-Factor Authentication
- If you have no 2FA, you'll see a prompt to set it up.
- If you haven't authenticated recently, you'll be guided to log out and authenticate.
- Enable Access Financial Reports permission in User Menu > Account Settings > Users > User Management for user profiles which will be used for managing Xero exports in Zanda.
- Enable users 2FA authentication: starting Monday, 28th August 2023, all users accessing the Xero export must enable Two-Factor Authentication (2FA) and authenticate within the last 24 hours. 2FA adds an extra layer of security to your account. Need help setting it up? Check our guide: Activating 2-Factor Authentication
- Add tax codes you work with in User Menu > Account Settings > Billing > Tax Rates
- Add services and products in User Menu > Account Settings > Billing > Services and User Menu > Account Settings > Billing > Products. Apply relevant tax rates to each service and product. Services and product names will be exported to Xero as Item Descriptions.
Connecting Your Zanda Account to Xero Account
Important Note:
If your business has multiple Zanda accounts and one Xero account, we don't recommend linking multiple Zanda accounts to one Xero account. This setup is likely to cause issues with customer data in Xero account.
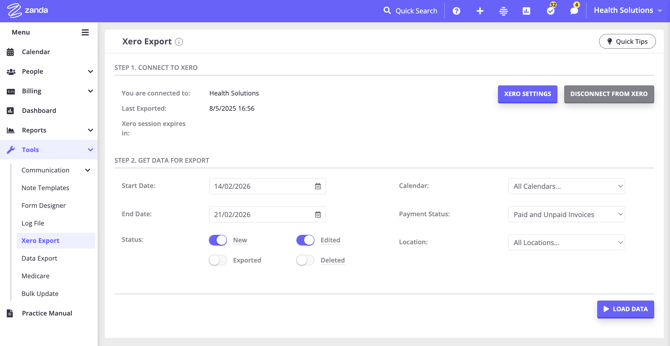
To connect your Zanda and Xero accounts, follow these steps:
- Go to Tools > Xero Export.
- You will be prompted to connect your Xero account to Zanda.

- Follow the steps to connect and authorize access to your Zanda account.
- Once the connecting is complete, you will automatically return to the Tools > Xero Export page.
- Click the Xero Settings button at the top-right and configure your Xero integration settings in Zanda.
- Here are the key settings to review:
- Select a Xero branding theme – this must be set up in your Xero account first. In Zanda, you’ll simply select which theme you want to use. Instructions for adding themes in Xero are linked here as well.
- Select your Xero sales account – this is where Zanda invoices will be exported. It’s commonly the 200 Sales Account, but your accountant may advise using a different one. Look for underlined feature names—hovering over them will reveal helpful tips.
- Map to diary – if your business uses multiple calendars for different disciplines or practitioners, you can pre-map Zanda calendars to specific Xero sales accounts. This way, invoices are automatically directed based on who provided the service.
- Xero payments account – this is separate from the sales account. It’s where your payments from Zanda will go. The Payments Clearing account is often used, but again, consult your accountant.
- Xero tracking category name – this helps you categorise invoices for reporting purposes. It works similarly to Zanda’s locations. You can have two tracking categories with multiple options—for example, Location with options like Brighton Clinic, In-home Services, or Telehealth.
- De-identify client information – you can choose to remove full client names, addresses, and emails from invoices sent to Xero, showing only initials and client IDs instead. This can help protect client privacy, especially if your accountant only has access to Xero.
- Set up tax codes – your accountant will advise which tax types to use. You can map Zanda tax rates to Xero tax types and manage tax settings under User Menu > Account Settings > Billing > Tax Rates.
7. Once configured, don’t forget to click Save!

Exporting Clients and Invoices to Xero
Important Note:
- The first time you export an invoice for a new client, that client will be created as a Contact in Xero. So exporting a client’s invoice also exports the client details.
- Exporting must be done in two batches:
- Export the invoices
- Then export the payments
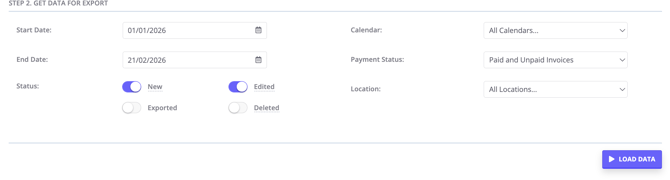
- To generate a list of invoices and payments, select the date range, invoice status (new, edited, already exported, or deleted), calendars, payment status (paid, unpaid, or both), and location.
Let’s break that down:
- Invoice status:
- New: never exported
- Edited: exported before, but changes were made
- Exported: just to check what’s been sent
- Deleted: lets you verify if something still exists in Xero
- Calendar: choose one or export for all calendars
- Payment status: all, paid only, or unpaid only
- Location: filter invoices by location if you have multiple clinics or service types
2. Click Load Data to see a list of invoices.
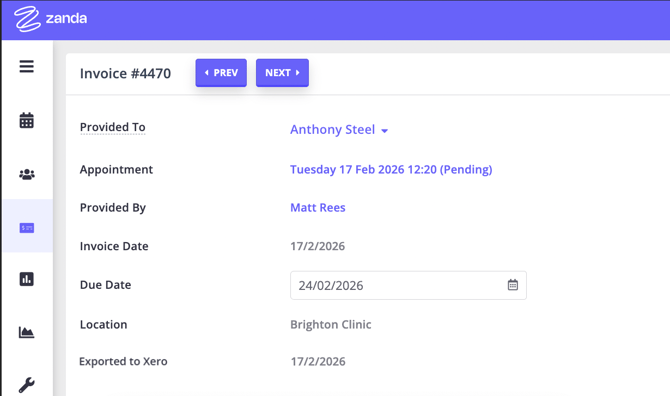
- Each invoice shows the appointment date (which is also the invoice date).
- You can right-click the invoice number to view, edit, refresh, or mark it as exported (if it already exists in Xero).
3. Select invoices you'd like to export to Xero. If you have a large number of invoices, use the Select Items to Export All button to quickly check all that are eligible—Zanda will skip already exported ones.
4. Set Xero Invoice Status: exported invoices can be in Draft or Approved status.
Important
If invoices are exported in Draft status then they can be edited and deleted in Xero, but payments can't be applied. If you initially export them in Draft status then you will need to export them again later in Approved status to export the related payments. You can change the export status at the bottom of the page.
5. Click 'Export Selected Invoices To Xero'.
 Later, if you want to confirm whether an invoice was exported, open the invoice in Zanda, it will display the export date and status in the invoice screen.
Exporting Payments to Xero
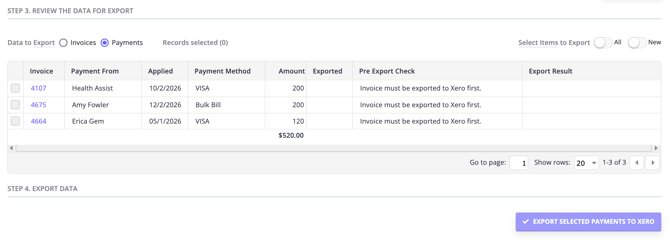
- To see the list of payments, click the 'Payments' option above the loaded list.
- The Pre-Export Check table on the payments tab tells you if an invoice has been exported yet for each payment. If not, export it first, then return and export the payments.
- Also note: payments are filtered by date applied (when the payment was added to its invoice in Zanda), not the invoice date. So if you apply a payment several days after the appointment, you’ll need to adjust the date filter to see those payments.
- Once ready, click 'Export Selected Payments To Xero'.
The export result will show in the table, so you can track what was successfully sent.
Understanding the Export Process
Exporting from Zanda to Xero is done in batches. Some other systems export invoices when they are created, however, we believe that it is better to do it in batches as it doesn't slow down the normal operation of Zanda. A batch-based approach also allows you to manage invoicing and payments in Zanda and then bring it into your accounting system (Xero) at a time of your choosing.
There are several business rules that Xero enforces (see below) and these could impact the way you use Zanda if the invoices and payments were exported to Xero live. For example, one rule is that an invoice can't be modified once it has had a payment applied. We think this rule is a bit limiting, so exporting payments at the latest possible time is recommended.
As exporting is done in batches and not live, Zanda doesn't need to store your Xero login credentials or even an access token, so you can be very confident that access to your information in Xero is secure.
Understanding Xero Rules
There are several rules enforced by Xero that we have no control over. If you find that you can't export an invoice or payment, then you will need to manually enter it into Xero (or adjust Xero/Zanda). If you manually enter an invoice or payment, you can mark it as exported in Zanda (Right-click/Ctrl-click on the item in the list and select "Mark and Exported").
- Invoices in Xero must have a status of Approved before a payment can be applied.
- Once payment is applied, no further changes to that invoice are permitted.
- Invoices in Xero with a status of Approved cannot be changed.
- Invoices in Xero with a status of Draft can be changed, but payments can't be applied.
- All payments must be assigned to an invoice.
- Overpayments are not permitted by Xero (payments more than the invoice amount).
Error Messages
Please see our article here for further troubleshooting tips.
Payment Reconciliation in Xero
Credit card and EFTPOS Payment reconciliation in Xero require some special consideration because your merchant processor (credit card/EFTPOS provider) will deposit a single amount each day into your bank account, but Xero will have each payment recorded.
To get around this, you should export the payments from Zanda to a clearing account in Xero. Then when you reconcile, create a receive money transaction, coding this to the payments clearing account. This page has more detail on how to do just that.
Frequently Asked Questions
❓ Can I use Zanda for UK Making Tax Digital (MTD) with Xero?
Zanda helps you prepare your financial data for Xero by exporting invoices, payments, client contact details, tax mappings, sales accounts, and tracking categories through the Xero Export workflow. Complete any MTD or VAT return submission in the accounting workflow your practice uses outside Zanda, and confirm the correct setup with your accountant or Xero adviser.
For the cleanest export, connect Xero in Tools > Xero Export, configure your Xero Settings, map your Zanda tax rates to Xero tax types, export invoices first, and then export the related payments.
Related Articles
- Xero Integration FAQs - Learn how to export invoices and payments to specific Xero accounts and use Xero tracking categories.
- Troubleshooting Xero Exports - Review common Xero export errors and how to resolve them.