%20-%20120%20x%2044.svg)
The ever-evolving nature of healthcare, coupled with economic fluctuations, technological advancements, and shifts in patient needs, necessitates periodic adjustments to the rates charged by allied health professionals. While discussing rate changes can sometimes be a sensitive issue, it is essential for the sustainability and growth of the industry. Organized and well-thought-out rate adjustments are not just beneficial for the professionals involved; they are pivotal in ensuring continued high-quality care for patients. This article offers insights on how to approach these changes, using the available Zanda features and tools in the most efficient way.
In this article:
- Is it Time to Raise Your Rates?
- Getting Your Account Ready for New Rates
- Setting Up New Rates
- Updating Your Client Portal
- Updating existing invoices and billing settings
- Communicating New Rates To Clients
- Frequently Asked Questions
- Related Articles
Is it Time to Raise Your Rates?
All practitioners at some stage (usually once a year or so) have to grapple with the question of when (and how!) to raise their rates. Many put it off for as long as possible because talking about, or even thinking about, money can be uncomfortable. The good news is that you don’t have to come up with all the answers yourself. We’ve done a lot of the heavy lifting for you and created a comprehensive webinar and a blog article, 'Is it Time to Raise Your Rates? [+ A Step-by-Step Guide on How to Do it Right]', which will equip you with all sorts of insights on how to prepare for the rates increase. Please set aside some time to watch and read to be ready for the rates increase.
Getting Your Account Ready for New Rates
Now that you made all necessary decisions about how the rates will be increased, let us ensure that your account's financial data is up-to-date. These Zanda features and tools will help you assess your current invoicing status and take all necessary actions:
- Search for appointments without invoices, and create the invoices where necessary:
1. Navigate to Reports > Clients > Appointments.
2. Set the start and end dates of the invoicing period to check.
3. Click " RUN REPORT".
4. Filter the Invoice column by empty cells. An empty Invoice cell will mean that there is no invoice allocated to a client appointment: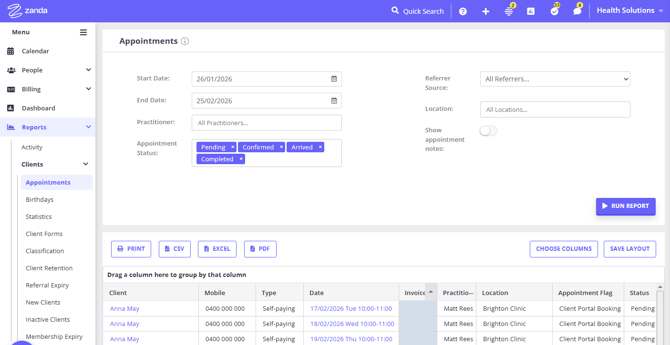
5. Right-click the appointment date in the generated report to open the relevant appointment panel in a different tab
6. Select the service that was provided during the appointment and save. This will generate an invoice that can be emailed to the client for payment. 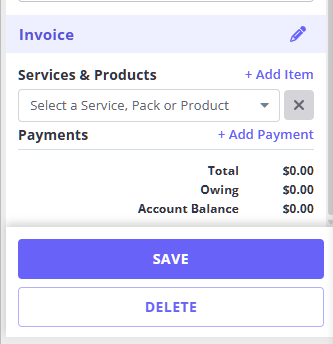
7. Repeat the steps 5 and 6 for all appointments without invoices.
- Search for unpaid invoices:
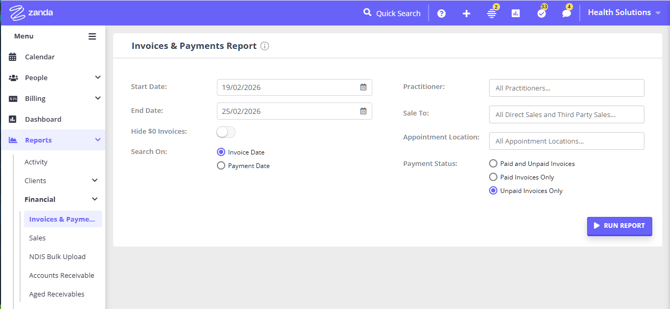
1. Navigate to Reports > Financial > Invoices & Payments report.
2. Set the start and end dates of the invoicing period to check.
3. Set 'Payment Status' to 'Unpaid Invoices Only'
4. Click " RUN REPORT".
5. A list of unpaid invoices will be generated for you to refer to and contact the payees to collect the missing payments.
- Search for unused or unfinished session packs, to close them and follow up with clients.
1. Navigate to Reports > Practice > Session Packs:
2. Clear the dates in the " Expired From:" and "Expired To:" fields to bring up a list of all Session Packs regardless of their dates.
3. Click " RUN REPORT"
4. The "Sessions" and "Status" columns will indicate how many sessions have been used and the packs' status.
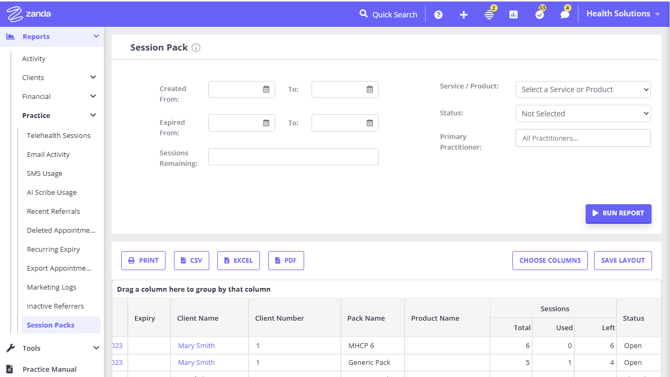
5. Right-click on the date a session pack was created, to open that specific session pack in the client's profile.
6. In the client's profile, you will be able to make the unused Packs inactive, to start new Packs in the new year, or make any other necessary updates.
Setting Up New Rates
And now you are ready to add your new rates to your Zanda account. Zanda services, products, and session packs templates will help you update your rates easily:
- Updating service rates:
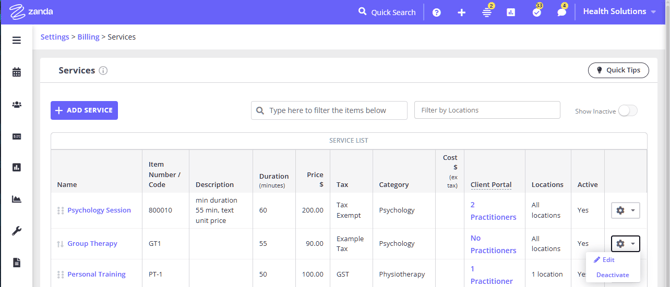
1. Go to User Menu > Account Settings > Billing > Services:
2. Click " ADD SERVICE"
3. Enter a new service name, indicating the rate period, for example. 'Standard Consultation 2026':
4. Enter all other service details, including new price.
5. Click " SAVE".
You can deactivate the service templates with older rates, to remove them from lists of current services. To do so, click on the gear icon next to a service template and select “ Deactivate”.
- Updating product prices:
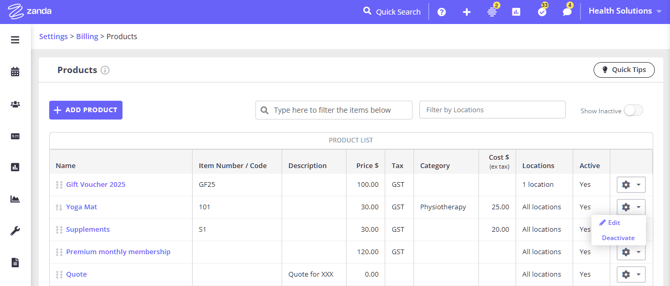
1. Navigate to User Menu > Account Settings > Billing > Products:
2. Click " ADD PRODUCT".
3. Enter the new product name and the rate period in the " Name:" field.
4. Enter all other details, including the new price, and save.
You can deactivate the products with old prices to remove them from the lists of current products.
- Updating session packs
2. Click " ADD SESSION PACK".
3. Enter the new name, other settings, and click " SAVE".
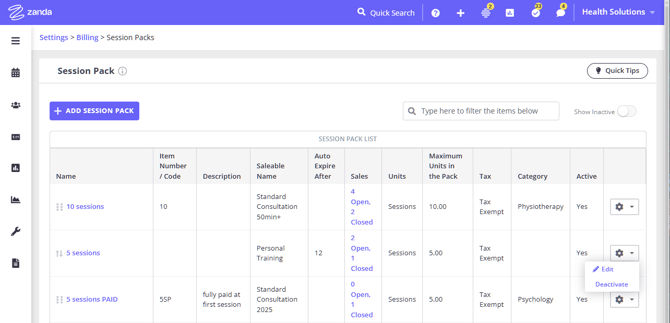
You can make the old pack templates inactive:
Note
- You can update current service, product or session pack fees and apply the change to all future invoices, which can be more convenient for recurring client appointments.
- If you decide to update the existing service or session pack fees, you can do so by navigating to User Menu > Account Settings > Billing > Services or User Menu > Account Settings > Billing > Session Packs and edit the templates with the new pricing. When prompted, you can choose to apply the updated pricing to future invoices. Product price changes update the product template for future use, but they do not prompt you to update existing future-dated invoices.
Updating Your Client Portal
If you offer online bookings to your clients, you will need to update available services with your new rates.
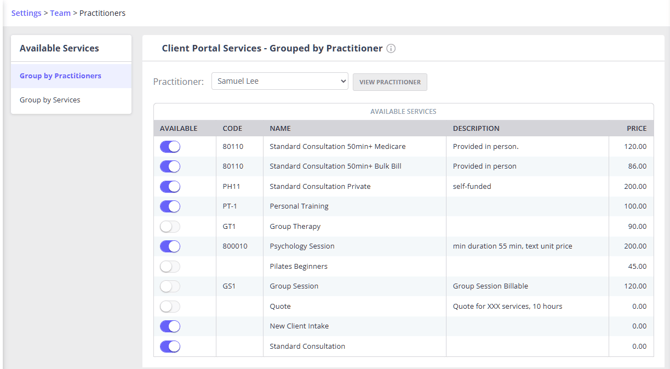
1. Navigate to User Menu > Account Settings > Schedule > Client Portal > Available Services
2. Make the services with old rates unavailable, and turn on the ' Available' switch for the new services:
Updating Existing Invoices and Billing Settings
- While we recommend creating new service, product, and session pack templates for your new rates, it is still possible to update the prices of your existing templates to continue using them in the new rates period. Here are the instructions on updating existing service templates. The same update-future-invoices prompt is available for session pack templates. Product templates can be edited for future use, but existing future-dated invoices need to be updated from the invoice or appointment.
1. Navigate to User Menu > Account Settings > Billing > Services.
2. Open an existing template to edit:
3. Update the " Name:" field with the new rate period:
4. Update the " Price:" field with the new rate:
5. Click " SAVE".
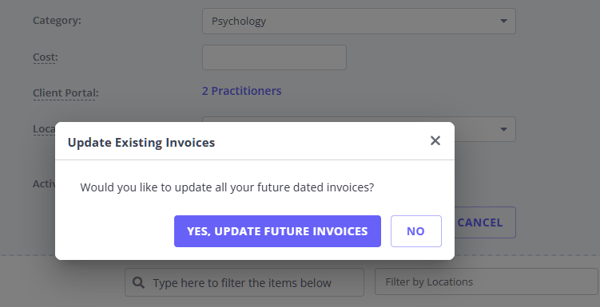
6. You will see a prompt asking you if you'd like to apply the change to the existing future dated invoices. Click " YES, UPDATE FUTURE INVOICES" or "NO" to confirm the update, or to leave the existing invoices with the old price unchanged.
- You may make a decision to provide special reduced rates to some of your clients. Here is how Zanda can assist you with updating individual clients invoices and billing settings.
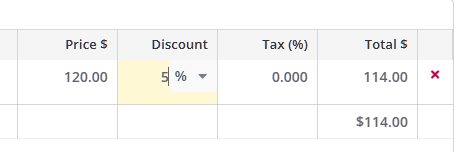
Applying reduced fees to individual invoices:
1. Open their invoice edit page:
2. In the DISCOUNT tab select discount mode, % or $:
3. Enter the discount amount or percentage:
4. Click " SAVE INVOICE".
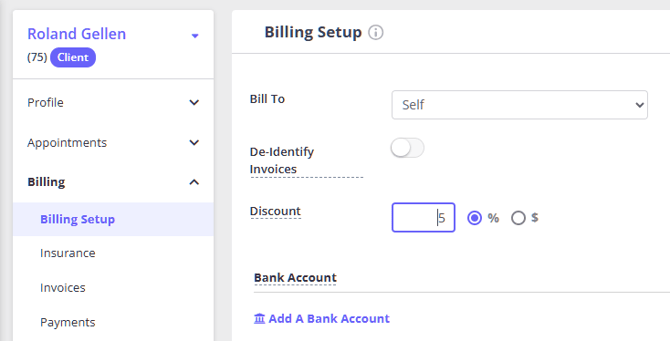
Setting ongoing client discounts:
1. Open a client's profile > Billing > Billing Setup:
2. Enter the discount and save the changes:
3. Click " YES" or "NO" in the confirmation window to define how the discount will be applied to the already existing client invoices.
Communicating New Rates To Clients
Once you’ve decided on your rates, you need to communicate them. A good guideline for communicating changes is four to six weeks in advance.
1. Create an email template where you can communicate the upcoming changes, in Tools > Communication > Templates > New Template.
2. Navigate to Tools > Communication > Bulk Send.
2. Select the template you created.
3. Click " CHOOSE RECIPIENTS"
4. Set the advanced search filters and click " GET CLIENTS"
5. Check the generated list, and click " ADD RECIPIENTS"
6. Click " SEND MESSAGE".
7. Click " YES" to confirm that you are ready to send the email to all selected recipients
Frequently Asked Questions
❓ Does Zanda automatically update Medicare and NDIS fees from 1 July?
No. Zanda does not automatically update Medicare or NDIS fee schedules. To use new rates, update the Price on your service templates in User Menu > Account Settings > Billing > Services. When you save an existing service, choose whether to apply the updated price to future-dated invoices.
❓ Do Medicare scheduled rebate increases update automatically when I submit a claim?
Yes. When you submit a Medicare claim through Zanda, the claim includes the Medicare item number and the service date. Medicare assesses the claim and returns the benefit amount based on its scheduled fees for that item and date.
You do not need to update your Zanda service price for Medicare to apply a scheduled rebate increase. Only update your services, products, or session pack prices in Zanda when you want to change the amount your practice charges on invoices.
Related Articles
- Adding and Editing Services - Add, edit, deactivate, and manage service templates.
- Managing NDIS Billing (AU-only) - Set up NDIS billing details, plan tracking, statements, and NDIS reports.
- Setting Up Medicare Claiming and Invoices (AUS Only) - Set up Medicare claiming details and prepare invoices for Medicare claims.
- Generating Medicare Invoices & Receipts (AUS Only) - Create and manage Medicare invoices and receipts.
- Managing Prepaid Session Packs - Manage session pack pricing and payments.