Managing Multiple Stripe Accounts in One Zanda Account
Manage multiple Stripe accounts in Zanda. Learn about settings, permissions, and more.
Watch this video tutorial:
In this article:
- User Settings and Permissions for Managing Multiple Stripe Accounts
- How to Connect a Practitioner with Their Own Stripe Account
- How to Connect to Your Business Stripe Account
- How to Make a Stripe Payment to a Specific Stripe Account
- How to Process Stripe Payments to Multiple Accounts via the Client Portal
- How to Check to Which Stripe Account a Payment Was Sent
- Collecting and Storing Client Credit Card Details
What User Settings and Permissions Are Required for Managing Multiple Stripe Accounts
- The account master user is able to see, connect, and disconnect all practitioners from their Stripe accounts. No setting updates are required for a master user to have this access.
- It is possible to set other user accounts with permission to see, connect, and disconnect their own practitioners with their Stripe accounts.
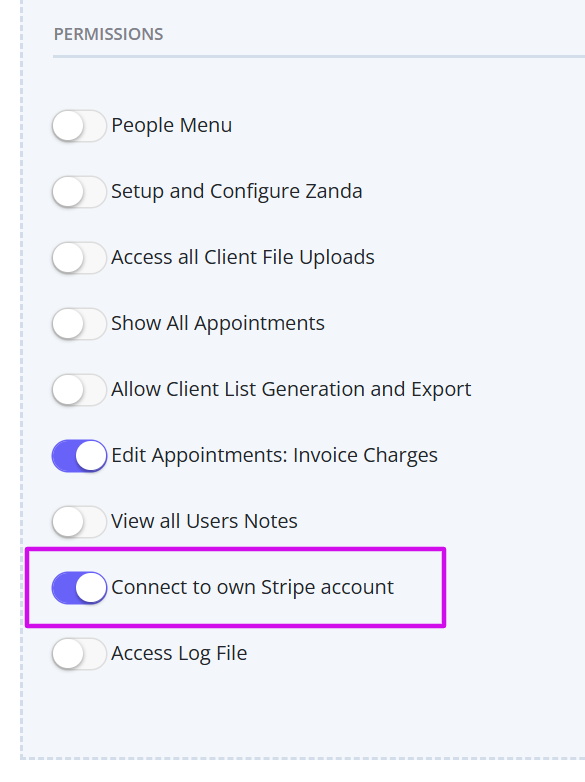
- Navigate to Settings > Team > Users > User Management, open the user account and enable 'Connect to own Stripe account' permission.

-
- Make sure this user is linked with their Default Practitioner Profile.
-
- To access their practitioner profile, the user must either have “Setup and Configure Zanda” or have access to their practitioner profile via the user setting.
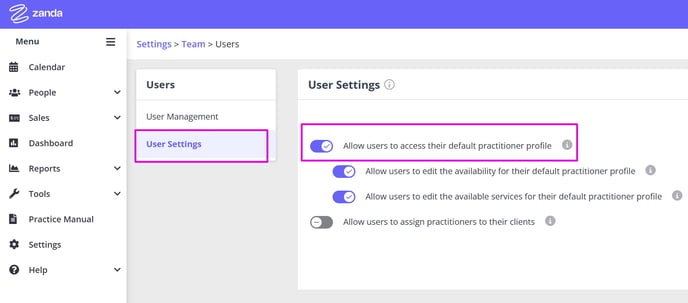
- To allow practitioners to access their default practitioner's profiles navigate to Settings > Team > Users > User Settings, enable 'Allow users to access their default practitioner profile'
- To access their practitioner profile, the user must either have “Setup and Configure Zanda” or have access to their practitioner profile via the user setting.

How to Connect a Practitioner with Their Own Stripe Account
Once the user settings and permissions are set, you and your users will be able to manage connection to practitioners' Stripe accounts.
1. First, you need to open your practitioner profile:
- If you have access to the Settings menu, go to Settings > Team > Practitioners and select your practitioner profile.

- If you don't have access to the Settings menu, but you have access to your practitioner profile, click the account business name at the top-right and select “Practitioner Profile”:

2. On the Practitioner Profile menu, select Online Payments:
3. Click the blue “Connect to Stripe” button and follow the prompts.
- If you already have an existing Stripe account, you will be able to log in to it using your Stripe login details.
- If you do not have a Stripe account yet, you will be able to register a new one.

4. Once the connection is established, you will be returned to the Practitioner Profile > Online Payments page. There, you will see confirmation of the successful connection and the buttons to either access your Stripe Dashboard or disconnect from Stripe.
How to Connect to Your Business Stripe Account
Beside linking practitioners to their own Stripe accounts, it is possible to link your account to Stripe using the “Business Default” connect option. This action will be available to Zanda account master user and users with the permission to Set and Configure Zanda.
1. Navigate to Settings > Payments > Stripe.
Note: Here, you can connect and manage your business Stripe account integration, and see a list of practitioners connected to their own Stripe accounts via your Zanda account.
2. Before you proceed connecting to your business Stripe account, click the 'More Information' link to read more about the business default settings:
“The business default will be used for storing and processing credit card payments for all clients except in the following cases:
- In-app payments: If the service provider for an invoice has a linked Stripe account. Other Stripe accounts can be selected.
- Portal Payments: If the service provider for an invoice has a linked Stripe account.
- Added a card via Profile: If the client’s primary practitioner has a linked Stripe account, the client’s card details will be saved to that account. Other Stripe accounts can be selected.
- Added a card via Form: If the client’s primary practitioner has a linked Stripe account, the client’s card details will be saved to the account.”

3. Once you are ready, click the blue “Connect to Stripe” button and follow the prompts to connect your business Stripe account to your Zanda account.

1. On the Appointment Panel, select 'Payment Method' to add a payment to its invoice.
2. On the 'Payment Method' dropdown, scroll to Integrated Payments and select “Credit Card — Stripe”.
3. The payment details window will appear. Here, you can see that the payment is set to pay to the appointment practitioner's Stripe account:
4. If you need to make a payment to another Stripe account linked to your Zanda account, click the “Pay to Stripe Account” dropdown to select a different Stripe account (e.g. Business Default or another practitioner).
5. If this is the first payment for this client, you will be able to save their credit card details. They will be saved in the same Stripe account that the payment goes to.
6. Once a payment is processed, you will be able to find its record in the payee profile (client, contact, or third party) in the Billing > Payments section.

1. First, make sure to enable Stripe payments in your client portal:
- Navigate to Settings > Schedule > Client Portal > Access and Settings.
- On the page, set the 'Credit card payments required when booking' to “Optional” or “Required” for client bookings and for group/class bookings, if you offer any.
- Save the changes.

2. When a client makes a booking via the Client Portal, they will see either the option or requirement to pay to complete the booking.

3. The system will have the 'Save this card for future charges' enabled by default. Unless the client removes the check, their credit card details will be securely stored for future use in the Stripe account this payment will go to.

4. If online payments are set to “Optional” on your Client Portal settings, invoices can be paid after bookings are made, from the “My Invoices” page on the client's homepage.
Note: If a client has invoices for sessions provided by different practitioners, and payments for these sessions are supposed to go to different Stripe accounts, there will be no “Pay All” option provided. The client/payee will have to process payments for each invoice separately.

How to Check Which Stripe Account a Payment Was Sent
You can check invoice/receipt Activity Logs to determine which Stripe account their payments went to. Here's how this can be done:
1. Open the Appointment Panel and click the pencil icon on the invoice section to open the Edit Invoice page.
2. On the Edit Invoice page, scroll to the bottom-right and click the 'View Activity Log' link under the save button.
3. Here, you will see all invoice activity records, including the record of the Stripe payment made. It will tell you when it was processed, if it was a Zanda account user who processed it, the amount processed and the Stripe account it went to.

4. On this example, a user who processed the payment is not mentioned. This means that the payment was made by a payee via an online payment link or the client portal.

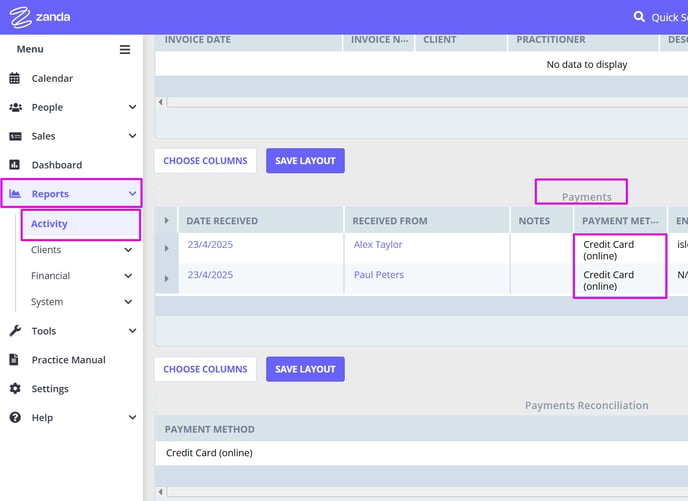
Tip: You can also check if a credit card payments was processed by a Zanda account user or by a client/payee, in the Reports > Activity Report. Run the report, go to its 'Payments' section, and you will see the records in the 'Entered By' column. If a payment was processed by an account user, their email address will be included. The N/A record means that a payment was processed via the client portal or online payment link by a client or their designated payee.

Collecting and Storing Client Credit Card Details
Important:
It is not possible to copy clients credit card details that are stored in your business default Stripe account to the practitioners' Stripe accounts via the integration, as this is not permitted by Stripe for the data security reasons.
Please read this section for the available options to securely collect and store clients' credit card details.
Client credit card details can be securely collected and saved in a relevant Stripe account via the Zanda integration with Stripe, via one of the below methods:
- When a client credit card details are collected via a linked profile field on a form, they will be automatically saved in this client's primary practitioner Stripe account if connected.
- If the client's primary practitioner does not have a Stripe account connected, the client's credit card details will be saved in the Business Default Stripe account.
- If neither the primary practitioner nor the business default are connected to Stripe, the client will not have the option to save their card details via the online form linked profile field.
- A Zanda user is able to manually enter and save client's credit card details in this client's Profile > Billing > Billing Setup.

- When entering those details, they will default to the client's Primary Practitioner's Stripe account. However, a user will be able to select a different Stripe account linked with their Zanda account manually, before saving the details.

- When a Zanda user processes a client's payment on their appointment or invoice, they will be able to select which Stripe account the credit card details will be saved to. By default, the appointment practitioner's Stripe account will be chosen, if it is connected.

- When a client processes their online payment and agrees to securely store their credit card details for future charges, their details will be saved in the Stripe account of the appointment practitioner. If the appointment practitioner does not have a Stripe account connected, the system will use the Business Default Stripe account.
Tip: It is possible to view, update, or remove a client's credit card details in Client Profile > Billing > Billing Setup: