%20-%20120%20x%2044.svg)
You can generate invoices billed to NDIS plan managers, record client NDIS numbers and start and end dates, generate statements billed to NDIS managers, track the amount of time and budget spent within the NDIS plan, using Zanda functionality.
In this article:
- Adding Client NDIS information
- Adding Practitioner/Organisation NDIS information
- How to turn off reminders for individual non-face-to-face appointments
- Billing to particular Payees
- Tracking the amount of time and budget spent within an NDIS plan
- Generating statements that include multiple services for one or multiple NDIS clients
- Recording Payments received from NDIS Plan Managers
- Frequently Asked Questions
- Generating NDIS Bulk Upload Report
- Related Articles
How to Add Client NDIS Information
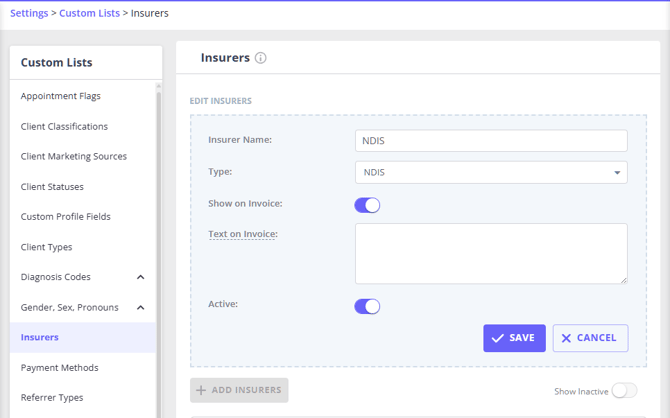
- Start with adding NDIS insurer to your account.
- Go to User Menu > Account Settings > Payments > Insurers;
- Add the insurer name 'NDIS';
- Select the insurer type 'NDIS';
- Slide the 'Show on invoice' switch on;
- Save the changes.
- Collect client's NDIS participant number automatically, using online forms: see details here.
- You can also add the client's NDIS participant number manually :
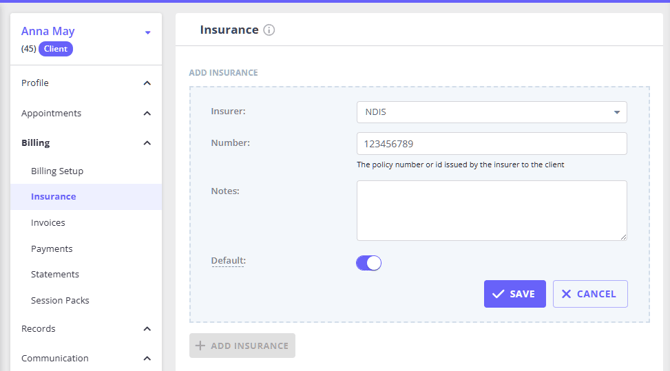
- Navigate to Client Profile > Billing > Insurance.
- Click '+Add Insurance'
- Select 'NDIS' in the Insurer field;
- Enter client NDIS participant number;
- Make this insurance type default for this client - this will ensure that it is included on their invoices automatically;
- Save the changes.
- Select how you wish to update this client invoices with the new NDIS number:
- apply to future dated invoices;
- apply to past and future dated invoices;
- do not update the existing invoices.
- If you need to show the NDIS plan start and end dates,
- Navigate to Client Profile > Billing > Billing Setup
- Add Client NDIS Start and End Date in the Extra Invoice Info field and Save Changes.
It is also possible to use Session Packs for adding the NDIS Plan dates to client invoices. Please follow the steps below:
- In User Menu > Account Settings > Billing > Session Packs, create the relevant Session Pack templates (can be used for tracking sessions, money, or hours).
- Name the template 'NDIS Plan Start Date / End Date'.
When a client provides the new NDIS agreement:
- Navigate to Client Profile > Billing > Session Packs
- Click on '+Add New Pack' at the top-left.
- Select the relevant Pack Template.
- Set the Expiry Date to the Plan End Date.
- Add the Plan dates to the Name field.
- Save the changes
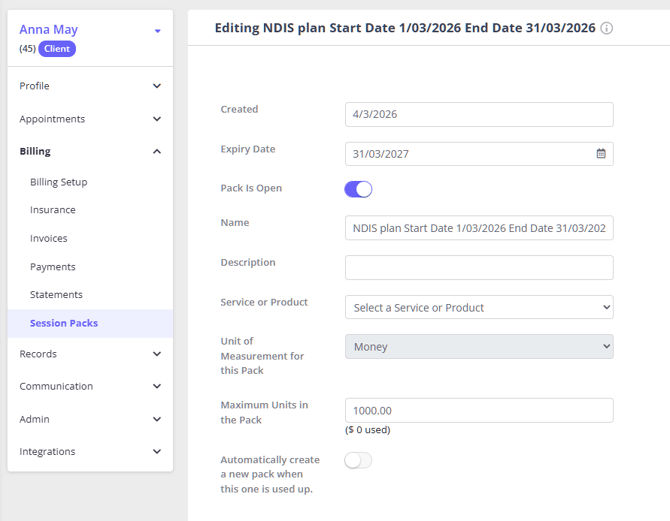
This will create a custom session pack for this client.
Select this Open Session Pack on the appointment panel (or the invoice) when billing the client/plan manager.
The Plan Dates will be recorded in the Item Description field on the invoice:

How to Add Practitioner/Organization NDIS Information
The practitioner NDIS information will be added to each practitioner on their profile. Here are the steps to follow:
- Navigate to User Menu > Account Settings > Team > Practitioners;
- Click on the name of a practitioner profile whose NDIS information you need to add;
- On the left-side practitioner profile menu, select the 'Insurers' tab;
- Click on '+Add Insurer';
- In the 'Insurer' dropdown, select NDIS. If you do not see the NDIS option available, please add it in User Menu > Account Settings > Payments > Insurers. (For detailed instructions, click here.)
- In the 'Provider Number', enter the practitioner's NDIS Id;
- Save the changes.
How to turn off reminders for individual appointments
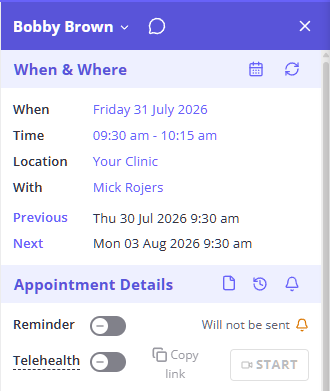
Some appointments may need to appear in your calendar and be linked to a client for invoicing purposes, without requiring an appointment reminder. Examples include report writing, travel time, case preparation, or other administrative work completed for a client.
To prevent standard appointment reminders from being sent:
- Create and save the appointment as usual.
- Reopen the appointment panel.
- Switch off the Reminder toggle.
- Save your changes.
The appointment will remain linked to the client, and you can create or link an invoice as needed.
Note: The Reminder toggle appears after the appointment is first saved. Switching it off may not prevent notifications or automations configured to send immediately when an appointment is booked.
How to Bill to an NDIS Plan Manager
When required, you are able to automatically generate client invoices where the Payee is their NDIS plan manager or the NDIA:
- Create a Third Party Profile for the NDIS plan manager/NDIA, as described here.
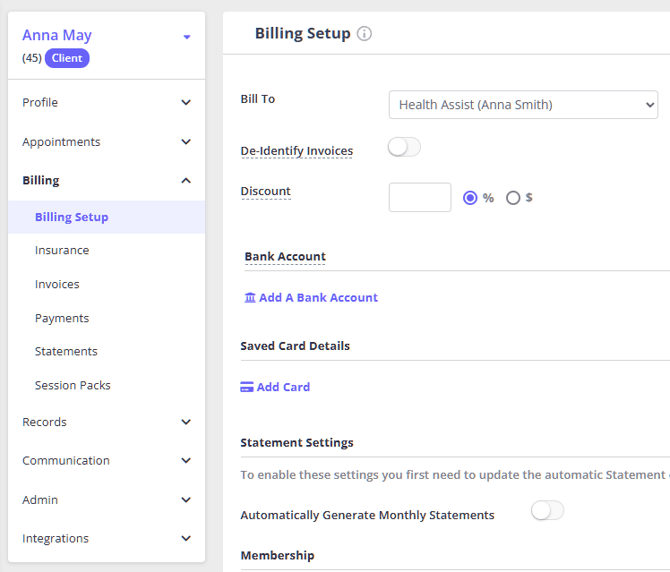
- Navigate to Client Profile > Billing > Billing Setup.
- In the Bill To drop-down list select the relevant Third Party, Save Changes.
How to Track Time and/or Budget allocated to an NDIS Client:
Zanda Session Packs feature allows keeping track of three separate metrics, designed for a variety of different situations you might need, making it a perfect tool for use when working with the NDIS clients:
- Number of Sessions
- Fixed Amount of Hours
- Fixed Amount of Money
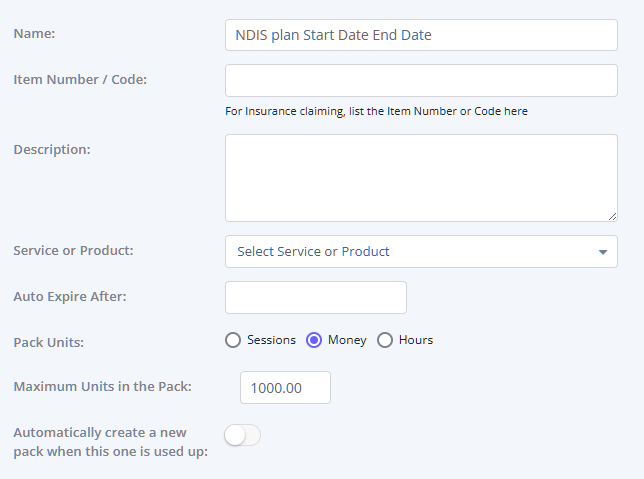
You can apply Session Packs to your invoices retrospectively to record additional services like phone call consultations, report writing, or travel for home visits. Here’s how:
-
Click on the Appointment this relates to.
-
Add additional Session Packs for specific services or products.
-
For consistent tracking of time or money within the same NDIS plan, select the same Session Pack for each service or product.
✔️ Pro Tip:
To manage and track travel time or costs in invoices, you can create a new service or product such as “NDIS Travel – per KM.” in User Menu > Account Settings > Invoices > Services/Products
- Use Services if you need to add time/duration to your appointments and invoices
- Use Products to account for the item units, not affecting the time of services provided.
- Adjust the quantity and price per invoice as needed to reflect travel components.
Frequently Asked Questions
❓ Does Zanda automatically deduct from a client's NDIS budget when an invoice is created?
Yes, when you select the client's open Session Pack on the appointment panel or invoice, Zanda counts the linked invoice item against that pack. For money-based packs, Zanda uses the invoice item total; for hours-based packs, Zanda uses the service duration and quantity; for session-based packs, Zanda uses the invoice item quantity. You can review the pack balance from the client's Billing > Session Packs page or in the Reports > Practice > Session Packs report, where Zanda shows the total, used, and left amounts.
How to Send Multiple Invoices for Multiple Clients to an NDIS Plan Manager in One File:
If you make an NDIS plan manager a Payee for the client's invoices, you are able to generate Statements that will combine multiple invoices into one file, with the Total Amount Owing for all the invoices included in the Statement.
More than one client's invoices can be included in the statement when required. Please refer here for more detailed instructions.
How to show the client's name on invoices sent to an NDIS plan manager
You may need the plan manager to receive and pay the invoice while the invoice still shows the name of the client who was seen. Here is how to set that up:
- Open the third party profile of the relevant NDIS plan manager.
- Navigate to Billing > Billing Setup.
- Enable the 'Print Client's Name as Payee' switch, then save the changes.
With this setup, the client's own name and address print in the 'Invoice to' section of that client's invoices and individual statements, in place of the plan manager's details, whenever the invoice is billed to this third party. The plan manager is still the payer and still receives the invoice.
The 'Provided To' section is separate. It records who received the service, so it always shows the client, and this switch does not change it. (On an invoice that is not linked to an appointment, the same section is labelled 'Supplied To'.)
❓ Does 'Print Client's Name as Payee' work when one plan manager pays for several clients?
Yes. Although the switch is set once on the third party profile, each invoice shows the details of the client that invoice belongs to. When the same plan manager is the payee for several clients, every client's invoices print with their own name and address in the 'Invoice to' section—enabling the switch does not mix client names across invoices.
Statements work per client. A statement shows the client's details in the 'Invoice to' section only when it covers that one client's invoices; a statement that combines invoices for more than one client stays addressed to the third party. To send per-client paperwork for several clients, generate a separate statement for each client from the third party profile > Billing > Statements.
❓ Why is the client's name missing from an invoice billed to a third party?
Usually De-Identify Invoices, not the payee setting. When De-Identify is switched on for a client (Client Profile > Billing > Billing Setup), Zanda prints the client's number in place of their name in the 'Provided To' section, and hides their date of birth, insurer details, and the appointment time. Turn De-Identify off for that client if the payer should see who the invoice is for.
De-Identify is applied as each invoice is created, so switching it off does not change invoices that already exist, including future-dated ones. To change one of those, open that invoice's Edit page, turn the De-Identify switch off and save.
❓ What happens if De-Identify Invoices and Print Client's Name as Payee are both switched on?
You get a mixed result that is rarely what anyone wants. De-Identify hides the client's details from the payer, but it does not apply to the 'Invoice to' block when the invoice is billed to a third party, so the client's real name and address still print there. At the same time, 'Provided To' shows the client number instead of the name.
Choose one or the other. If the plan manager needs to see the client, turn De-Identify off on the client's profile. If the client's identity should stay private, leave De-Identify on and turn 'Print Client's Name as Payee' off on the third party profile.
Example Use Case:
- Make the third party (NDIS plan manager profile) a payee for their client invoices:
- To make them a default payee for all client invoices, open the client's profile > Billing > Billing Setup and select the third party in the Bill To field
- To make them a payee for a single invoice, open a client's invoice and select the third party as the Payable By
- In this third party profile, go to Billing > Billing Setup and enable the 'Print Client's Name as Payee'.
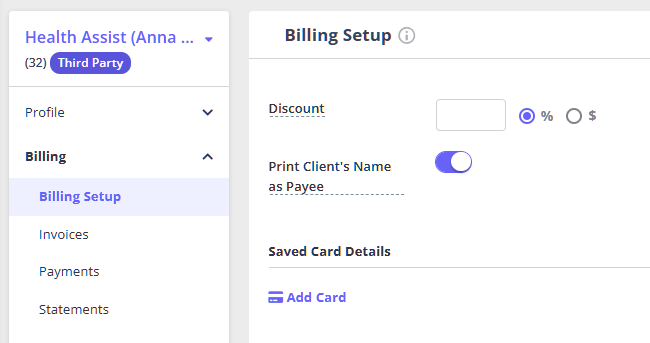
- Send these invoices to the third party - client's details will be shown on these invoices PDFs
- Generate a Statement for one client:
- Go to the third party profile > Billing > Statements
- Create a new statement
- Select invoices to this one client only
- Generate a statement. If only one client's invoices were included, the statement is addressed to that client details in the 'Invoice to' section.
How to Record a Third Party Payment:
When an NDIS plan manager has paid the invoices billed to them, you'll need to record those payments on the corresponding invoices. Here you will find the detailed instructions for this process.
Frequently Asked Questions
❓ How do I add a client's NDIS number to an invoice?
Add the client's NDIS participant number to their NDIS insurance record, then make sure the invoice includes that NDIS insurance. For new invoices, mark the client's NDIS insurance as the default insurance type so Zanda can include it automatically. For an existing invoice, open the invoice, use the Insurance field to select the client's NDIS insurance, and save the invoice.
If the client's NDIS number has already been added under Client Profile > Billing > Insurance, you do not need to type the number directly on the invoice. Zanda uses the client insurance record linked to the invoice when it prints insurance details and when it fills the NDIS Number column in the NDIS Bulk Upload report.
How To Generate NDIS Bulk Upload Report
- The report is located in the Reports > Financial > NDIS Bulk Upload tab.
- Once you set the invoice filters as needed, click on the ' Run Report' button to generate the report.
- When the report is ready, click on the ' EXCEL' button on the left to export the report and download it as a file to be uploaded via the NDIS myplace portal.
Learn more about this report here.
Related Articles
- NDIS Bulk Upload Report (AU-only) - Learn how Zanda generates and exports invoiced NDIS services for upload to the NDIS myplace portal.
- Invoicing to a Third Party - Set up and bill an NDIS plan manager or NDIA third party payee.