%20-%20120%20x%2044.svg)
Clients often request a list of their future or upcoming appointments. To facilitate this, Zanda offers a communication merge field that allows you to effortlessly create these lists for both email and printed formats.
In this article:
- Setting Up a Template
- Sending the Future Appointments list to Your Clients
- Exporting a Client's Appointment List from Their Profile
- Frequently Asked Questions
- Related Articles
Setting Up a Template:
- Navigate to Tools > Communication > Templates, and choose the appropriate message type—either Email or Letter—based on how you plan to use the template.
- Fill out the template by adding your desired message in the Content section. In the merge fields dropdown, locate and select the {ListAllFutureAppointments} option to include the upcoming appointments.
- Please be aware that the template only needs to be set up once.
- Press Save.
Here’s an example of what your completed template might resemble.
Hi {ClientFirstName},
Please find below a list of your future appointments:
{ListAllFutureAppointments}
If any of these times do not suit you please contact us on: {BusinessPhone}.
Kind Regards,
{BusinessName}
Hint: for past appointments 💡
You can use the {ListAllPastAppointments} merge field for listing the client's past appointments instead..
Sending the Future Appointments list to Your Clients:
- In the client's profile scroll down to the Communication section.
- Select either New Email or New Letter.
- New Email: To email it directly to the client simply select the template from the drop-down box, scroll to the bottom of the page and click "Save And Send" (or "Save As Draft" if you'd like to send it later).
- New Letter: To generate your template as a letter so that you can print or save it as a PDF just select the template from the drop-down box and select either "Save And Send" (or "Save As Draft" if you plan on making some changes to it before you print/save it). The page should refresh and the "Print", "Word" and "PDF" options will appear - click whichever option you would like.
Exporting a Client's Appointment List from Their Profile
If you need a quick, standalone list of one client's appointments to print or save as a PDF, you can export it straight from their profile.
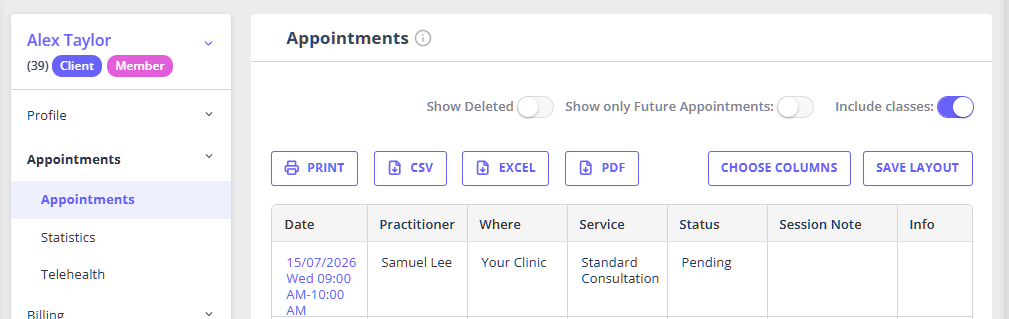
- Open the client's profile and select Appointments.
- Use the toggles at the top to set what is included—Show Deleted, Show only Future Appointments, and Include classes.
- Click Choose Columns to show or hide the columns you want on the list. Available columns include the appointment Date and time, Service, Practitioner, Where, Status, and appointment notes.
- Sort by the Date column if you only want the most recent appointments at the top.
- Use the PRINT, CSV, EXCEL, or PDF button to generate the list.
This list is already limited to the client whose profile you are in, so there is no separate client-name column to add here. There is also no date-range filter on this tab—sort by Date to bring the most recent appointments together. If you need to filter to a specific date range, or you need the client's name printed on the list itself (for example, for a funding or third-party application), use Reports > Clients > Appointments instead—see below.
Frequently Asked Questions
❓ Which appointment list should I use?
Use the Communication template method in this article when you need a client-specific list to email, print, or save as a letter. The {ListAllFutureAppointments} merge field creates a table with the appointment Date, Time, Location, and With columns. It includes active future appointments for that client, and it leaves out cancelled, late-cancelled, and rescheduled appointments. The {ListAllPastAppointments} merge field creates a similar table for past appointments and also includes the appointment Status.
Use the calendar Print option when you need an appointment list for the calendar view you are working from. From the calendar toolbar, click the three vertical dots > Print. Zanda opens an Appointment List PDF preview showing the selected date range, calendar view, calendar names, generated date and time, and appointment rows with Time, Client, Status, Service, Contact, and Comments columns.
Use Reports > Clients > Appointments when you need to review, group, filter, print, export to Excel, or download appointment information for reporting. This report can be filtered by date range, practitioner, appointment status, referrer source, location, and appointment notes.
❓ Can I add an adjuster name or another custom identifier to the appointment list?
No. The future and past appointment list merge fields use fixed columns. The future appointments list includes the appointment date, time, location, and practitioner. The past appointments list also includes the appointment status.
If you need a custom identifier to appear in a printed appointment list, add it to the appointment comments before printing from the calendar. The calendar appointment list printout includes the appointment time, client, status, service, contact details, and comments.
For a reportable list with more client and appointment details, use Reports > Clients > Appointments. This report can include the hidden Client Number column when shown before export, and you can turn on Show appointment notes to include appointment notes.
Related Articles
- How to Back Up Your Appointments - Learn how to print appointment lists and export appointment data.
- Client Reports - Review client appointment reports and other client reporting options.
- Navigating the Calendar Display — Use the calendar toolbar's Print option to generate an Appointment List PDF from the current calendar view.