Reflecting Location Types on Appointments
Set up location types in Zanda to easily identify appointment modalities on your calendar.
Many practices provide services to clients in a mix of modalities including face to face, over the phone or via a video call. Zanda makes it easy to track how the services will be delivered while viewing your calendar so that you can prepare for your the appointments accordingly.
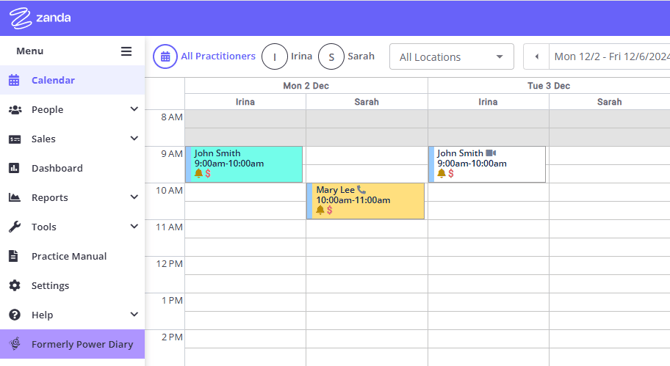
Using location types, you see at a glance the modality for each appointment in your calendar.
In this article, you will learn how to set up location types and then link these to appointments to see the modality in the calendar.
In this article:
- How Location Types Work
- Setting Location Types
- How Changing a Location Type to Telehealth Video Call Affects Future Appointments
- Setting Locations Availability
- Viewing Location Types on Appointments
How Location Types Work
- There are three locations types to choose from:
- In Person (the default for all new locations),
- Phone, and
- Telehealth Video Call.
- Appointments booked in the phone location type will have a phone icon on the appointment, and those booked in the Telehealth Video Call location will have a video icon visible on the appointment. Appointments booked in an in person location type won't show any icon.
- New appointments booked in the Telehealth Video Call location
- will have telehealth call links enabled by default
- reminders with a {ClientTelehealthUrl} merge field will populate with a telehealth link.
Setting Location Types
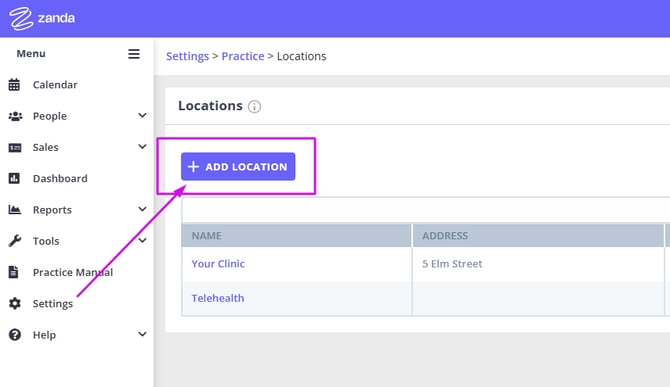
First start by adding the appropriate location types to your locations.
1. Navigate to Settings > Practice > Locations..png?width=670&height=459&name=Google%20chrome%20Workflow%20-%20Step%202%20(23).png)
2. Add a new location, or click on the existing location where you need to set the location type.

3. In the 'Location Type' dropdown field, select the relevant location type: In Person, Telehealth Video Call or Phone.
-1.png?width=670&height=396&name=Google%20chrome%20Workflow%20-%20Step%207%20(5)-1.png)
4. Save the changes.
5. Repeat the action for all locations where necessary.
How Changing a Location Type to Telehealth Video Call Affects Future Appointments
This section explains how the Telehealth Video Call location type affects future-dated appointments and guides you through the setup process.
Setting Up a Telehealth Video Call Location
To enable Telehealth appointments at a specific existing location, follow these steps:
- Go to: Settings > Practice > Locations.
- Open an existing location to edit.
- Set the Location Type to 'Telehealth Video Call'.
- Enter any other necessary location details and click Save.
- After saving, a pop-up message will appear, asking:
"Would you like to add Telehealth to all your future-dated appointments at this location?"- Click "Yes, Update Future Appointments" to enable the Telehealth link for all future appointments in this location.
- Click "No" to leave future appointments unchanged (the Telehealth link will remain disabled).

💡 User Pro Tip
We introduced the ability to bulk-enable Telehealth call links on all future-dated appointments in a Telehealth Video Call location on February 21, 2025.
If you set up a Telehealth Video Call location before February 21, 2025, and have future appointments in that location with inactive Telehealth call links, you can enable them in bulk using these steps:
- Go to: Settings > Practice > Locations.
- Find the location where the future appointments need updating.
- Click the location name to open it for editing.
- Change the Location Type to any other type and click Save.
- On the confirmation pop-up, select either option.
- Change the Location Type back to 'Telehealth Video Call' and click Save.
- On the confirmation pop-up, click "Yes, Update Future Appointments" to enable the Telehealth link on all future appointments in this location.
This ensures all future appointments at that location have Telehealth links enabled, even if they were originally created before the feature was introduced.
Setting Locations Availability
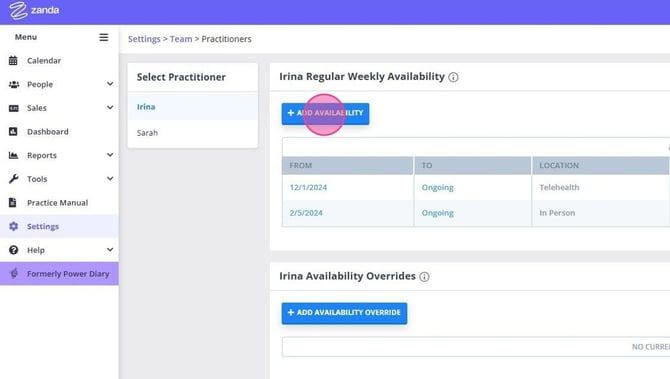
1. Navigate to Settings > Team > Availability.
.png?width=670&height=577&name=Google%20chrome%20Workflow%20-%20Step%2016%20(2).png)
2. Select the practitioner and click '+Add Availability' or edit their existing availability.

4. In the ' Locations' dropdown field of the availability settings, select the relevant location.
.png?width=670&height=352&name=Google%20chrome%20Workflow%20-%20Step%2019%20(1).png)
5. Adjust your available hours, if needed, and save the changes.
6. Once availabilities' locations are set, you will see them in the list of the practitioner's availabilities:
Viewing Location Types on Appointments
When location types are set and client appointments are booked in their relevant locations, you will be able to easily identify appointments based on their locations of delivery.
❇️Tip:
Set the Location Filter to All Locations, or use the Time Finder tool when booking a new appointment to a specific location, to avoid double booking.
- Appointments that are linked to the location type 'Telehealth Video Call'* with have a video icon, and 'Phone' location types will have a phone icon. 'In person' appointments will have no icon to represent modality.

- The telehealth and phone location icons will be added to the calendar appointment blocks and to the appointment hover cards.
- Phone appointments:
.png?width=670&height=616&name=Google%20chrome%20Workflow%20-%20Step%201%20(45).png)
- Telehealth appointments:✴️
.png?width=670&height=571&name=Google%20chrome%20Workflow%20-%20Step%202%20(24).png)
- Phone appointments:
✴️Important Note
- All new appointments booked in a location with the type "Telehealth Video Call" will have Telehealth toggle enabled by default.
- This also applies to bookings made via the client portal in these locations.
- If initially a new appointment was created in a different location, and then moved to the Telehealth Video Call location, the Telehealth link will not be enabled automatically. This will need to be enabled manually if desired.
