This article will show you how to send a letter to a referrer from a client’s profile.
In this article:
- Before We Begin
- Generating the Letter from a Letter Template
- Sending the Letter
- Frequently Asked Questions
- Related Articles
Before we begin, please make sure to:
✅ Create a referrer profile.
✅ Ensure the referrer profile has a valid email address.
✅ The referrer is entered into the client’s profile on the Referrals page and is set as Default.
Our article here explains how to accomplish the above tasks: Adding/Editing Referrers and Referrals
Generating the Letter from a Letter Template
Before you start, make sure the reusable letter template is set up in Tools > Communication > Templates. See Creating and Managing Email, SMS, and Letter Templates for the template setup steps.
1. Go to the client’s profile and navigate to Communication → New Letter.
2. Select the Related Appointment, if applicable.
3. Next, choose the Template you want to send the referral to.
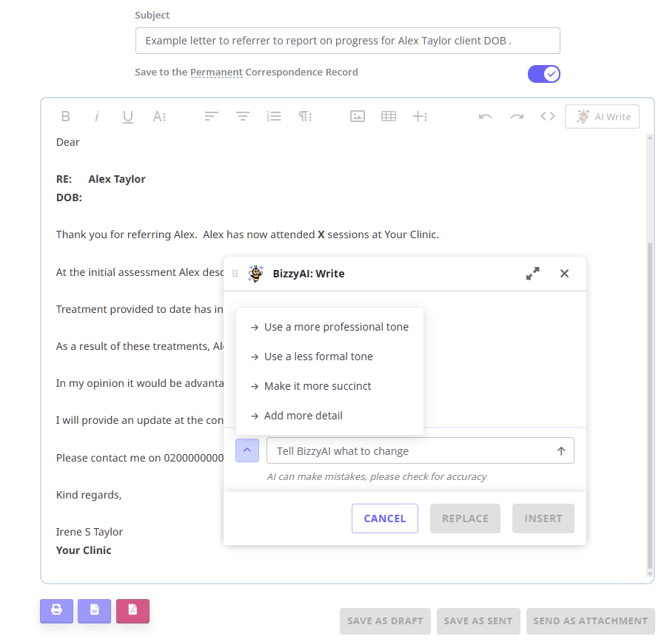
❇️ You’ll see the letter appear in the text editor, ready for sending.
-
Feel free to edit the text or add any extra information.
- Use BizzyAI: Write to help you draft and edit the letter byusing preset prompts or typying in your own instructions.
Sending the Letter
After drafting your letter, you can send it as a PDF via email. Here’s how:
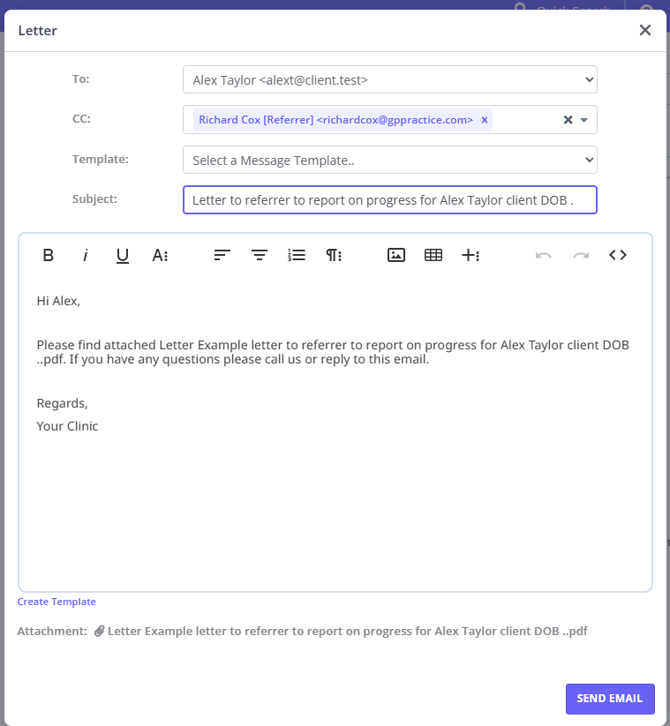
1. Click the Send as Attachment button on the bottom-right corner.
2. Read the prompt that appears, and click YES to continue.
3. ❗In the ‘ To:’ drop down menu, choose the referrer to whom you want to send the email.
4. Use the ‘ CC:’ field to select the client or a client’s contact. Doing so will send the letter to them in addition to the referrer.
- When you send the letter as attachment, you will be able to select a custom email template created and saved in Tools Communication > Templates.
- If you do not select a custom email template, the system will use a default template for sending attachments.
- The 'From' email address in the default email template is populated from the User Menu > Account Settings > Communication > Communication Options page, the 'Business Email Address' field.
- If no email address is entered there, the system will use the email address saved in User Menu > Account Settings > Practice > Business Info.
Hint
- Before you send the email, you will be able to add more attachments to it, if necessary. You can use the text editor feature to upload a file from your previous uploads folder, or directly from your device.
- If you need to add a client file from their profile > Records > Files or Admin > Admin Files, you will need to download it to your device first, and then upload to the email with an attached letter.
6. Send the email.
💡Important
If you do not see the Send Email button, this means that your display is set to scale larger than 100%. To resolve:
- Zoom out on the browser screen to 100% for the immediate fix.
- On a Windows device, set up the Display Scaling and Layout to 100% by default, for the permanent fix:
- Open device Settings > System > Display
- Select the Scale and Layout to be 100% (Recommended)
- On a macOS device,
- go to the Apple Menu > System Preferences > Displays
- change the scaling to be smaller (more space)
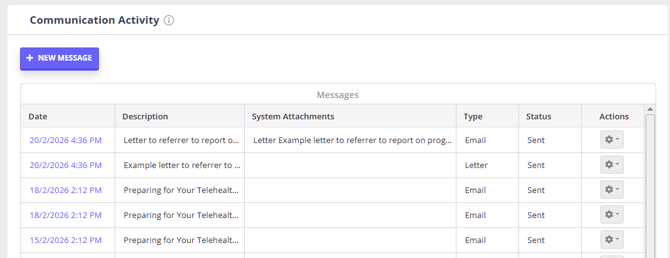
7. Now go to the referrer’s profile (use the search bar to quickly find the referrer) and navigate to Communication > Activity.
- Here, you’ll see the email record and its status.
- If the email included the letter as a PDF, the System Attachments column shows the attachment name.
- The Sent status means Zanda processed the email as sent. If the recipient cannot find it, ask them to check their inbox rules, spam folder, or email security filtering.
Frequently Asked Questions
❓ Can I send several progress notes to a referrer in one email?
Yes. Notes are sent to a referrer as PDF attachments on a letter email, so you can include as many as you need in one send:
- Save the notes as PDFs first. In the client's Records > Notes , click Print All to generate a single PDF containing every note, or open an individual note and use the Print button at the bottom to save just that one. Save the PDF(s) to your device.
- Start the referrer email from Communication > New Letter , draft your covering letter, and click Send as Attachment.
- In the To: drop-down, choose the referrer. Before sending, add your saved note PDF(s) as attachments—upload them from your device alongside the letter.
- Send the email. The letter and its attachments are saved automatically to the referrer's Communication > Activity and the client's Records > Correspondence.
There isn't a single button that emails selected notes straight to a referrer, but attaching the printed PDFs to a referrer letter puts them all in one email.
❓ Why does the sent email say the letter attachment is unavailable?
You can still check the saved letter record. The email record may show the attachment name while the attachment preview is unavailable. Open the separate Letter entry in Communication > Activity or Records > Correspondence to review the letter itself.
❓ Can I edit a letter after saving it as sent?
Use Save as Draft while you are still working on a letter. Draft letters stay editable when you open them again from the client's Communication > Activity history.
When you click Save as Sent or Send as Attachment, Zanda saves the letter as the final copy. You can still open the saved letter from the communication history to print it or export it to Word or PDF, but the sent copy is kept as the completed record. If you need to correct the content after that point, create a new letter with the updated wording so the original sent record remains intact.
Related Articles
- Communicating with Clients - Learn where emails, SMS, letters, and correspondence are stored in a client profile.
- Previewing Attachments Before Emailing - Learn which attachment types can be previewed before you send an email.
- Creating and Managing Email, SMS, and Letter Templates - Learn how to create and update letter templates.
- Sending Letters Securely - Learn how to export Zanda letters to Microsoft Word.
- Add Users Signature to Emails and Letters - Learn how to add user signatures to email and letter templates.