Sending Links to Pay Invoices Online
Use Zanda and Stripe to email or SMS invoice payment links to clients. Learn setup, automation, and client payment process for seamless transactions.
You can use Zanda communication and automations features and integration with Stripe to send your clients invoice payment links for them to be able to pay via a credit card.
Important ☝️
To use this feature, you will need to connect your Stripe account first by going to Settings > Payments > Stripe. If you don't, your clients will encounter this error message:
"Credit Card Processing is not enabled. Please contact to arrange an alternative method of payment."
In this article:
- Emailing Invoice Payment Link
- Sending Invoice Payment Link Via SMS
- Sending Invoice Payment Link Via Automation
- Paying Invoice
How to Email Invoice Payment Links
When emailing an invoice, you are able to include a link for clients to be able to pay via a credit card. You do this by editing the default email template used for invoice emails. This enables the client to settle their outstanding invoices by simply clicking on the link and entering their credit card details.
Note💡
For many practices, email is the preferred method of sending invoices and invoice pay links to clients and other payees (client contacts or third parties), it also allows selecting multiple recipients and CC the invoice emails, when necessary.
Here are the steps you need to take to do this:
1. Go to Tools > Communication > Templates or Settings > Communication > Email, SMS & Letter Templates. Here, you'll see an Invoice and Statement Email template included by default. You can either use this or create a new template to be sent when emailing invoices.
2. Open the template and type in your default message that will be sent to clients when you email an invoice to them. It might look like this:
3. Next, add your desired merge fields. To enable clients to pay the invoice themselves, also add the {InvoicePayLink} merge field as well.
4. So it looks something like this: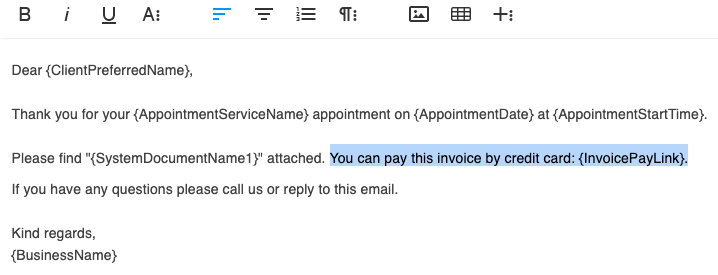 5. Once done, click Save.
Now head over to Settings > Billing > Invoices and make sure the email template you just created is selected as the default email on this page.
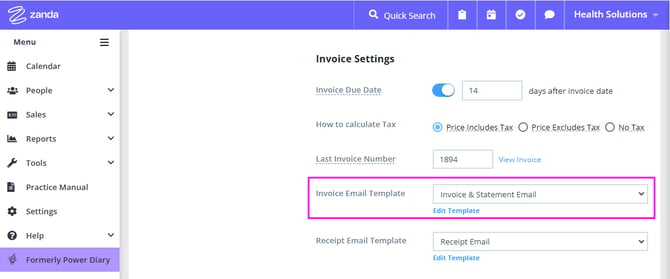
This will ensure your clients receive that particular email with the payment link anytime you email an invoice to them.
How to Send Invoice Payment Link Via SMS
In the modern world, communication via SMS sometimes proves to be the most efficient way of connecting with your clients. If you find yourself and your practice in such circumstances, here is how you can easily send invoice payment links to your clients using the Zanda SMS feature.
Note 💡
Use this method to send an invoice payment link directly to the client who will be attending an appointment. This feature will not work for sending the link to client's contact or a third party payee.
- You can use appointment reminders to send clients their invoice pay links while reminding them of their next appointment. Use this method if you require your clients to pay for their appointment before the appointment start date:
1. In Tools > Communication > Templates, open or create an SMS reminder template;
2. Copy the {InvoicePayLink} from the available merge fields and add it to the SMS reminder template;
3. In Settings > Communication > Reminders, make sure that this SMS reminder templates is selected to be sent automatically and manually. - Now, when your appointment reminder goes out automatically, or when you send it manually from the appointment panel, the {InvoicePayLink} merge field will generate the invoice payment link.
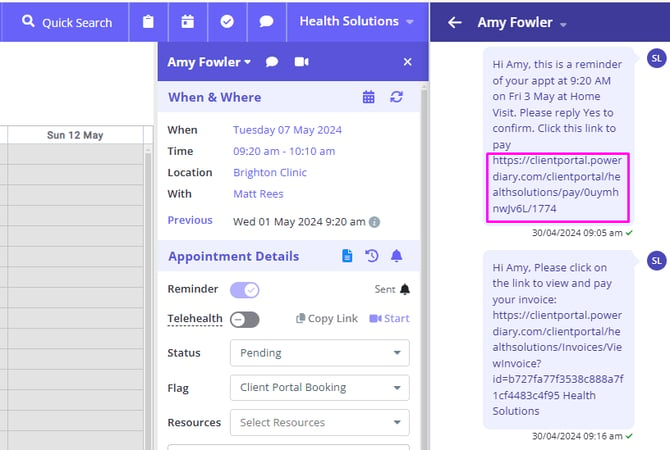
- Another option would be to create an SMS template to send invoice payment links manually without an appointment reminder, using the text messaging panel. Use this method if your clients pay their invoices after they attended their appointment:
1. In Tools > Communication > Templates, open or create a custom SMS template;
2. Copy the {InvoicePayLink} from the available merge fields and add it to the SMS template;
3. When you need to send the invoice pay link via SMS, find the appointment whose invoice needs to be paid in the practitioner's calendar and click on it once to bring up the appointment panel;
4. At the top of the appointment, next to the client's name, you will see a speech bubble icon. Click on it to bring up the messaging panel next to the appointment panel on the right;
5. In the Select Template section of the messaging panel, select the SMS template with the invoice payment link.
6. The invoice payment link will be generated, just hit the Send SMS button to send it to the client.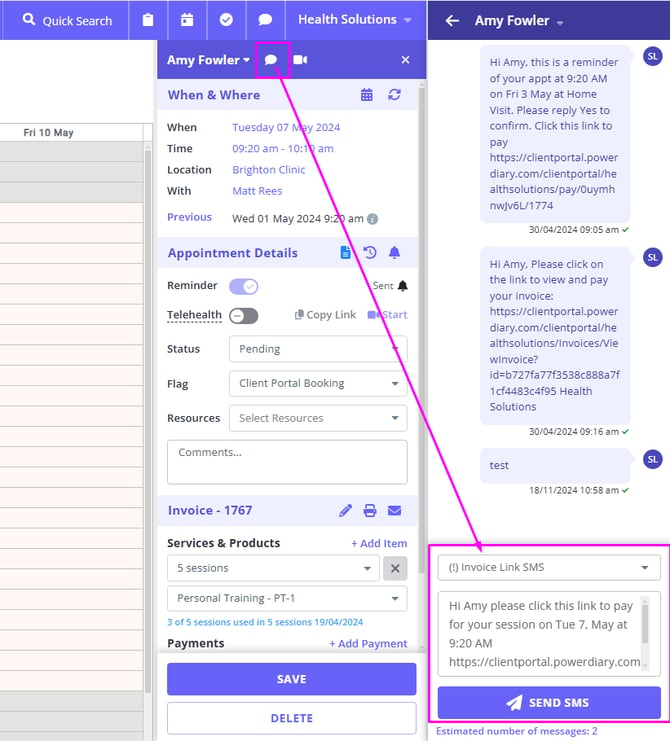
-
It is also possible to manually send an SMS message with the invoice payment link from the Client Profile > Communication > New SMS menu:
1. Navigate to Client Profile > Communication > New SMS;
2. In the 'Create New SMS' form, select the relevant appointment and the SMS template with the invoice pay link merge field.
3. This will generate the SMS message with the invoice payment link.
4. Use the 'Save as Draft' or 'Save and Send' button to save to send later, or send the message immediately.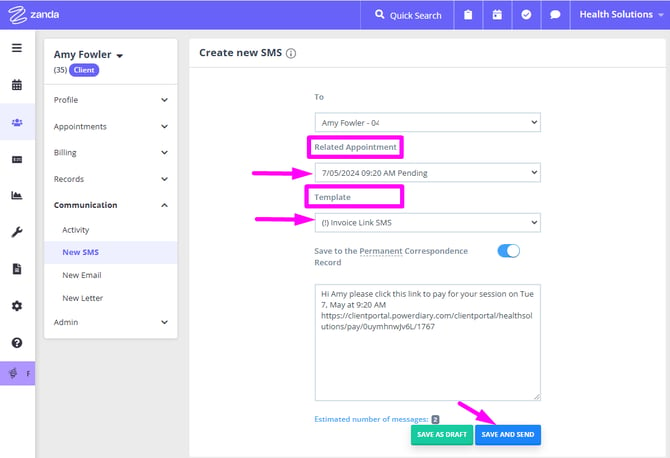
How to Send Invoice Payment Link Via Automation
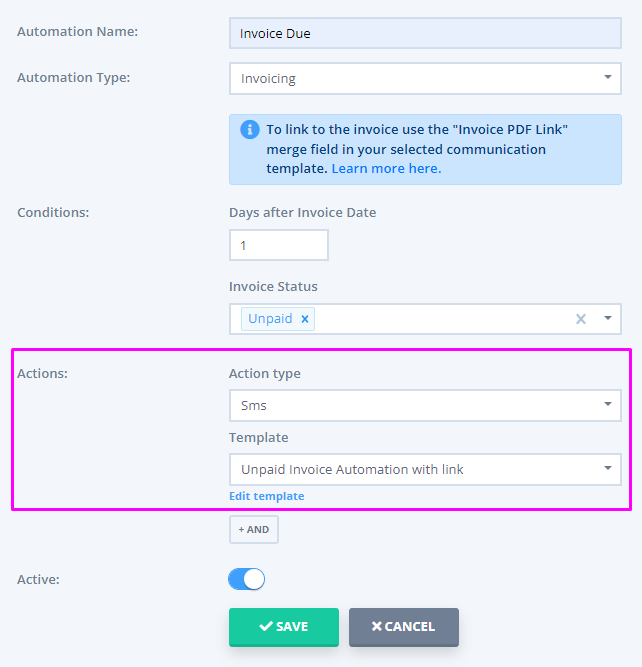
Invoicing automation enables you to create automated SMS or emails that the system will send automatically to invoice payees, following the conditions you've defined. Additionally, it facilitates the creation of automatic tasks according to your specified conditions. Set the Automation following these steps:
- Go to Settings > Communication > Automations
- Click on the '+ Add Automation' button at the top of the page
- Enter the name of the Automation
- Select the Automation type 'Invoicing'.
- Set the Conditions for this automation. All conditions must be met for an automation to be triggered. The following conditions can be set:
- Days After Invoice Date - this is when the automation will be
- Invoice status ('Unpaid')
- In the 'Actions' dropdown, select the Action which defines what the automation will do. Either select an automated email or SMS to be sent or have a task created.
- Once the 'Actions' are selected, the 'Template' dropdown will appear. Click on it to select the message template that will be used for this automation.
- You can add another action by clicking the '+AND' button and selecting an action then template. You can add as many additional actions as needed.
- Save the changes to finish creating the Automation.
- Once the Automation is created, it will be triggered for all invoices that meet the criteria you set up, including invoices that existed before you enabled the automation.
How Your Clients Will Pay Invoices Online
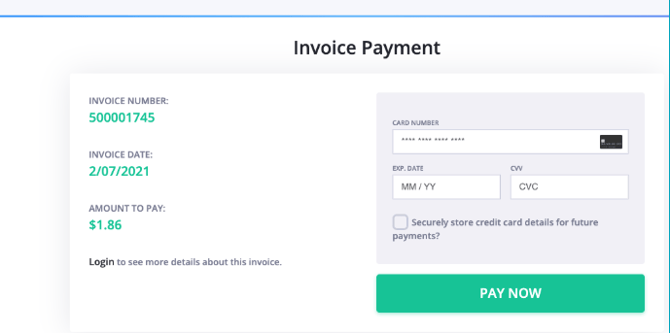
Once the recipient of your email or SMS with included invoice payment link click on that link to open it in their device's browser, they will see the online payment form.
- They will need to enter their card details and hit the 'Pay Now' button.
- If they previously consented to secure storage of their credit card details in your business's Stripe account via Zanda, their details will be already pre-populated, and they only need to click 'Pay Now'.
An example of your client's experience is below, replaced with your local currency;
💡 Notes
- The secure card storage option won’t appear when a client opens a direct payment link to an invoice.
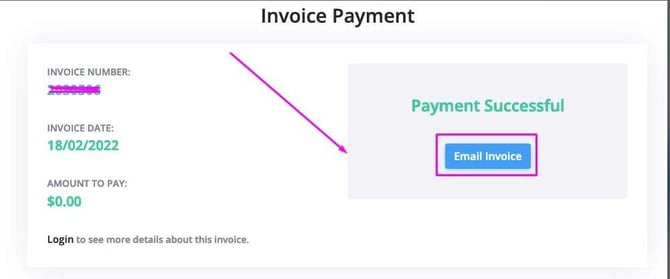
To see the option to save card details for future use, the client must be logged into their Client Portal account when making the payment. - If your clients have paid the invoice online, they will be able to email the receipt to themselves. The system will use the same email template that is set up in your Zanda account in Settings > Billing > Invoices:
- If only Invoice Template is selected, the system will use this template.
- If the Receipt Email is selected, the system will use this email template.
- If no email templates are selected, the system will use its in-built template which will attach the PDF copy of the paid invoice.
