%20-%20120%20x%2044.svg)
In this artice:
- Recall Automations Overview
- Steps To Create A Recall Automation
- Sending All Automation Communication to Clients' Contacts
- Frequently Asked Questions
Recall Automations Overview
Recall automations help your practice follow up with clients who may be due to rebook after their last appointment. You can use this automation to send a recall email or SMS, remind clients to schedule their next visit, encourage ongoing care, or create an internal task for your team to follow up manually.
A recall automation is triggered a set number of days after a client’s last booked appointment, but only when the client has no future appointments scheduled. This makes it useful for re-engaging clients, reducing gaps in care, and helping your practice stay connected with clients who have not yet rebooked.
You can set up recall automations for different follow-up workflows. For example, you might send a 30-day rebooking reminder after a treatment appointment, a 90-day recall for ongoing care, or a task for your admin team to contact clients who have not returned after a specific appointment type, location, client type, client classification, appointment flag, or telehealth appointment.
Use this article to set up automated recall emails, SMS messages, and tasks for client rebooking reminders, lapsed client follow-up, overdue appointments, ongoing care recalls, no future appointment follow-up, service-specific recalls, location-specific recalls, telehealth recalls, and internal team follow-up.
Recall automations are processed every day at 2:00 PM (14:00) local time for each account for eligible clients.
Important note about recall automations
Recall automations are based on the number of days since a client’s last appointment and whether they have a future appointment booked.
They are not triggered by appointment status, such as No Show or Cancelled. To follow up after specific appointment outcomes, such as missed, cancelled, or attended appointments, use a Post-Appointment Automation instead.
Follow these steps to create an automation:
- Navigate to User Menu > Account Settings > Communication > Automations
- Click on '+ Add Automation'
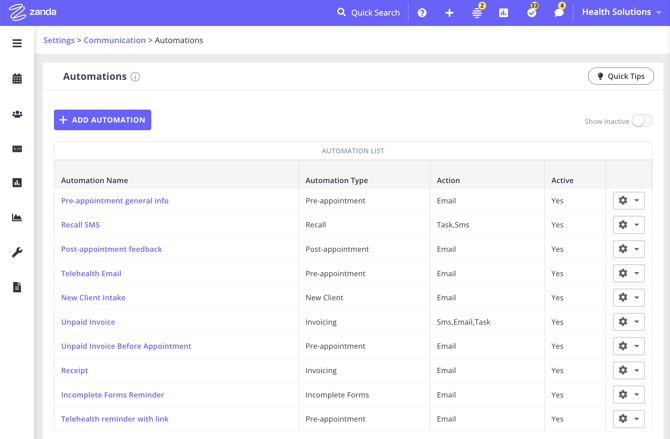
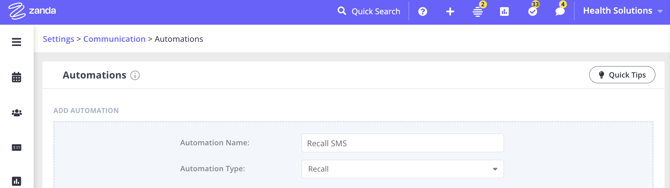
- Give the automation a name (e.g. "3 month recall")
- Select the 'Recall' Automation Type.
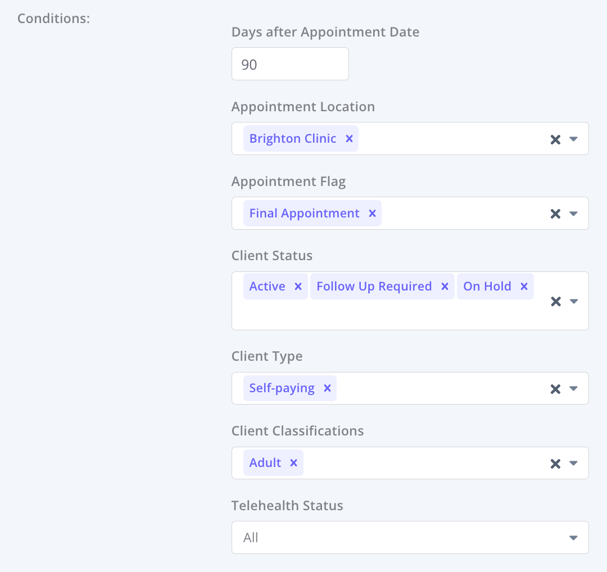
- Set Conditions for this automation. All conditions must be met for an automation to be triggered for clients that have no future appointments booked. The following conditions can be set:
- Days after Appointment Date - this is when the automated message will be sent.
- Appointment Location - leave it as all, or select one or many locations.
- Appointment Flag - leave it as all, or select one or many appointment flags.
- Client Status - leave as all, or choose a status to filter out clients who do not need a recall created.
- Client Type - leave it as all, or select one or many client types.
- Client Classifications - leave as all, or choose one or more client classifications to filter out clients who do not need a recall created.
- Telehealth Status (refers to appointments with telehealth links on or off, select All, Enabled or Disabled).
⚖️ How Matching Works
-
Within a single condition (e.g. multiple Client Classifications), the system applies OR logic. Example: If you select Adult and Child, the automation will trigger if the client is either Adult or Child.
-
Across different conditions (e.g. Days after Appointment + Client Status + Telehealth Status), the system applies AND logic. Example: The automation will trigger only if the last appointment was 90 days ago AND the Client Status is Active AND Telehealth Status is Enabled.
| Logic Type | Example | Result |
|---|---|---|
| OR (within one condition) | Client Classification = Adult OR Child | Triggers if the client is either Adult or Child |
| AND (across conditions) | Days After Appointment = 90 AND Status = Active AND Telehealth = Enabled | Triggers only if all match |
💡 Tip: Multiple selections inside one condition = OR, while multiple conditions together = AND.
-
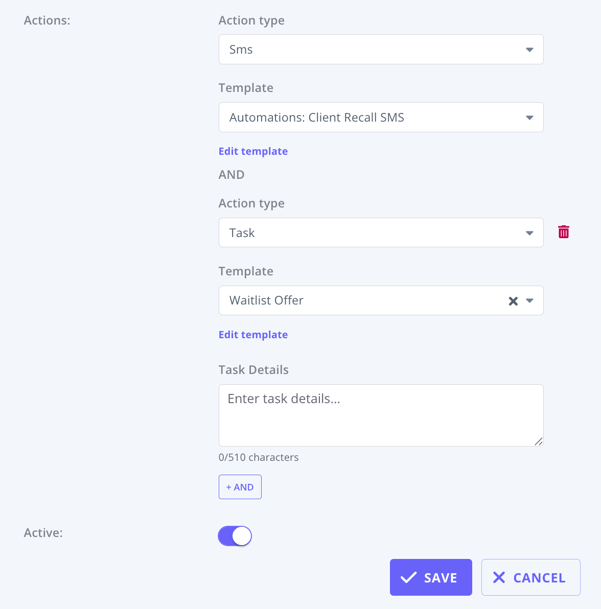
- The email or SMS will be sent to the client that the appointment is booked for.
- If you selected a Task action, in addition to selecting a communication template, you can also add an internal note for your team in the Task Details field. The automation task will appear in your main Tasks dashboard and will be visible to all users.
- Pre-built templates are available — see Communication Templates for Automations for ready-to-use email and SMS recall templates.
7. Save the changes. The automation will start sending in the next daily batch for client's that meet the conditions going forward.
Sending All Automation Communication to Clients' Contacts
You can send automations communications, such as pre-appointment messages, follow-ups, invoices reminders, recalls and so on, directly to a client’s contact.
How It Works
- Open the relevant Client Profile > Contacts tab and select their connected contact, or add the contact who will be receiving their automation communication messages.
- Each connected contact profile includes a Send all automation communication toggle. You’ll find this setting just below the Send reminders toggle in the connected contact’s settings. Turn this toggle on.
- Save the changes. When this option is turned on, all automated messages that would normally go to the client will also be sent to that contact. This includes any automations triggered by reminders, invoices, recalls, or similar workflows.
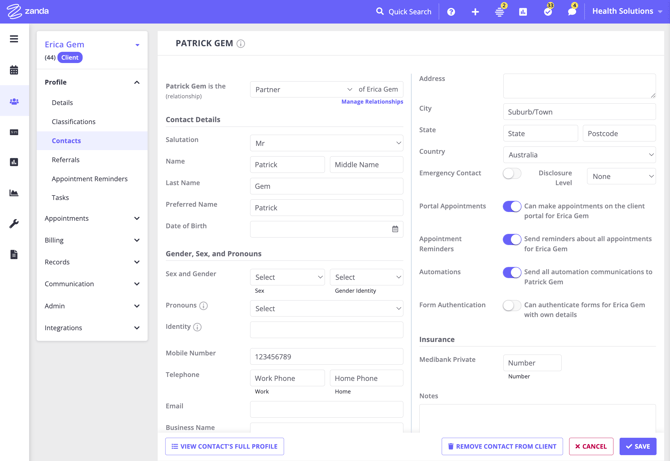
Example
If a parent, guardian, or carer is listed as a contact and the Send all automation communication option is enabled, they will receive the same automated messages as the client.
💡 Tip: Before enabling this setting, make sure you have the contact’s consent to receive communications on behalf of the client. This helps maintain privacy and ensures compliance with communication and data protection standards.
Frequently Asked Questions
Q: Is a Recall Automation the same as a No-Show follow-up?
No. Recall Automations trigger based on the number of days since a client’s last appointment when they have no future appointment booked — regardless of whether the past appointment was attended or missed. To follow up specifically on no-shows or cancellations, use a Post-Appointment Automation with an appointment status condition.
Q: Where do I find the Recall Automation settings?
Navigate to User Menu > Account Settings > Communication > Automations. There is no separate "Recalls" menu section — recall is one of the automation types available when you click + Add Automation.
Q: What action types are available?
SMS, Email, and Task. You can send a message directly to the client or create a task for your team to follow up manually.
Q: Can I filter recalls by appointment type or client type?
Yes. You can filter using such automation conditions as: Days after Appointment Date, Appointment Location, Appointment Flag, Client Status, Client Type, Client Classifications, and Telehealth Status.