Invoicing automation helps your practice manage billing follow-up without manually tracking every invoice. You can use it to automatically send unpaid invoice reminders, overdue payment follow-ups, paid invoice receipts, and invoice PDF links by SMS or email to the correct invoice payee. This may be the client, a connected contact, or a third-party payer.
You can also create internal tasks based on invoice conditions, helping your team follow up on outstanding or overdue invoices, payment issues, or other billing actions. Invoicing automations can be configured using conditions such as invoice status, days after invoice date, practitioner, appointment location, service, client type, and client classification.
Use this article to set up automations for unpaid invoices, fully paid invoices, automatic receipts, payment reminders, invoice communication, and billing follow-up workflows.
-
The unpaid invoices automation is processed every day at 2:00 PM (14:00) local time for each account for eligible invoices.
-
The paid invoices automation is triggered when a payment is applied to an invoice that makes the Total Payments equal to or greater than the Total Charges. It is executed immediately and does not wait for the daily 2:00 PM automations system job to run.
In this article:
- Using Invoicing Automation for Invoice Reminders and Receipts
- Before You Begin
- Setting the Unpaid Invoices Automation
- Setting the Paid Invoices Automation
- Sending All Automation Communication to Clients' Contacts
- Frequently Asked Questions
- Related Articles
Using invoicing automation for invoice reminders and receipts
Invoicing Automation enhances your billing process by automatically sending payment reminders and receipts, as well as generating follow-up tasks according to the status of invoices. This eliminates the need for manual tracking of unpaid or paid invoices, allowing the system to efficiently notify clients and payees on your behalf.
Benefits of Invoicing Automation:
- Save time by reducing repetitive admin work
- Improve cash flow by reminding payees promptly
-
Strengthen client communication with professional, timely messages
-
Ensure no invoice slips through the cracks
With customizable conditions and flexible actions, you can tailor automations to match your practice’s billing processes and client needs.
Before You Begin
Before setting up invoicing automations, keep the following in mind:
-
Timing of messages: Automated emails and SMS are scheduled to be sent after 2 PM in your local time zone. This ensures consistent delivery across all client communications.
-
Invoice PDF links:
-
Any invoice/receipt pdf links generated by the system will expire 7 days after creation. If clients or payees need access after this period, a new link will need to be generated.
- If your Zanda account is linked with your Stripe account, they can also pay their invoices directly through the Invoice PDF Link
-
Use this information to strategically design your automations, ensuring that clients receive prompt reminders and receipts consistently, without any delays.
Setting the Unpaid Invoices Automation
Use this option to automatically follow up on outstanding invoices. By sending payment reminders via SMS or email, or assigning tasks to your team, you can encourage faster payments without extra admin effort.
The Unpaid Invoices Automation ensures clients (or their designated payees) are reminded of outstanding payments promptly, improving collection rates and keeping your revenue flow steady.
- Go to User Menu> Account Settings > Communication > Automations
- Click on the '+ Add Automation' button at the top of the page

- Enter the name of the Automation
- Select the Automation type 'Invoicing'.
Set the Conditions for this automation. All conditions must be met for an automation to be triggered.
⚖️ How matching works:
-
Within a single condition (for example, multiple Client Classifications), the system uses OR logic. If you select Adult and Child, the automation will trigger if the client is either Adult or Child.
-
Between different conditions (for example, Invoice Status + Client Type + Client Classification), the system uses AND logic. This means all conditions must be true at the same time. Example: The automation will trigger only if the invoice is Unpaid AND the Client Type is Self-Paying AND the Client Classification is Adult.
| Logic Type | Example | Result |
|---|---|---|
| OR (within one condition) | Client Classifications = Adult OR Child | Automation triggers if client is either Adult or Child |
| AND (across conditions) | Invoice Status = Unpaid AND Client Type = Self-Paying AND Classification = Adult | Automation triggers only if all conditions are true |
💡 Tip: Think of it this way — multiple selections inside a single field = OR, while multiple fields together = AND.
- The following conditions can be set:
- Days After Invoice Date - this is when the automation will be triggered, days after the appointment date (which is the same as the invoice date).
- Invoice status ('Unpaid') - sent days after invoice date
- Appointment Location - the automation will be triggered for invoices issued for appointments provided in this location.
- Client Status - custom, set it up via User Menu > Account Settings > Clients > Client Statuses.
- Client Type - custom (helps practices define which clients or payees will be receiving unpaid invoices reminders).
- Set up your custom client types via User Menu > Account Settings > Clients > Client Types.
- Client Type is assigned to each client profile on the Details page. - Client Classifications - choose all classifications, a specific one, or a combination of multiple classifications to tailor your invoicing automation more precisely.
- Practitioner - the automation will be triggered for invoices issued for the practitioner who delivered the billed services.
- Service - the automation will be triggered for invoices which include this service as an item line.

- In the 'Actions' dropdown, select the Action which defines what the automation will do. Either select an automated email or SMS to be sent or have a task created.
- Once the 'Actions' are selected, the 'Template' dropdown will appear.
- Click on it to select the message template that will be used for this automation.
- Use {InvoicePayLink} to add a direct payment link, {InvoicePDFLink} (SMS and email) to add an invoice PDF link, or {InvoicePDFAttachment} (email only) to attach the invoice PDF to the automated message.
- If your Zanda account is linked with your Stripe account, clients or other nominated invoices payees can also pay their invoices directly through the Invoice PDF Link.
- An automation message will be sent to the invoice payee (which can be the client themselves, or their contact or a third party). You can view the sent message in the payee profile > Communication > Activity.
- If you selected a Task action, in addition to selecting a communication template, you can also add an internal note for your team in the Task Details field. The automation task will appear in your main Tasks dashboard and will be visible to all users.
- You can add another action by clicking the '+AND' button and selecting an action then template. You can add as many additional actions as needed.
- Save the changes to finish creating the Automation.
- Once the Automation is created, it will be triggered for any invoice that meets the criteria you set up, including invoices that existed before you enabled it. The Days After Invoice Date condition is matched exactly, so each qualifying invoice is sent on the day it reaches that number of days after its invoice date — older invoices that are already past that day are not re-sent.
- A record that an invoice was sent will be made:
-
The
EmailedOnfield will be populated with the date and time when the invoice is sent in the invoice lists and reports -
An entry in the invoice activity log will be created stating the “ [date] [time] Automation emailed to [email address]"
-
The invoice emailed icon is updated on the relevant appointment that the invoice has been emailed.
-
** Note: If an invoice is meeting the automation criteria (i.e. is unpaid at the day the automation is sent), the email will be triggered regardless if the invoice has been emailed to the payee previously.
Setting the Paid Invoices Automation
This automation sends a confirmation or receipt when an invoice has been fully paid. You can also assign tasks to staff if follow-up actions are needed after payment.
Sending timely receipts reassures clients, strengthens trust, and provides a professional payment experience, while reducing the manual workload of your team.
-
Go to User Menu > Account Settings > Communication > Automations
-
Click on the '+ Add Automation' button at the top of the page
-
Enter the name of the Automation
-
Select the Automation type 'Invoicing'.
Set the Conditions for this automation. All conditions must be met for an automation to be triggered.
⚖️ How matching works:
-
-
Within a single condition (for example, multiple Client Classifications), the system uses OR logic. If you select Adult and Child, the automation will trigger if the client is either Adult or Child.
-
Between different conditions (for example, Invoice Status + Client Type + Client Classification), the system uses AND logic. All conditions must be satisfied together for the automation to run. Example: The automation will trigger only if the invoice is Paid AND the Client Type is Insurance AND the Client Classification is Adult.
-
| Logic Type | Example | Result |
|---|---|---|
| OR (within one condition) | Client Classifications = Adult OR Child | Automation triggers if client is either Adult or Child |
| AND (across conditions) | Invoice Status = Paid AND Client Type = Self-Paying AND Classification = Adult | Automation triggers only if all conditions are true |
💡 Tip: Think of it this way — multiple selections inside a single field = OR, while multiple fields together = AND.
-
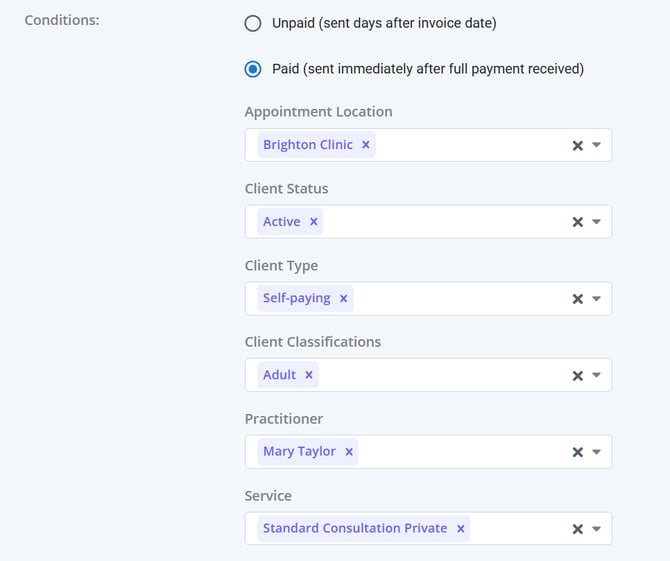
Invoice status - Paid (send immediately after full payment received)
- Appointment Location - the automation will be triggered for invoices issued for appointments provided in this location.
- Client Status - custom, set it up via User Menu > Account Settings > Clients > Client Statuses.
-
Client Type - custom (helps you define which clients or payees will be receiving receipts).
-
Set up your custom client types via User Menu > Account Settings > Clients > Client Types.
-
Client Type is assigned to each client profile on the Details page.
-
-
Client Classifications - choose all classifications, a specific one, or a combination of multiple classifications to tailor your invoicing automation more precisely.
-
Practitioner - the automation will be triggered for invoices issued for the practitioner who delivered the billed services.
-
Service - the automation will be triggered for invoices which include this service as an item line.
-
In the 'Actions' dropdown, select the Action which defines what the automation will do. Either select an automated email or SMS to be sent or have a task created.
-
Once an action is selected, the 'Template' dropdown will appear. Click on it to select the message template that will be used for this automation.
-
Use the {InvoicePDFLink} (SMS and email) or {InvoicePDFAttachment} (email only) in your communication templates to generate and add a receipt pdf link or pdf attachment to the automated message.
-
An automation message will be sent to the invoice payee (which can be the client themselves, or their contact or a third party). You can view the sent message in the payee profile > Communication > Activity.

-
- If you selected a Task action, in addition to selecting a communication template, you can also add an internal note for your team in the Task Details field. The automation task will appear in your main Tasks dashboard and will be visible to all users.
-
You can add another action by clicking the '+ AND' button and selecting an action then template. You can add as many additional actions as needed.
-
Save the changes to finish creating the Automation.
-
Once the Automation is created, it will be triggered for all fully paid invoices that meet the criteria you set up.
Sending All Automation Communication to Clients' Contacts
You can send automations communications, such as pre-appointment messages, follow-ups, invoices reminders, recalls and so on, directly to a client’s contact.
Pro Tip: You can add the Contact type to other profiles, such as Third Party, on their Admin > Manage page, and connect these profiles to a client as their contact, to be able to send them a copy of client's automated invoice emails.
Please be aware that these contacts will also be receiving messages sent by other automation types if they are sent to their connected clients.
How It Works
- Open the relevant client Profile > Contacts tab and select their connected contact, or add the contact who will be receiving their automation communication messages.
- Each connected contact profile includes a Send all automation communication toggle. You’ll find this setting just below the Send reminders toggle in the connected contact’s settings. Turn this toggle on.
- Save the changes. When this option is turned on, all automated messages that would normally go to the client will also be sent to that contact. This includes any automations triggered by reminders, invoices, recalls, or similar workflows.

Example
If a parent, guardian, or carer is listed as a contact and the Send all automation communication option is enabled, they will receive the same automated messages as the client.
💡 Tip: Before enabling this setting, make sure you have the contact’s consent to receive communications on behalf of the client. This helps maintain privacy and ensures compliance with communication and data protection standards.
Frequently Asked Questions
❓ Can invoicing automation create invoices automatically for recurring appointments?
No. Invoicing automation works with invoices that already exist; it does not create invoices from recurring appointments. Use recurring appointments to create the appointment series. Then create the invoice from each appointment by adding the service or using the invoice workflow on the appointment panel. After the invoice exists, an invoicing automation can send unpaid-invoice reminders, paid-invoice receipts, invoice PDF links, direct payment links, or internal follow-up tasks when the invoice matches the conditions you set.
❓ Will invoicing automation send invoices with a zero total?
No. Invoicing automation does not automatically send zero-total invoices through the unpaid invoices automation. That automation only follows up on outstanding invoices with a chargeable total, so invoices with a zero total are not included in the scheduled unpaid-invoice send.
Paid invoice automations work differently. They send when a payment is applied to a positive-total invoice and the invoice becomes fully paid. If you need to send a zero-total invoice for your own records, send it manually from the invoice instead of relying on an automation.
❓ Can a paid invoice automation email notify a Zanda user instead of the client or payee?
Paid invoice automation email and SMS actions are designed for the invoice payee, such as the client, a connected contact, or a third-party payer, rather than a Zanda user. To create an internal follow-up for your team, use a Task action in the automation. For in-app payment alerts, eligible users can also receive Invoice Payments notifications in Practice Hive when an invoice is fully paid online through the Client Portal or an Invoice Pay Link.
❓ Can I schedule invoices to be created automatically?
For appointment-based billing, you can create a recurring appointment series from an appointment that already has a service, product, or invoice items attached. Zanda creates the future appointments in the series and copies the invoice items into each occurrence, so each appointment has an invoice you can edit if details change.
For existing invoices, use invoicing automations to send reminders, receipts, invoice PDF links, SMS or email messages, or internal tasks based on invoice status and timing such as Days after Invoice Date. These automations follow up on invoices that already exist. For standalone sales that are not linked to appointments, create the invoice from Billing > New Invoice.
❓ Can I limit an unpaid-invoice automation to only new invoices, so it doesn't include invoices that already existed?
There isn't a setting that restricts an invoicing automation to future invoices only. There is no start date or cut-off that includes only invoices created after you switch the automation on. The available conditions are invoice status, Days After Invoice Date, appointment location, client status, client type, client classification, practitioner, and service — none of them limit the automation to newly created invoices.
In practice, though, turning the automation on does not send a reminder to your entire back-catalogue of unpaid invoices at once. The unpaid invoices automation runs each day and looks for invoices that are exactly the number of days past their invoice date that you set in Days After Invoice Date. An older unpaid invoice that is already well beyond that day count when you enable the automation has passed its trigger point and won't be sent. Only invoices that reach the day you set — on or after you turn the automation on — will trigger it. For example, if you set 7 days after invoice date, the automation picks up each unpaid invoice on the day it becomes 7 days old, rather than immediately messaging every unpaid invoice on your books.
Related Articles
- Using Practice Hive for Notifications, Release Notes, and Team Chat - Learn how Practice Hive invoice payment notifications work and who can see them.
- Sending Invoices and Receipts to Your Payees - Review how invoice and receipt emails are sent to payees.
- Emailing Invoices and Receipts to Your Payees - Send invoices and receipts manually or with invoicing automation.
- Creating, Editing, Printing and Emailing Invoices - Create, edit, print, email, and review invoice activity.
- How Can I Write Off an Invoice? - Review options for handling invoices that will not be paid.
- Creating, Editing and Deleting Recurring Appointments - Set up recurring appointments for repeat bookings.