Setting Up Session Pack Templates
Learn how to create, edit, and manage session pack templates in Zanda. Track sessions, hours, or prepaid amounts efficiently for your clients.
Session Packs are a very cool feature you can use when creating new appointments in Zanda. It can be used to keep track of three separate metrics, designed for a variety of different situations you might need:
- Number of Sessions
- Fixed Amount of Hours
- Fixed Amount of Money
For example, you can use a Session Pack to keep track of prepaid subscriptions a client has bought or the number of appointments your referral has had with your clinic.
Watch the video tutorial
In this article:
- Creating A New Session Pack Template
- Viewing And Editing The Existing Session Pack Templates
- Activating The Deactivated Session Pack Templates
How To Create A New Session Pack Template
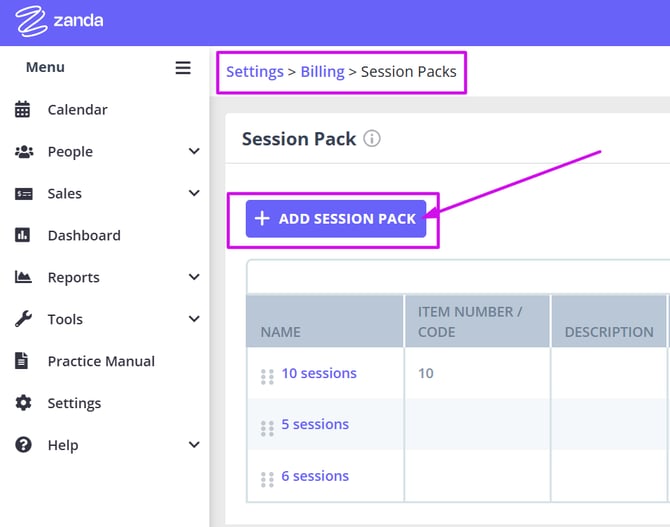
- Navigate to Settings > Billing > Session Packs using the menu on the left side of Zanda.
- Click on + Add Session Pack.

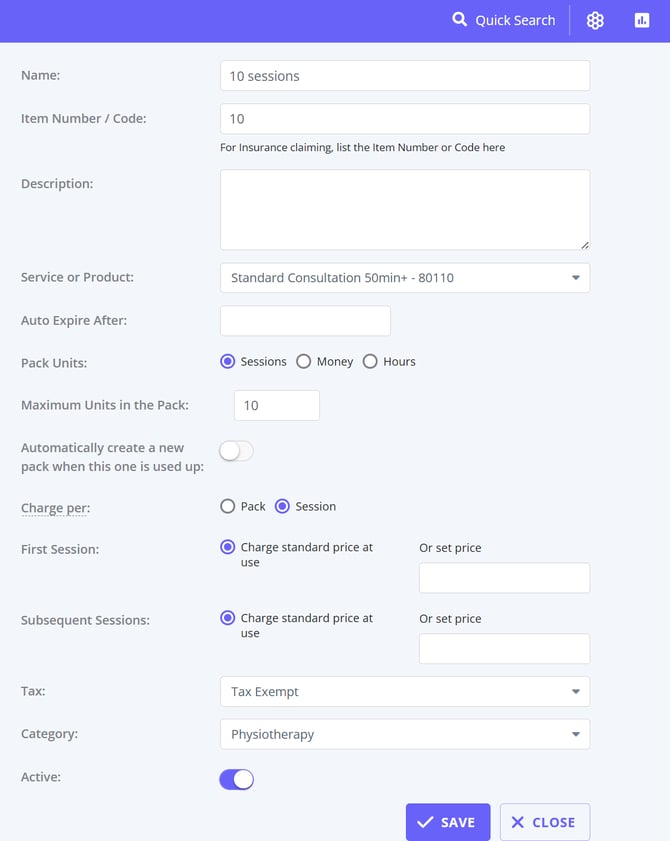
3. A form will open up where you can add details of your new Session Pack Template in the following fields:
- Name: Use a comprehensive name that will help you to identify the Session Pack Template when generating an invoice
- Item Number / Code: add one if the session pack template will be used for invoices for insurance claiming. Feel free to leave this field blank, if you are going to use the session pack with the services that already have their own Item Codes or Numbers
- Description: Add further details related to the Session Pack Template here. When the session pack is used in conjunction with a service, the Session Pack Template Description will not be included on invoices.
- Service: When you select a service template in this field, it will be applied to an invoice automatically each time you add this Session Pack to it. However, you will still be able to remove this service from the invoice and select a different one, if necessary.
You are able to leave this field blank when setting up the template. This will give you the flexibility of selecting the specific service or you have provided in an appointment. For example, you will be able to select between face-to-face and telehealth services, different types of treatment, etc. - Auto Expire After: This is an optional field. Session packs created from this template will automatically expire and become inactive after this period.
- Pack Units: Select one of the tracking types: Sessions, Money, or Hours. Please note that it is necessary to use Services with a session pack when tracking for Hours, as only Service Templates are set up with the Duration metrics.
- Maximum Units in the Pack*: enter a number of sessions or amounts of money or hours that represent the maximum units allocated.
If the maximum number or amount fluctuates from client to client (this often happens with NDIS (AUS) clients), enter one possible number or amount. Later, you will be able to adjust the maximum units when adding a session pack from this template to the individual client. - Automatically create a new pack when this one is used up:
- When the switch is on, the individual clients' session packs created from this template will be recreated automatically once the previous pack is used up or expires.
- Have this switch off if you need to receive a new referral or a new service agreement from a client before assigning another session pack to them. - Charge per:
- If you select Pack, you will be prompted to assign a pack price. This price will be allocated to the first invoice in the pack. The subsequent invoices will have the 0 prices on them.
- If you select Session and have the charge on for Charge standard price at use, the Service standard price will be allocated to invoices.
- If you select Session and use the Or set price, the service prices will be overridden by this setting. - Active: Thurn this off when you need to retire this session pack template.
- Tax: select the tax rates according to your business nature. The tax rates options can be added here.
- Category: This is the internal tracker that you can set up by following the instructions here.
- Once you've filled out all the necessary fields, click on Save. This will create a new template for you.

*Important
Do not leave the Maximum Units in the Pack as 0. If you do so, the session packs you will create from this template will expire immediately after you create them. It means you will see no session pack after you create and save it.
How To View, Edit And Deactivate The Existing Session Pack Templates
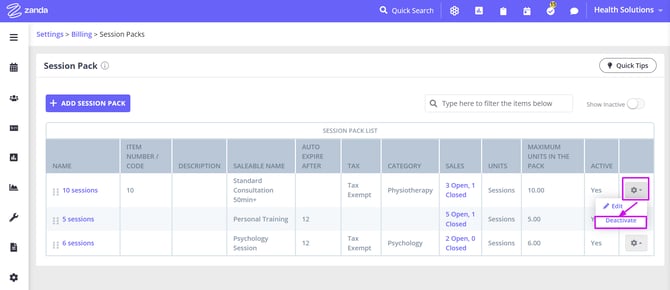
Navigate to Settings > Billing > Session Packs using the menu on the left side of Zanda.- There, you can see a list of the existing active session packs.
- Use the filter box at the top-right to search for the templates by their name.
- The Sales column contains a link to the list of all individual session packs created from this template, for more statistics.
- Click on the cogwheel icon in the last column to edit or deactivate the existing Session Pack Template.

How To Locate And Reactivate A Deactivated Session Pack Template
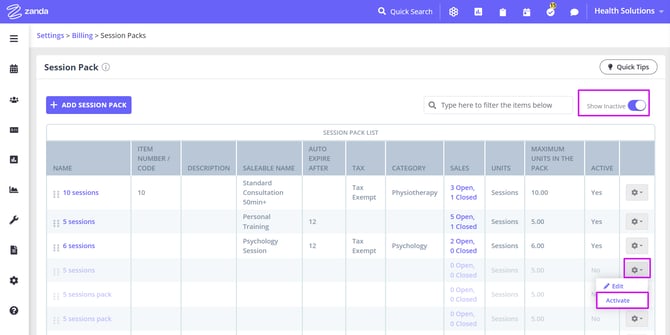
Navigate to Settings > Billing > Session Packs and
- Turn on the Show Inactive switch in the top-right corner;
- At the bottom of the templates list, you will see the deactivated templates that are greyed out.
- Click on the cogwheel icon in the last column, and select Activate
- You can also click on the hyperlink in the Sales column to get to the list of session packs that had been created from this deactivated template.

Hint 💡
This article will help you learn about different ways of using Session Packs and advise which of the methods would be more suitable in your individual situation: Using Session Packs