Taking Prepayments, Bulk Payments and Allocating to Invoices
Learn how to manage prepayments and apply payments across multiple invoices in Zanda, including single invoice payments and editing client payments.
You can make prepayments, as well as apply one payment across multiple invoices or partial payment to an outstanding invoice, using this feature. This is great if clients pay you in advance or as outlined in their payment plan, or if clients or Third Parties pay for batches of invoices at one time.
Watch the tutorial:
In this article:
- Adding a Payment to a Single Invoice
- Adding a Prepayment or Payment for Multiple Invoices
- Viewing and Editing Client Payments
- Using a Prepayment to Pay an Invoice
Adding a Payment to a Single Invoice
Single payments are added against a particular invoice. If the client pays the full invoice amount then you would apply the payment by either clicking on the appointment and using the Payment' drop-down list to select the payment method. Alternatively, you can add payment by editing the invoice and using the 'Add Payments' line to add the payment.
Adding a Prepayment or Payment for Multiple Invoices
1. To add a payment go to Sales > New Payment.
2. Search for the client's name and select their name from the results.

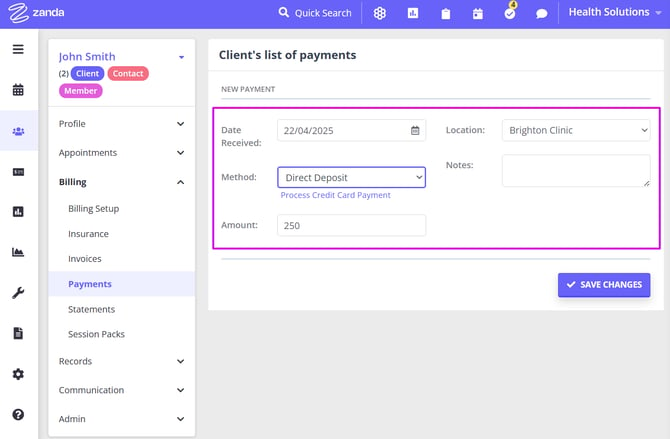
3. You can then enter the payment details (Payment Method, Payment Amount, Date Received, Location, Notes).

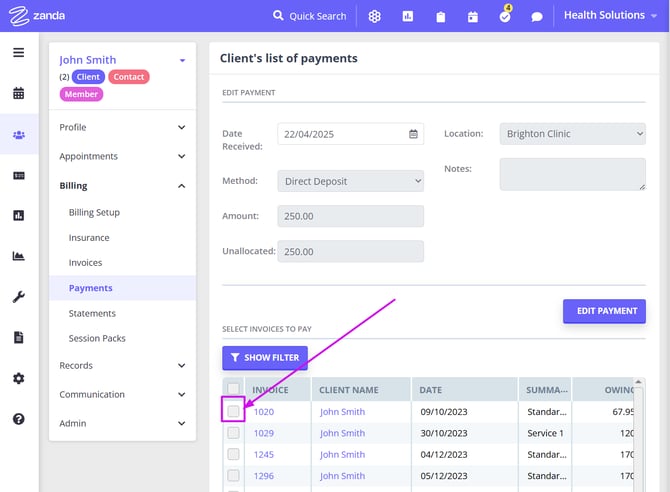
4. If you would like to allocate the payment to the client's invoices, use the 'Select Invoices to Pay' section to tick the invoices you would like to apply the payment to and then click 'Save'.

(If you would like to record the payment without allocating it to an invoice i.e. for a Prepayment, just click 'Save')
5.Once you have saved the payment you will be taken to the editing payment screen which will allow you to edit the details of the payment or to delete the payment if required. You can navigate away from this page at any time as the payment has been recorded.
Viewing and Editing Client Payments
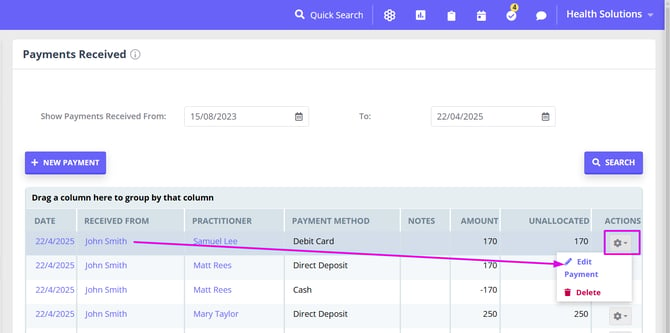
1. To view payments from clients go to Sales > Payments.
2. Enter the search criteria (Start/End Date, Client Name, Calendar, Payment Status) and then click 'Search'. To edit a payment click on the gear icon under the column "Actions" and select "Edit Payment".

3. You'll then see the Edit Payment screen which allows you to make changes to the payment.
Using a Prepayment to Pay an Invoice
1. Go to the "Edit Invoice" page by right-clicking the appointment and selecting "Edit Invoice" or clicking on "Edit" in the Appointment Panel.
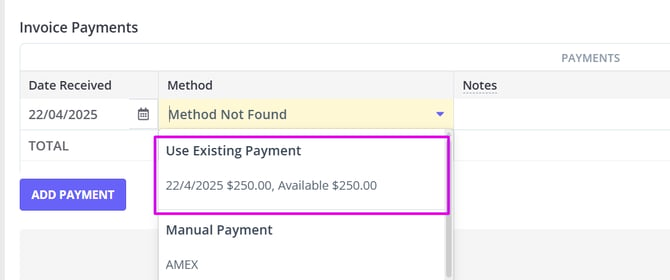
2. Click on the payment listed in the dropdown box "Use Existing Payment", where a list of available Prepayments will display. Select the desired prepayment and then click Save Invoice.
Hint 💡
Prepayments can be used to record gift voucher payments. Simply create a client record for the Gift Voucher recipient and then add the Gift Voucher prepayment to their Account.