Zanda Bulk Update functionality helps to update all types of profiles in bulk, rather than one by one, anytime you need. Here's what can be updated:
- Client status
- Client type
- Primary practitioner
- Add assigned practitioner
- Remove assigned practitioner
- Receives marketing communication (opt in / out)
- Add classification
- Remove classification
- Users can book appointments for the client
- Client can book appointments on the portal
- Archive a profile
- Delete a profile
Note: To access and action the bulk update feature, a user will need the following permissions:
- Setup and Configure Zanda
- Communication Menu
- Can Add and Search Clients
- Access All Referrer and Third Party Profiles (to update referrers and third parties)
- Change Assigned Practitioners (to complete the Primary and Assigned Practitioner updates)
User permissions are managed in User Menu > Account Settings > Team > Users
You can find the Bulk Update feature via Tools > Bulk Update.
Explore the various profile settings available within the Bulk Update feature and learn how to effectively use this functionality.
In this article:
- Using Advanced Search Filters to Select Profiles
- Updating Specific Fields for Selected Profiles
- Archiving and Deleting Selected Profiles
- Related Articles
How to Use Advanced Search Filters to Select Profiles
Go to Tools > Bulk Update page, where you will see the Advanced Search filters that will help you to select the profiles that require updating.1. First, you can select which of the profiles to select according to their Role: Client, Referrer, Contact, or Third Party, or any combination of more than one Role.
2. Then, make a selection of the relevant filters. While a majority of the filters and fields on the advanced search are fairly straightforward (first name, last name, telephone, email etc.), some might not be as immediately obvious.
- Filtering by Practitioner Type
It is possible to generate a list of clients based on available practitioner types and their relationship to client profiles.
-
- Primary Practitioner: a practitioner that is set as a Primary Practitioner in a client profile > Admin Manage page.
- Assigned Practitioners: practitioners that are set as Assigned Practitioners in a client profile > Admin Manage page.
- Appointment Practitioner: a practitioner who provided appointments to the clients which will be included in the list.

- 'Had an Appointment Between' and 'No Appointments Between'
These two filters can be extremely powerful if you're looking for information specific to a client's activity within your business.
For example, you might want to find a list of all clients who have had an appointment this year but don't have an appointment booked for the future. To do this you would simply set the 'Had an Appointment Between Dates' to the 01/01/2022 to today's date and then toggle the 'No Future Appointments Slider'.

- Using Multiple Filters to Refine Search Results
You are able to use all of these filters in conjunction with each other. This means that you can refine the results of the search down to refine a specific list of results. For example, you might want to run the above search but only look for results relevant to a specific practitioner and clients with a particular classification applied. In this case, you would set the above filters up and then simply select the relevant classification (or classifications) and the practitioner that you're wanting to report on.
💡 Filtering Logic Tip: Classification toggles use OR logic (not AND). Selecting multiple classifications finds clients with any of them. Also, if you select no toggles, the search defaults to all clients (not just those with no classifications).
3. Once the roles and filters are selected, click on the Get Clients button to generate the list of profiles to be updated.
How to Update Specific Actions or Fields and Values for Selected Profiles
-
When the list is ready, tick the boxes in front of client names to select all or some of the listed profiles that you wish to update.
-
Under the generated list of profiles, you will see the section that allows you to select which profile action or field and value to update.
-
Select an action or field you'd like to update.
- Select a value.
- Click Apply Update.

Example Use Case: How to mark active clients inactive in bulk:
In Zanda, the closest match for making a client inactive is usually to archive the client profile. Archived clients are hidden from standard searches, while their profile records stay stored in Zanda. If your practice uses Client status for internal workflow labels, you can update that field in bulk instead, or do both as separate updates.
- Go to Tools > Bulk Update.
- In the Advanced Search filters, set Role to Client.
- Use appointment filters to find the right group. For example, set Had an Appointment Between for the active period you want to review, then use No Appointments Between or No Future Appointments to find clients who have not returned or have nothing booked ahead.
- Click Get Clients.
- Select the clients you want to update from the generated list.
- To archive the selected clients, click Archive and confirm the action.
- To update their internal status instead, choose Client status in Select Action or Field to Update, choose the status in Select Value, then click Apply Update.
💡 Tip: Archive and Client status are separate fields. Archiving controls whether a client profile appears in standard searches. Client status is a configurable label your practice can use for its own workflows.

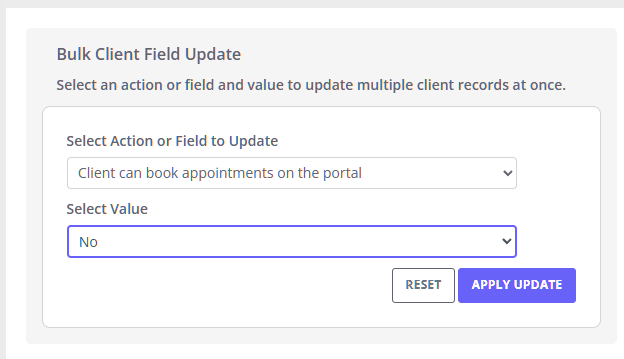
Example Use Case: How to block all archived clients from booking appointments on the client portal in bulk:
- Go to Tools > Bulk Update
- In the Advanced Search filters, set the 'Archived' felter to 'Archived Only'
- Run the search
- Select all clients in the generated list
- In the Bulk Client Update settings
- Select Action or Field to Update: select 'Client can book appointments on the portal'
- Select Value: select 'No'
- Click 'Apply Update'
- This will successfully prevent your archived clients from booking appointments at your practice via your client portal.
Example Use Case: How to update marketing communication status in bulk:
Use this when you need to update the marketing communication status for a filtered group of clients, such as clients who have had an appointment within a specific date range.
💡 Before you opt clients in: Only set clients to Opted In when your practice has confirmed consent or another valid basis to send marketing communications. If consent is not confirmed, leave the client as Opted Out.
- Go to Tools > Bulk Update.
- In the Advanced Search filters, set Role to Client.
- Use the appointment filters to narrow the list. For example, set Had an Appointment Between to the date range you need. You can also use No Appointments Between, No Future Appointments, or Appointment Practitioner when those filters match your audience.
- Click Get Clients.
- Select the clients you want to update from the generated list.
- In Select Action or Field to Update, select Receives marketing.
- In Select Value, select Opted In or Opted Out.
- Click Apply Update and confirm the update.
- Bulk changing the location of existing booked appointments (either across all appointments or for a specific client). The Bulk Update tool updates client profile fields, not booked appointments. If the appointments are part of a recurring series, you can still change the location for the whole series in one step: edit the Location on one appointment in the series, save, then choose All Future Appointments on the Update Recurring Appointment prompt. Appointments that are not part of a series must be updated individually.
- Bulk rescheduling appointments to a different time or date.
- Setting or clearing a default insurer for selected clients. The Bulk Update tool doesn't include an insurer field, so a default insurer can't be assigned to, or cleared from, a group of clients at once. Set or clear the default insurer on each client individually in Billing > Insurance : add or choose the insurer and toggle Default on, or toggle Default off to stop it being applied to new invoices. To have an insurer assigned automatically to a practitioner's clients, switch on Default For All Clients on the practitioner's provider number (User Menu > Account Settings > Team > Practitioners). See Insurers and Provider Numbers for what that setting does to existing clients and how to reverse it.
- Bulk enabling the Send all automation communication toggle for client contacts. This setting lives on each connected contact, so it must be turned on one contact at a time—the Bulk Update tool updates client profile fields only, not contact settings (the same applies to the contact's Send reminders toggle). To enable it, open the client profile > Contacts tab , select the contact, turn on Send all automation communication , and save the changes. See Setting Up New Client Automations for details.

How to Archive and Delete Selected Profiles
- Repeat the above steps to generate a list of profiles you'd like to archive or delete.
- Make sure you ticked the boxes to select which profiles to archive or delete.
- Click on the Archive or Delete* button and follow the prompts to confirm the action.
*Important
- You can unarchive a profile at any time.
- A deleted profile is flagged for deleting by the system, and you have a grace period of 48 hours to restore a profile that was flagged for deleting. After that time, the profile will be deleted without an option to restore.
Related Articles
- Sending Bulk Communications - Learn how to send bulk SMS and email campaigns and filter recipients by marketing communication status.
- Using Advanced Search for Client Reports - Learn how Advanced Search filters work, including appointment history filters.
- Insurers and Provider Numbers - Set a client's default insurer in Billing > Insurance and assign a default insurer to new clients from a practitioner's provider number.