%20-%20120%20x%2044.svg)
By using the calendar filters, you can display and count appointments that match specific criteria such as note status, invoice status, and appointment flags. This feature ensures that appointments needing attention are easily identifiable, making your workflow smoother and more organized.
The filters you can apply include:
- Note Status: Filter by appointments with no note, draft, or completed notes.
- Invoice Status: Filter by appointments with no invoice, unpaid, or paid invoices.
- Appointment Status: Filter by appointment status ( Pending, Confirmed, Arrived, Completed, Rescheduled, Cancelled, Late Concellation, No Show.)
- Appointment Flags: Filter appointments using custom flags you’ve assigned.
- Medicare Claim (for AUS accounts only): Filter client appointments by whether they have an associated active Medicare claim.
- Resources: Filter appointments by resource items allocated to appointments.
- Rooms: Filter appointments by Room items allocated to appointments.
In this article:
- How To Use Calendar Filters
- Filtering by Medicare claims (AU-only)
- Benefits of Using the Calendar Filters
- Frequently Asked Questions
- Related Articles
How to Use Filters
Important Notes:
-
The Calendar Filter feature is available to all users, no special user permission needed!
-
When you select multiple items within a category (e.g. "No Note" and "Draft") the filter will find all appointments that match either of the selected items (it acts as an OR operator).
-
When you select items across categories (e.g. "No Notes" and "No Invoice" and "Resource A") the filter will find all appointments that match both of the selected items from each category (it acts as an AND operator).
-
Click the calendar filters button on the calendar toolbar.
-
Choose the one or more of desired criteria* from the filter options available (note status, invoice status, appointment flags).
-
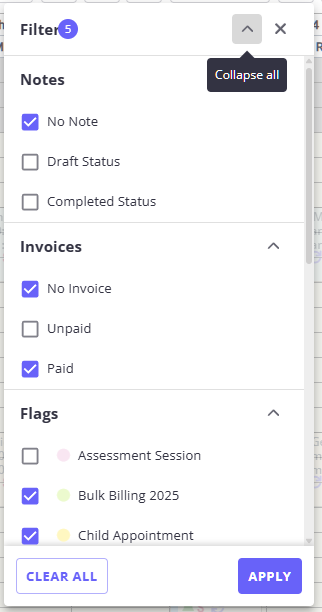
Collapse and expand all filter groups with a single click using the header icon (with “Collapse all” / “Expand all” tooltips).
-
Collapse or expand individual sections to hide filters you’re not working with right now.
-
See how many filters you’ve selected at a glance via a badge next to the filter header that automatically counts your checked items.
- Once you've made the filters selection, click Apply.
-
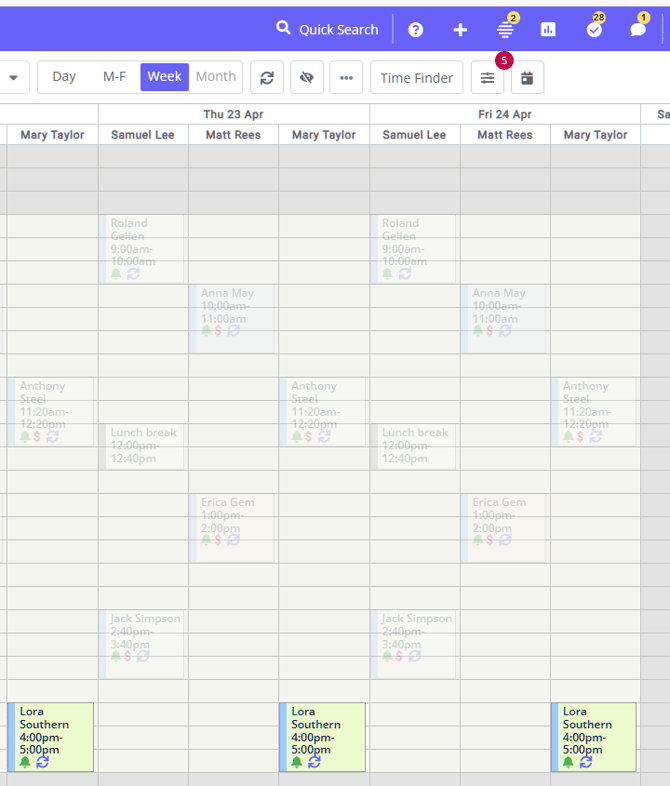
The calendar display view will adjust to show appointments that match the selected criteria. Appointments that do not match the criteria will appear with reduced transparency.
-
Check the filter button counter for a quick overview of how many appointments meet your criteria.
-
To clear the filtered selection, click the calendar filters button again and select 'Clear All'. Close the filters display once done.
💡 Important: Personal and group appointments are only filtered by the Appointment Flag and Resource filters, as note, invoice status, or Medicare claim status do not apply to these types of appointments. Enabling any Medicare claim, note, or invoice filter will show personal and group appointments with reduced transparency so you can focus on matching client appointments. .
Filtering by Medicare claims (AU-only)
If your practice is registered in Australia, you can filter your calendar to show rclient appointments with or without an associated Medicare Australia claim. The calendar filter shows whether a claim exists for the linked appointment invoice; it does not show detailed Medicare claim statuses such as assessed, pended, rejected, or referred.
To filter by Medicare claim status
- Go to the main Calendar page.
- In the top toolbar, select Filter.
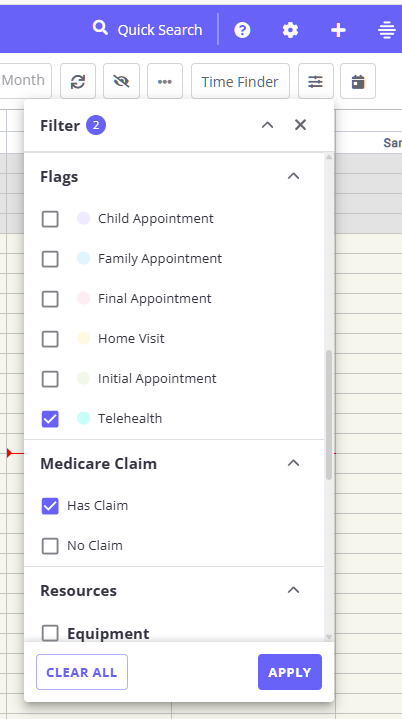
- Scroll down the filters menu to find the Medicare Claim section.
- If the section is collapsed, select the chevron icon to expand it.
- Choose one of the following options:
- To view appointments with Medicare claims, select Has Claim.
- To view appointments without Medicare claims, select No Claim.
- To view all appointments, leave both options unchecked or select both options.
- Select Apply at the bottom of the filters menu.
💡 Combining filters: You can use the Medicare Claim filter together with other calendar filters, such as invoice payment status or appointment flags.
When multiple filters are selected, the calendar will highlight appointments that match all selected filter criteria and show non-matching appointments with reduced transparency .
💡 Clearing filters: To reset your calendar view:
- Open the Filter menu.
- Select Clear all at the bottom of the menu.
- Select Apply.
Frequently Asked Questions
Why can I not see the Medicare Claim section in the filters menu?
The Medicare Claim filter is only available for Australian practice accounts. If your practice country is not set to Australia in User Menu > Account Settings > Practice > Business Info, this section will not appear in the calendar filters menu.
Why did my personal or group appointments disappear when I enabled the filter?
This is expected. Personal and group appointments do not have Medicare claims.
When you apply a Medicare claim, note, or invoice filter, non-client appointments appear with reduced transparency so you can focus on appointments that match the selected filter.
Why is an appointment with an invoice not showing under Has Claim?
An appointment will only appear under Has Claim if an active Medicare claim has been created for the invoice linked to that specific appointment. Check that the Medicare claim has been started and saved for the appointment’s invoice.
Benefits of Using Calendar Filters
Using calendar filters can significantly enhance your workflow by allowing you to:
- Identify Appointments Needing Action: Quickly see which appointments require writing a note, taking a payment, or sending some client documentation.
- Improve Efficiency: Focus on appointments that need immediate attention without getting overwhelmed by the entire schedule.
- Have Better Organization: Keep your calendar organized by highlighting appointments based on your specific criteria.
Frequently Asked Questions
❓ Can I see the Medicare claim status on the appointment screen?
The calendar appointment screen shows whether a client appointment has a Medicare claim through the Medicare Claim filter, using Has Claim or No Claim. To review the detailed status of the claim, open the Medicare claim record instead and use the Medicare Claim Statuses article to understand each status.
❓ Can I hide personal appointments from a specific calendar view?
Calendar Filters are the supported way to reduce personal-appointment clutter, but they do not include a setting that hides only personal appointments while keeping every other appointment visible.
The closest workflow is to use Calendar Filters to focus the current calendar view. Appointments that do not match your selected filters stay on the calendar with reduced transparency, so nothing is deleted or lost. Personal and group appointments can match the Appointment Flags and Resources filters. Note, invoice, and Medicare claim filters apply to client appointments, so personal and group appointments are de-emphasized when those filters are active.
If your goal is to make personal appointments easier to separate from client appointments, add a consistent flag or resource to those personal appointments, then use the Appointment Flags or Resources filter when reviewing your calendar.
❓ Does Hide Unattended Appointments hide personal appointments?
Hide Unattended Appointments applies to unattended appointment statuses, such as rescheduled, cancelled, late cancellation, and no show. Personal appointments use a separate appointment type and are managed through calendar filters, flags, resources, or the personal appointment itself.
❓ Can I show each room as a separate column on the calendar?
Calendar columns are based on practitioner diaries, not rooms or resource items. To focus the calendar on room bookings, set each room up as a resource item, allocate the room to appointments, and use the Resources filter to highlight appointments linked to the selected room.
If you need to compare more than one room, you can open the calendar in separate browser tabs and apply a different room filter in each tab. You can also use the Time Finder to search for available appointment times for a specific room or resource before booking.
❓ Can I filter the calendar by client type or client tag?
The calendar filters do not include a client type or client tag option. Calendar filters focus your view by Note Status, Invoice Status, Appointment Status, Appointment Flags, Medicare Claim (AU only), Resources, and Rooms.
If you want to find or work with a group of clients by client type, filter the client list instead: go to People > Clients > Advanced Search and filter by client type there.
To focus the calendar on a particular service or appointment type, use Appointment Flags as a workaround:
- Set up a flag for each service type you want to filter by (see Managing Appointment Flags).
- Assign the matching flag to those appointments.
- Open Calendar Filters, choose the flag under Appointment Flags, and select Apply.
💡 Keep in mind: each appointment can carry only one flag at a time. If you are already using appointment flags for another purpose, an appointment can't also hold a separate service-type flag, so plan how you assign flags before relying on this workaround.