Using Coloured Appointment Flags
Easily identify appointment types with colored flags in Zanda. Set up, use, and manage appointment flags for clear and efficient calendar organization.
You can use coloured flags for different types of appointments. This will make it easy for you to identify each type of appointment on your Zanda calendar. For example, you can set an initial appointment to be blue in colour, returning an appointment in green, etc.
In this article:
- Setting up a Coloured Flag for an Appointment Type
- Using the Coloured Flag for that Appointment
- Setting a Default Appointment Flag in a Client Profile
- Setting a Client Portal Booking Flag
- Deactivating An Appointment Flag
Setting Up an Appointment Flag and its Colour
Here’s how you can set up a colour flag for an appointment type in Zanda:
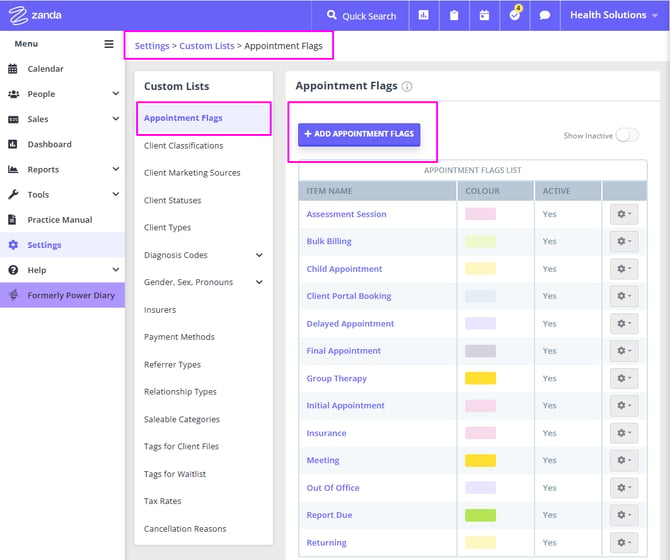
1. Navigate to Settings > Schedule > Appointment Flags.
2. Here, you will have an overview of the already existing flags, and create new ones.
3. Click on +Add Appointment Flags.

4. Name your appointment flag, assign a colour to it and switch it to active. Once done, press Save.

5. Your newly created Appointment flag - along with its colour - will show up in the Appointment Flags List.

Using An Appointment Flag In An Appointment
Here’s how to add an appointment flag in any appointment you create in Zanda:
1. Go to your calendar and create a new appointment.
2. In the Appointment Settings Panel, enter all the details about the appointment and then scroll down until you see the Appointment Details section.
3. Click on Select a Flag and choose your desired appointment flag from the drop-down menu.
4. Click Save to save your new appointment.

You’ll see that it will be displayed with the colour of your appointment flag.

Setting a Default Appointment Flag in a Client Profile
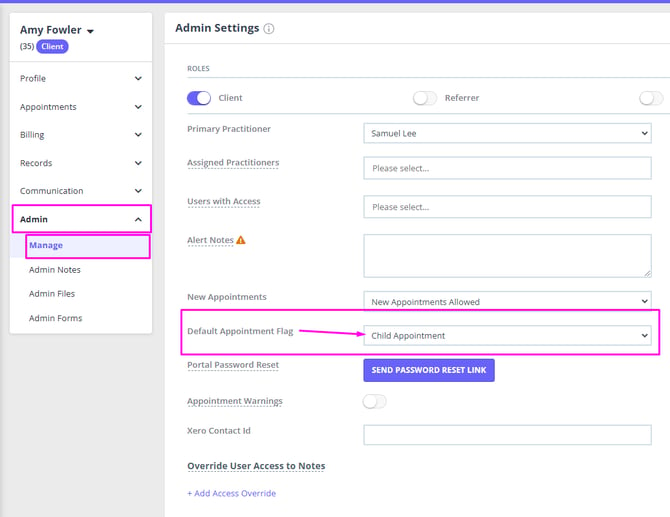
To set a specific appointment flag as the default for one or more clients, navigate to the appropriate client profile and select Admin > Manage > Default Appointment Flag > Select the relevant Appointment Flag > Save.
The selected flag will then default for every appointment for that client profile. Users will be able to manually change the default flag for specific client appointments when needed.

Setting a Client Portal Booking Flag
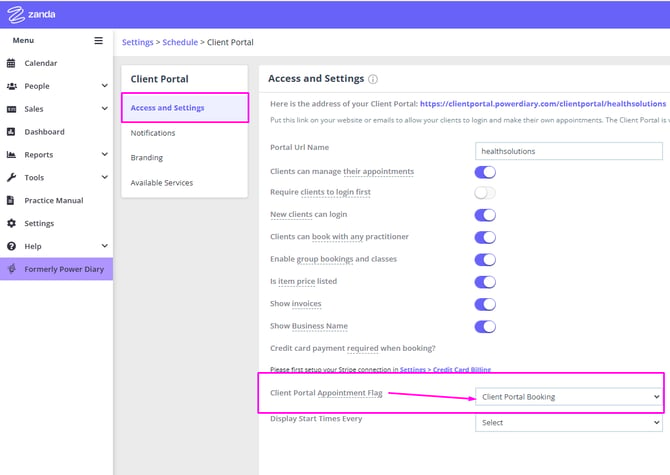
You can set a default colored flag that will be automatically applied to all appointments clients booked via your client portal. This will help you see in a glance which appointments were booked online and might need your attention.
- To set the flag, navigate to Settings > Client Portal > Access and Settings.
- Scroll down to the 'Client Portal Appointment Flag' settings and click the dropdown box next to it.
- Select the flag. (If you do not have the suitable flag, you can create it in Settings > Schedule > Appointment Flags. )
- Save the changes.

Deactivating An Appointment Flag
Deactivating an appointment flag is easy.
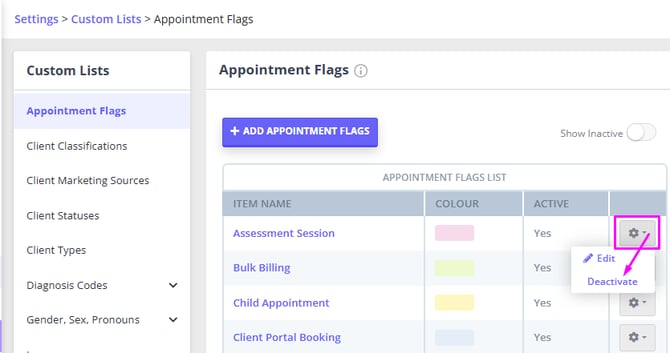
1. Navigate to Settings > Schedule > Appointment FLags.
2. In the Appointment Flags List, search for the Appointment Flag you want to make inactive.
3.Click on the gear icon located on that Appointment Flag’s extreme right and then click Deactivate. This will remove the Appointment Flag from your list.
