%20-%20120%20x%2044.svg)
In this article, we will answer the frequent questions about Zanda integration with Xero.
In this article:
- How Can I Export Invoices and Payments to Specific Sales and Payments Accounts in Xero?
- Can I Send GST-Free and GST-Applicable Services to Different Xero Sales Accounts?
- Can I Export Different Service Categories to Different Xero Accounts?
- Why Do My Xero Export Filters Reset After I Save Xero Settings?
- How Can I Use Xero Tracking Categories with Zanda?
- Does the NDIS Participant Number or Support Item Code Carry Through to Xero When I Export Invoices?
How Can I Export Invoices and Payments to Specific Sales and Payments Accounts in Xero?
- Navigate to Tools > Xero Export > Xero Settings, and select the Xero Sales and the Payment accounts you wish to export to.
If you always export to the same accounts, it is only required to set this up once. However, if you export and track your transactions in different sales and payment accounts in Xero, please update these settings before exporting each batch on invoices and payments. Do not forget to save the changes!
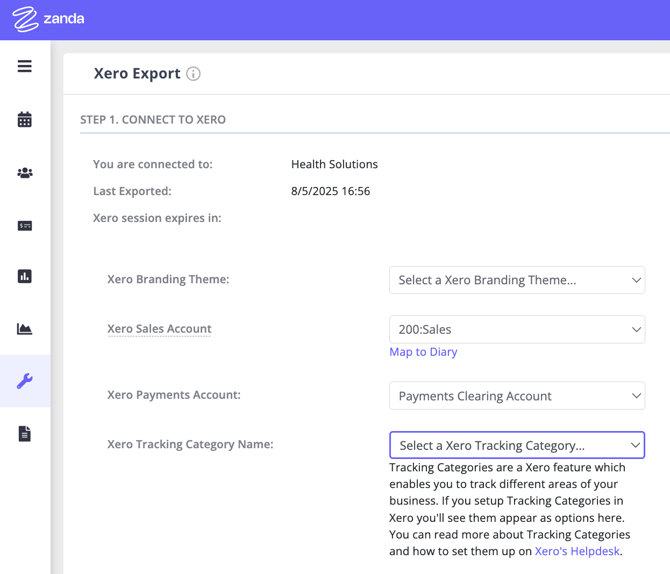
- Use the Map To Diary feature to link Calendars/Practitioner sales to a specific Xero Sales Account. When you map your Calendars to specific Xero Sales accounts, invoices will be exported to the relative accounts based on the provider's Calendar automatically, meaning that you will not need to update the Xero Setup before each export.
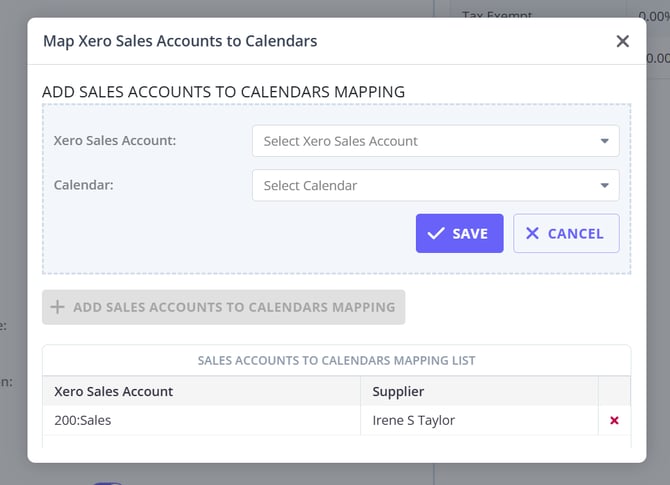
- Navigate to Tools > Xero Export > Xero Settings and click on Map To Diary under the Xero Sales Account dropdown.
- Click on Add Sales Account to Calendars Mapping.
- Select the Xero Sale Account and the Calendar.
- Click the 'Save' button.
Can I send GST-free and GST-applicable services to different Xero sales accounts?
Zanda maps Xero sales accounts by Calendar, not by service or tax rate. If GST-free and GST-applicable invoices are both provided from the same calendar, Map To Diary will send those invoices to the same mapped Xero Sales Account.
You can still map each Zanda tax rate to the correct Xero Tax Type in Tools > Xero Export > Xero Settings. This controls the tax treatment sent to Xero for each invoice line item, while the sales account controls the revenue account used in Xero.
For separate Xero sales accounts, use separate export batches only when your invoices can be separated by an available export filter, such as Location. In that setup, select the relevant Xero Sales Account in Xero Settings, load and export the matching batch, then update the Xero Sales Account before exporting the next batch.
Why Do My Xero Export Filters Reset After I Save Xero Settings?
Save your Xero Settings before you load the invoice or payment batch you want to export. When you click Save in Tools > Xero Export > Xero Settings, Zanda refreshes the Xero Export page, so you will need to select the date range, invoice status, calendar, payment status, and location again before clicking Load Data.
If you regularly export different calendars to different Xero Sales Accounts, use Map To Diary instead of changing the default Xero Sales Account for each batch. Calendar mappings automatically send invoices to the mapped sales account based on the provider's calendar, which can reduce repeated settings changes during the export workflow.
Can I Export Different Service Categories to Different Xero Accounts?
Use the Xero Sales Account, Map To Diary, and Xero Tracking Category settings to control how invoices are organized in Xero. Service categories in Zanda help organize services, including on the Client Portal, but they do not route invoice line items to different Xero accounts.
For example, if you want to report on NDIS services separately from other services in Xero, the best option is usually to:
- Set up the relevant account or tracking structure in Xero.
- In Zanda, go to Tools > Xero Export > Xero Settings.
- Select the Xero Sales Account and tracking category options you want to apply before exporting the invoice batch.
- Use Map To Diary when practitioner or diary-based sales should post to different Xero sales accounts automatically.
Service categories are still useful for keeping your Zanda service list organized, but the Xero export uses the account and tracking settings selected in the Xero export workflow.
How Can I Use Xero Tracking Categories with Zanda?
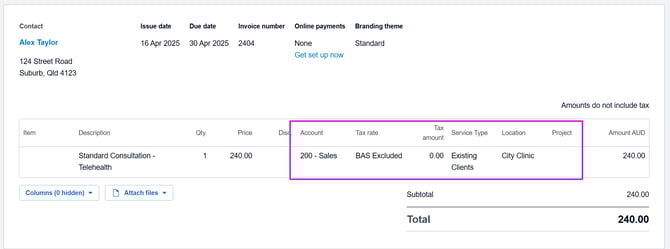
If you set up Tracking categories in Xero, you are able to pre-assign them to Zanda invoices before you export them to Xero. The Xero Tracking Categories can help you track how different areas of your business are performing (such as departments, cost centers, or locations).
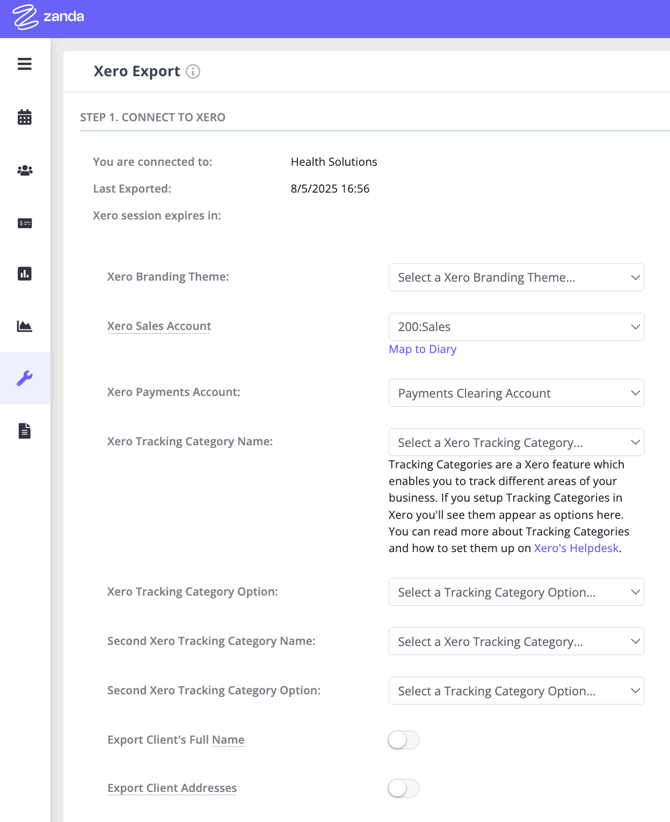
- Navigate to Tools > Xero Export > Xero Settings.
- Select Xero Tracking Category Name and Xero Tracking Category Option.
- If this batch of invoices should also be tracked by the second tracking category in Xero, select Second Xero Tracking Category Name and Second Xero Tracking Category Option.
-
This is what the invoice exported with these Xero Sales accounts, tracking categories, and category options will look like in Xero:
Does the NDIS Participant Number or Support Item Code Carry Through to Xero When I Export Invoices?
No. When you export an invoice to Xero, Zanda sends the client's contact details, the invoice line items (service name, quantity, unit amount, tax, and account/tracking information), and the invoice reference—but the NDIS Participant Number and NDIS Support Item Code are not included anywhere in that export. These fields live in Zanda for NDIS billing and the NDIS Bulk Upload Report, but they don't travel across to Xero.
If you need the NDIS support item code to show up on the exported Xero invoice line, add it directly to the service name in User Menu > Account Settings > Billing > Services (for example, "Standard Consultation - 15_055_0128_1_3") rather than relying on the separate item code field—the service name is what's sent to Xero as the invoice line description, so the code travels with it.
The Xero invoice's Reference field is populated from the client's name (or their de-identified initials and client ID, if you use that setting)—there's no option to populate it with the NDIS Participant Number instead.