%20-%20120%20x%2044.svg)
Adding your Client Portal to your website via either a book now button, link, QR code, or by directly embedding it into your website is a great way to promote client bookings and save you administration time.
In this article:
- Copying the Client Portal URL
- Using your booking link for service-specific campaigns
- Option 1: Adding a Book Now button to Your Website
- Option 2: Embedding the Client Portal in Your Website
- Option 3: Linking to Your Website using HTML code
- Adding Client Portal URL to Your Facebook and Instagram Account
- Adding Client Portal URL to Your Google Profile
- Generating a QR Code For Your Client Portal URL
- FAQs
- Related Articles
The Client Portal allows your clients to directly book appointments with you - without you having to do a thing! In this article, we will give you step-by-step instructions on how to add your Client Portal to your website, socials, Google and marketing materials, using a few different methods.
Tip:
Want to preview how the Client Portal looks on a mobile device? You can simulate smaller screens right from your browser:
-
Chrome:
Go to ⋮ (three dots) > More tools > Developer Tools, then click the 'Toggle Device Toolbar' icon (next to the 'Elements' tab). On the left, click 'Dimensions' and select a device to preview. -
Safari (Mac):
Go to Safari > Settings > Advanced, then tick “Show Develop menu in menu bar”. From the menu bar, go to Develop > Enter Responsive Design Mode and choose a device.
This is a great way to ensure your portal looks just right for clients using phones or tablets.
Copying the Client Portal URL
Before you can add the Client Portal to your website, first you’ll need to copy the Client Portal URL from Zanda.
1. To find your unique client portal URL, simply navigate to User Menu > Account Settings > Schedule > Client Portal > Access and Settings
2. On this page, below the ‘Portal Access’ section, you’ll find the ‘Your Client Portal Link’ block, which holds the unique URL to your Zanda Client Portal.
3. Next to the link, you’ll see the ‘Copy Link’ button. Click it to copy your unique Client Portal URL link. 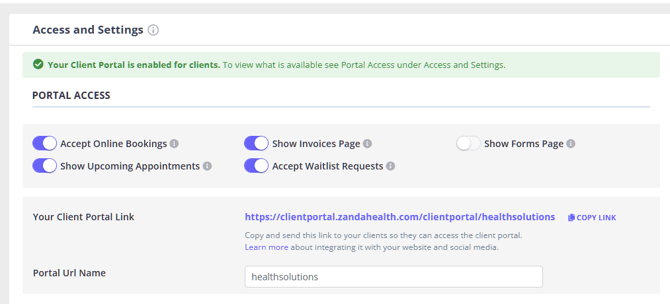
This link will take clients directly to your Client Portal.
Troubleshooting: "Whoops! This page doesn't seem to exist"
If your Client Portal booking link opens a page that reads "Whoops! This page doesn't seem to exist" (with the note "You might be using an invalid link"), the address being opened isn't a valid, current Client Portal link. Common causes:
- The link was copied incompletely, or extra characters were added when it was pasted into a website, email, or social profile.
- An older bookmarked or saved link is being used.
- The link was typed manually instead of copied.
To fix it, re-copy your current Client Portal URL straight from Zanda and replace the old one everywhere you’ve shared it:
- Go to User Menu > Account Settings > Schedule > Client Portal > Access and Settings.
- In the Your Client Portal Link block, below the Portal Access section, click Copy Link to copy your current, unique Client Portal link.
- Paste this fresh link in place of the old one on your website, booking buttons, email signature, and social profiles.
- Open the link yourself to confirm it loads your Client Portal.
If clients still see this message after you’ve shared the freshly copied link, contact Zanda Support with the exact link so we can check it.
Using your booking link for service-specific campaigns
If you are running a Meta ad, Google ad, email campaign, or landing page for a specific service, use your Client Portal booking link as the call-to-action URL and make the advertised service easy to select in the booking flow.
To send clients straight to online booking, add /appointment-booking to the end of your copied Client Portal URL. For example:
- Australia accounts:
https://clientportal.zandahealth.com/clientportal/xxxxxxx/appointment-booking - The USA and Canada accounts:
https://clientportal.us.zandahealth.com/clientportal/xxxxxxx/appointment-booking - The UK accounts:
https://clientportal.uk.zandahealth.com/clientportal/xxxxxxx/appointment-booking
Clients will then choose the location, service, practitioner, and available time. To support a service-specific campaign:
- Make sure the advertised service is available for online booking.
- Use a clear service name and description so clients can recognize it in the service list.
- If you offer many services, use saleable categories so clients can filter the service list.
- Keep the landing page, ad copy, and booking button text aligned with the service name clients will see in the Client Portal.
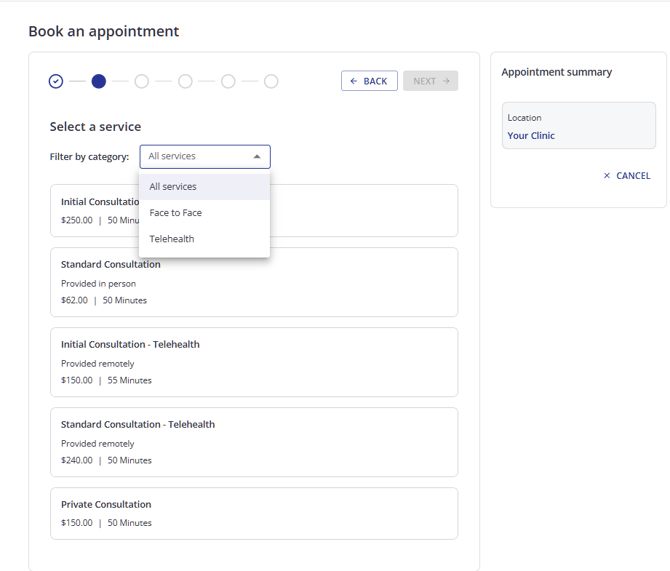
What a booking link can and cannot pre-select
A Client Portal link can send clients straight to the booking flow, and you can control where it drops them and how few steps are left. The one thing a link cannot do is choose the service for them: clients always pick that from the list. Here is what you can control:
- Skip the portal home page. Add
/appointment-bookingto the end of your Client Portal URL and clients land on the booking flow instead of the portal menu (see the examples above). - Link straight to group bookings and classes. If group bookings are enabled on your portal, add
/class-bookinginstead. Clients start on the group booking flow, which has no service step at all. - Know which steps clients can skip. If only one location is available, that step is selected automatically and clients move straight past it, and the same happens when only one practitioner is available. The service step always asks the client to choose, even if you offer a single service.
- Make the right service easy to spot. Use a clear service name and, if you offer many services, saleable categories so clients can filter the list (points 1-4 above).
💡 Online booking must be turned on for these links to work. If online bookings are switched off for your portal, the link opens a page telling the client the portal is not available. You choose which services clients can book online under User Menu > Account Settings > Schedule > Client Portal > Available Services.
Embedding the Client Portal in an iframe (Option 2 below) changes where the portal appears, not how many steps it has. Clients still choose the location, service, practitioner, and time inside the embedded frame.
Option 1: Adding a Book Now button
A book now button is the most straightforward method for adding the Client Portal to your website. You should be able to easily do this depending on how your website is configured and through which service. In this scenario, you’re simply adding the link you copied above to a button that leads to your Client Portal. (If you don’t manage your website yourself simply send the link to your website manager and they should be able to quickly take care of it for you.)
Option 2: Embedding the Client Portal
Embedding your portal is slightly more difficult, but manageable. To do this you simply need to insert the client portal using an iframe. An iframe is an HTML tag that allows you to embed external websites into a webpage.
At its most basic, the iframe should look something like this:
- Australia accounts:
<iframe src="https://clientportal.zandahealth.com/clientportal/xxxxxxx" height="75%" width="75%"></iframe>
- The USA and Canada accounts
<iframe src="https://clientportal.us.zandahealth.com/clientportal/xxxxxxx" height="75%" width="75%"></iframe>
- The UK accounts:
<iframe src="https://clientportal.uk.zandahealth.com/clientportal/xxxxxxx" height="75%" width="75%"></iframe>
Embedding works in current browsers, including Safari on Mac, iPhone, and iPad.
Earlier guidance in this article asked you to swap the iframe for a different snippet because Safari showed a “Your browser doesn’t support cookies.” message. That is no longer the case. The message has been retired, and the Client Portal now sets its sign-in cookie so that browsers accept it while the portal is inside an iframe on another website. Use the full iframe shown above, and if you applied the older snippet, replace it with the full iframe.
Very old browsers are the exception. Safari on iOS 12, Safari on macOS 10.14, and Chrome versions 50 to 69 will not accept the portal’s sign-in cookie inside an iframe, so a client on one of those browsers sees an error page reading “This website does not work in your browser version” rather than the portal. If you need to support clients on browsers that old, send them to the Client Portal with a Book Now button (Option 1) or an HTML link (Option 3) instead of embedding it, so the portal opens as a page of its own.
Option 3: Linking using HTML code
Let’s say you have a paragraph of text on your website explaining how easy it is to book appointments with you. You may want to insert a link to your Client Portal within that text so clients can click straight through and make a booking.
Depending on the website builder you use you may simply be able to highlight the text in your paragraph and click on an ‘add link’ button.
It might look something like this, and you can then just add the link you copied above:

If you don’t have this option you can do the same thing. You’ll just have to add some simple HTML code that tells web browsers that the text is a link, and what it should do if someone clicks on it. Here’s how you can do that:
Enter your Client Portal URL copied above into this HTML code:
<a href="Insert Client Portal URL Here" target="_blank"> Book Now </a>
Once you do that, your HTML code should look something like this:
for AU: <a href="https://clientportal.zandahealth.com/clientportal/xxxxxxx" target="_blank">Book Now</a>
for the US/CAD <a href="https://clientportal.us.zandahealth.com/clientportal/xxxxxxx" target="_blank">Book Now</a>
for the UK <a href="https://clientportal.uk.zandahealth.com/clientportal/xxxxxxx" target="_blank">Book Now</a>
This code is designed to open the Client Portal in another tab. This way, your website remains open and your clients can return to it after they are done booking an appointment.
If you don’t want the Client Portal to open in another tab, simply omit the target=“_blank” part of the HTML code like this:
for AU: <a href="https://clientportal.zandahealth.com/clientportal/xxxxxxx">Book Now</a>
for the US/CAD <a href="https://clientportal.us.zandahealth.com/clientportal/xxxxxxx">Book Now</a>
for the UK <a href="https://clientportal.uk.zandahealth.com/clientportal/xxxxxxx">Book Now</a>
Doing so will open the Client Portal in the same window as your website.
Pro-Tip 💡
You can replace the ‘Book Now’ text with anything you want. For example, you can edit it to say ‘Click Here To Book an Appointment’ and it would look like this:
for AU <a href="https://clientportal.zandahealth.com/clientportal/xxxxxxx" target=“_blank>Click Here To Book an Appointment</a>
for the US <a href="https://clientportal.us.zandahealth.com/clientportal/xxxxxxx" target=“_blank>Click Here To Book an Appointment</a>
for the UK <a href="https://clientportal.uk.zandahealth.com/clientportal/xxxxxxx" target=“_blank>Click Here To Book an Appointment</a>
Once you have this link, you can paste it inside any HTML text area of your website. And that’s it.
In a few simple steps, you’ve successfully embedded an HTML link to the Zanda Client Portal on your website. Once your clients click on this link, they will be taken to the Client Portal, where they will be able to easily book an appointment at any time.
Adding Client Portal URL to Your Facebook and Instagram Account
You can use your Zanda Client Portal URL to add it to your Facebook account Intro page as a website
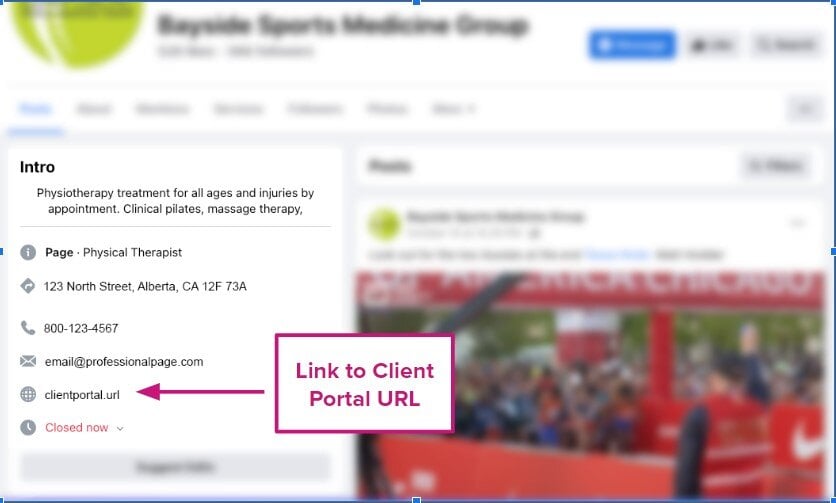
Adding Client Portal URL to Your Google Profile
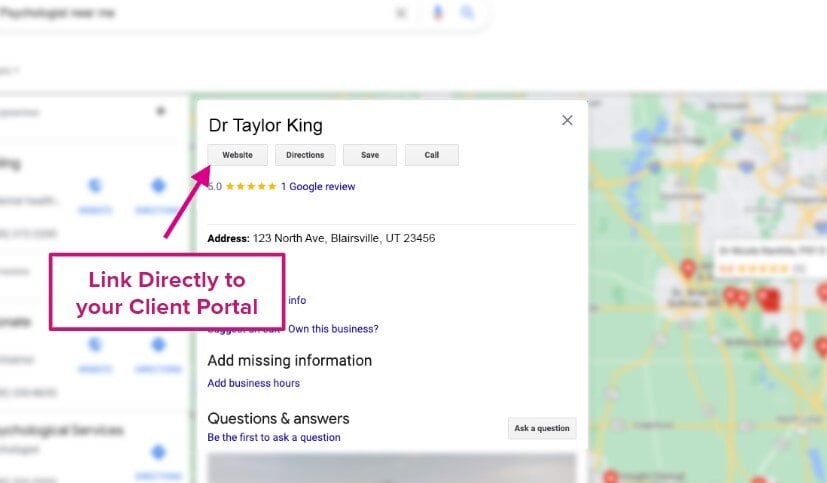
You can use your Zanda Client Portal URL to add it to your Google Profile account settings as a website:
Generating a QR Code For Your Client Portal URL
For enhanced visibility and ease of access, you can create a QR code that opens your Client Portal URL. Use the same link you copied from Your Client Portal Link in Zanda, then place the QR code on printed marketing materials, business cards, flyers, signs, or emails.
- You can generate a QR code using one of the free online tools. Search for "Free QR Code generator" in your web browser, paste your Client Portal URL, and download the QR code image.
- One of the easy ways to create your own marketing materials is with Canva.
It takes less than 2 mins from start to finish, just follow these steps:
- Go to Canva
- Create a Design > Type A4; You’ll see ‘French Flyer’. Choose it.
- Go to Apps and search for QR code. Click it, paste your Client Portal URL, and click Generate code.
- Add a heading text box with the text: “Book your next appointment online.”
- Add a subheading under the QR code: “Scan this QR code with your mobile phone and save it for later”.
- Design the document with your brand colors, and add your logo and your name.
Note💡
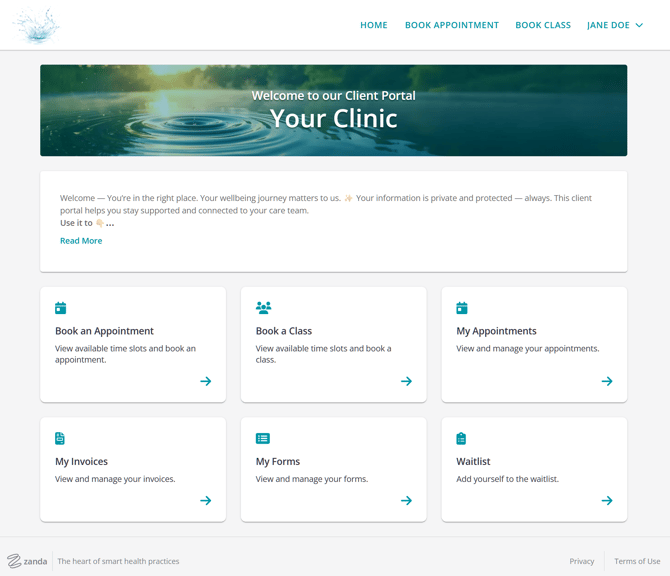
Below is an example of what your Client Portal might look like:
Can clients book through the Client Portal without registering or signing in (as a guest)?
Clients cannot book appointments through the Client Portal as a guest. They must register for an account or sign in before completing a booking.
You can choose when clients are prompted to log in or register:
- Immediately after clicking the "Book Appointment" button, or
- At the end of the booking process when they confirm their appointment.
To make registration quick and easy, clients only need to provide their name, email address, and mobile number to create an account.
❓ Can I create a link that opens a specific appointment type or service?
To point a campaign at one service, use your booking link as the call-to-action and make that service easy to find in the list: give it a clear name and description, and use saleable categories so clients can filter. The link itself opens the booking flow rather than a particular service, so the client makes that choice. See What a booking link can and cannot pre-select above for the links available and the steps clients can skip.
Related Articles
- Setting Up Online Bookings on Client Portal - Configure booking rules, payment requirements, booking flags, and triage options for Client Portal appointments.
- What Are the Saleable Categories For? - Use saleable categories to group services and help clients filter the Client Portal service list.
- Adding and Editing Services - Create service names, descriptions, categories, and Client Portal availability settings for online bookings.