The Zanda Client Portal provides your clients with a secure, convenient online experience where they can manage appointments, submit forms, pay invoices, join your practice waitlist and stay connected with your practice.
This guide helps you understand how clients log in, how they reset or update their password, and how your team can configure portal access settings to ensure a smooth, frustration-free experience.
In this article:
- For Clients: Logging In to the Client Portal
- For Clients: Resetting Their Password
- For Practice Administrators: Configuring Client Portal Access
- Common Scenarios & How to Handle Them
- Understanding Contact Registration Logic
- Frequently asked questions
- Related articles
For Clients: Logging In to the Client Portal
What Clients Can Do After Logging In
Once authenticated, clients can (based on your portal settings):
-
Book new appointments and classes
- View and manage upcoming appointments
-
Complete intake and consent forms, and update their personal details, depending on your settings
-
Download previously submitted forms
-
View invoices and make online payments
-
Join telehealth sessions
- Join your waitlist
Having all of these tools in one place reduces administrative overhead and gives clients control over their own experience.
How Clients Log In
Step 1: Open the Login Page
Clients can access the login screen by:
- Following the Client Portal link you provide in emails or on your website
-
Clicking Log in at the top of your Client Portal home page, or
-
Selecting any portal feature that requires login (e.g., “Book Appointment,” “Book Class")
This flexibility ensures clients can reach the login flow naturally as part of their activity.
Step 2: Enter Email and Password
Your client must enter:
-
Email address — this must match what your practice has stored in their profile
-
Password — created during previous login or via password reset
Clients can also select Remember me:
-
Checked → stays logged in for up to 14 days
-
Unchecked → logged out automatically when closing the browser
Step 3: Log In
After entering credentials, clicking Log in unlocks access to all their available features.
Security Behaviors Clients Should Know
Failed Login Attempts
For security, Zanda automatically protects against repeated incorrect logins:
-
Clients have 3 attempts
-
After 3 incorrect attempts, the account is locked for 5 minutes
-
They will see:
“Maximum number of attempts exceeded, please try again in X minute(s).”
This prevents unauthorized access and protects client information.
If a Client Gets Locked Out
Clients simply need to:
-
Wait the required time
-
Try logging in again with the correct password
-
Use password reset if unsure
No manual unlocking from admins is required.
For Clients: Resetting Their Password
Clients can reset their password at any time, whether they are logging in for the first time or have simply forgotten it.
Zanda provides two password reset options:
-
Self-service password reset (most common)
-
Password reset link sent by the clinic
Both include multi-factor verification (via SMS or email) for security.
Option 1: Self-Service Password Reset
This is the easiest and fastest way for clients to create or replace a password.
Step 1: Start the Reset Process
At the login screen, clients click: “Click here to reset your password.”
Step 2: Enter Personal Details
Clients must enter:
-
First Name
-
Last Name
-
Email address (must match your records)
-
Mobile number (if SMS verification enabled)
-
New password + confirmation
A password strength indicator helps clients create a secure password.
Why this matters:
These details ensure the correct client is verified and prevent unauthorized resets.
Step 3: Request Verification Code
After entering details, clients click Get verification code.
They’ll receive the code via:
-
SMS, if your practice uses SMS verification
-
Email, if set to email verification
- Clients can resend the verification code if they didn't receive it.
- If the portal shows Message request limit exceeded, ask the client to wait before selecting Resend the verification code again. If needed, use email verification instead and have the client request a new code.
Tip: Tell clients to check spam/junk folders if they don’t see the email immediately.
Step 4: Verify and Log In
To finish:
-
Copy the verification code from the email or SMS you received from your practice
-
Type the verification code into the portal
-
Click Register
-
Automatically log in with their new password
No additional login step is required.
Option 2: Password Reset Link (Sent by the Clinic)
Clinics may also send a reset link to clients who are having difficulty. This is a useful next step when an existing client is trying to register or book through the Client Portal, but the portal says the account already exists or the client's information does not match your records.
Sending the link manually:
- Find and open the client's profile > Admin > Manage
- Click the 'Send Password Reset Link' button
- Confirm the action
Zanda sends the link to the email address saved on the client's profile. Ask the client to use that link to set their portal password, then log in before booking.
Sending the link with communication template:
- Go to Tools > Communication > Templates and create new or open existing SMS or email template to edit.
- Insert the {PortalRegistrationLink} merge field in your template body text where fits. This merge field generates a link for existing clients in your Zanda account to register or reset their client portal login details.
- Send this SMS or email manually when needed or add it to one of your automation workflows.
What Clients Need to Know:
-
The link arrives via email which is saved in their client profile > Details page.
-
It opens the portal directly to the password reset screen
-
The link is time-limited for security
-
If it expired, clients can request a new link or use the self-service option
- The client will enter the new password, and confirm it
Once they set their new password and verify with a code, they’ll be logged straight in.
For Practice Administrators: Configuring Client Portal Access
This section explains how your practice controls who can access the portal, how clients verify their identity, and what clients can do once they log in.
Where to Configure
Go to User menu > Account Settings > Client Portal > Access and Settings. All portal access controls are managed from this page.
Allow New Clients to Register
Controls whether brand-new clients (not yet in your system) can create accounts.
ON
-
Both new and existing clients can log in
-
Clients see Register and Log In
-
Useful for practices accepting new clients
OFF
-
Only existing clients can access the portal
-
New visitors see:
“This portal is only available for existing clients.” -
Registration button is greyed out
Use this when:
You do not want new clients creating profiles without an intake process.
Require Clients to Login Before Viewing Services
Controls whether clients need to login before browsing availability or services.
ON (Recommended for privacy)
-
Clients must login before seeing services, prices, or availability
-
Ideal for sensitive services, private clinics, or specialty practices
OFF
-
Clients can browse without logging in
-
They must log in only when they’re ready to book
Important Note: If you disable "Allow New Clients to Register," Zanda automatically enables the 'Require Clients to Register/Log in First' setting to prevent new visitors from accessing your portal.
Verification Method (SMS or Email)
Determines how clients receive verification codes during registration and password resets.
SMS Verification
-
Requires valid client mobile numbers
-
Faster and more secure
-
Ideal for highly identity-sensitive practices
Email Verification
-
Uses the client's stored email
-
Works even without a mobile number
-
Most flexible option
Automatic Fallback
If SMS is unavailable, Zanda automatically switches to email.
Portal Access Features
You decide what clients can do after logging in:
-
Accept Online Bookings
-
Show Invoices Page
-
Show Forms Page
-
Show Upcoming Appointments
-
Accept Waitlist Requests

Important:
At least one of these must be enabled for the portal to be useful.
Common Scenarios & How to Handle Them
1. Existing Client Logging In for the First Time
If a client has never created a portal password:
-
They click Log in
-
Then click reset your password
-
Enter their details
-
Create a password
-
Receive a verification code
-
Log in automatically
👍 This process replaces the need for clinics to manually issue passwords.
2. Client Forgot Their Password
Same as above — the self-service reset handles it quickly.
👍 Encourage clients to reset rather than guess, to avoid lockouts.
3. Client Locked Out After Too Many Attempts
Clients must:
-
Wait 5 minutes
-
Try again or reset their password
👍 No action from staff is needed.
4. Portal Should Be Available Only to Existing Clients
Set Allow New Clients to Register = OFF.
👍Zanda automatically restricts access appropriately.
5. Practice wants to change or remove a client's portal email or booking access
A client portal login uses the email address stored on the client profile, so manage portal access from the client profile controls.
Use the Profile Details page to update the client's Email field, then click SAVE CHANGES. To help the client set up or reset their portal login after the email is correct, go to Admin > Manage and use Portal Password Reset. If you only need to stop the client from booking online, go to Admin > Manage > Allow New Appointments and turn off Client can book appointments on the portal.
If updating the profile is blocked or you see an email-address error, contact the Zanda support team.
Existing client sees a details mismatch
If an existing client sees "The information you provided does not match our records. Please verify the information.", Zanda could not connect what they entered to an active client profile. This can happen even when the details look identical, because the portal matches on a specific set of fields. Work through these checks:
- Confirm the client's profile is active. Zanda only matches a portal login to active client profiles. If the client's profile has been archived, no attempt will ever match — regardless of the details entered. Restore the profile from your archive first, then ask the client to try again. This is the most common cause of an "everything looks identical but it still won't match" report.
- Check the name against the saved profile. Zanda matches on First Name and Last Name. Capitalisation doesn't matter, but a different spelling, a typo, an extra space, a missing or extra middle name typed into the first-name box, or a maiden vs married surname will stop the match. Compare against the exact names saved on the profile.
- Match the field your verification method uses.
- If your Client Verification Method is Email, the client must enter the email address saved on their profile — a different or old email will not match.
- If your verification method is SMS, Zanda matches on the mobile number instead, and the email is not checked. Make sure the mobile number the client enters is the same one saved on their profile; a different or outdated number will stop the match even when the name and email are correct.
- Check for a duplicate profile. If the client has more than one active profile with the same name and matching detail, the portal can't tell which one to use and shows a "please contact [your practice] for assistance" message instead of the mismatch message. Merge or archive the duplicate so only one active profile remains, then ask the client to try again.
If the details are correct and the client still can't get in, send them a reset link from the client's profile > Admin > Manage > Send Password Reset Link (see Option 2 above). This lets the client set their portal password directly against their profile without going through the self-service match step.
When Allow New Clients to Register is turned off, the portal only allows existing clients to continue, so a single matching active profile is required before a client can log in or book.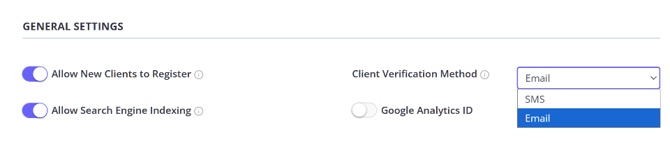
We have updated the registration process on the Client Portal to make it easier for existing contacts (such as parents, guardians, or partners) to access services. This feature ensures that when a contact registers as a new client, or uses the Forgot Password option, their details are matched to an existing contact profile in Zanda account , instead of creating a duplicate profile.
When a person
-
registers on your Client Portal as a new client using their Name and Email (or Mobile Number):
- The system searches their existing records.
- If it finds a matching "Contact" profile, it recognizes this is the same person.
- Automatic Profile Upgrade: Instead of creating a duplicate profile, the system links them to their existing Contact profile.
- Result: The person can log in and continue using their existing contact profile for client portal bookings on behalf of their connected clients.
-
is an existing Contact in you Zanda account and they decide to reset their password in the Client Portal or via the Password Reset link which you can email them, the system will also match their details to the existing contact profile and they will continue using their existing contact profile for client portal bookings on behalf of their connected clients.
Frequently asked questions
❓ Can I copy a client's password reset link without sending an email?
No. The Send Password Reset Link button on the client profile is designed to email the reset link to the email address saved on the client's profile. If you want to send the link another way, add the {PortalRegistrationLink} merge field to an SMS or email communication template so Zanda generates the client portal registration or reset link when the message is sent.
Related Articles
- Available Merge Fields for Communication Templates - Review the merge fields you can add to SMS and email templates, including
{PortalRegistrationLink}. - Client Portal Registration for New Clients - Learn how client portal registration links work for new clients.