%20-%20120%20x%2044.svg)
This article will show you how to create communication templates. By creating a communication template, you can reuse consistent text for client emails, SMS messages, and letters. For example, a saved letter template can be selected when you create a new client letter or referrer letter, so you can start from approved wording instead of typing the letter from scratch.
Your Zanda account comes preloaded with commonly used communication templates. Go to Tools > Communication > Templates to review the templates, and configure them for your practice before creating one from scratch.
In this article:
- Creating Your Own Communication Template
- Using BizzyAI: Write to Create and Refine Templates
- Editing and Cloning Your Communication Templates
- Testing a template before sending it
- Adding Merge Fields To Your Communication Templates
- Managing Active and Inactive Communication Templates
- Troubleshooting Merge Fields Not Populating
- Frequently Asked Questions
- Related Articles
Creating Your Own Communication Template
There are three types of templates you can create:
- SMS
- Letter
To create a new template, please follow these steps:
- Go to Tools > Communication > Templates.
- Click the + New Template button at the top-left.
- Select the message type: Email, SMS or Letter
- Enter the Name of your template, and a clear Description so your team knows when to use it. If you're creating an email template, you will also need to enter the From Email Name, From Email Address, and the Email Subject. The From Email Address is also where client replies are sent — so enter the address you want replies to be received at.
- About Email From Name and Email From Address These fields are stored individually on each email template — there is no single global setting that controls them across all templates. If you need to update the Email From Name or Email From Address across multiple templates, you will need to edit each one separately:
- Go to Tools > Communication > Templates
- Click the gear icon next to the template → select Edit
- Update the Email From Name and/or Email From Address fields
- Click Save
- Repeat for each template you want to update
- About Email From Name and Email From Address These fields are stored individually on each email template — there is no single global setting that controls them across all templates. If you need to update the Email From Name or Email From Address across multiple templates, you will need to edit each one separately:
- Type the template text in the Content box. Use the Toolbar buttons to format the text and add images, tables, links, and files to the content of the template.
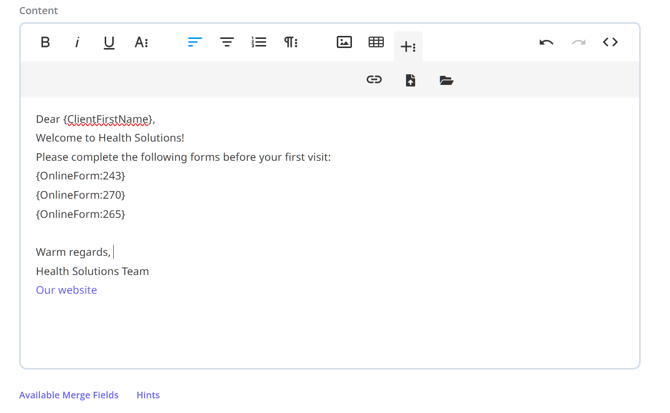
Creating a letter template
Letter templates are useful for standard client letters, referral updates, discharge summaries, certificates, and other written communications you send from a client profile.
- Go to Tools > Communication > Templates.
- Click + New Template.
- Select Letter as the message type.
- Enter a template name and description that make the purpose clear, such as the letter type, recipient, or workflow it supports.
- Add the letter content in the Content box.
- Add merge fields for information that should populate when the letter is created, such as client, recipient, referrer, business, appointment, or user details.
- Click Save & Preview to check how the letter will appear as a PDF document.
- Click Save.
After you save the template, it becomes available when you create a new letter from a client profile, including client letters and referrer letters. You can still edit the letter before saving, printing, exporting, or sending it.
❓ What is the default font color for letter templates?
Zanda does not save a separate default hex color on unformatted letter template text. The letter uses the HTML styling saved in the Content box, then applies the standard print styling when you click Save & Preview, print, export, or send the letter.
If your practice needs a specific brand color, highlight the text in the Content box, click the text color icon in the editor toolbar, and enter the hex code you want to use. Click Save & Preview to check how the letter will appear as a PDF document.
❓ What should I check if letter formatting changes after saving?
Letter templates save the HTML content from the Content box, then apply print styling when you click Save & Preview, print, export, or send the letter. If paragraph spacing, fonts, or other formatting look different after saving, check the saved template before using it with a client:
- Reopen the letter template from Tools > Communication > Templates.
- Click Save & Preview to confirm how the saved template will appear as a PDF document.
- For paragraph spacing, use Enter to start a new paragraph with extra spacing, or Shift + Enter to start a new line with single spacing.
- If you copied content from another document, use Code View (
< >) to check whether pasted HTML is affecting the layout. You can also paste the text again without external formatting, then reapply fonts, colors, spacing, and alignment in the Zanda editor.
If the template still loses formatting after you save and preview it, take a screenshot of the editor and the preview, note which formatting changed, and contact support so the team can check the saved template.
❓ How do I keep a footer at the bottom of every page in a letter template?
Letter templates don't have a separate page-footer region. A letter is built as one continuous document, so any text or image you add at the end sits directly after your content—where it appears depends on how long the letter is, rather than being anchored to the bottom of each page. This is expected behavior, not a formatting fault, and there's currently no setting that pins a repeating footer to the bottom of every page of a letter.
If you need a footer that always sits at the bottom of the page, you have a couple of options:
- Add the footer in Word. Create the letter from the client profile as usual, then download it as a Word document. Word supports true page footers, so you can add your footer there and it will repeat at the bottom of every page. Print or attach the finished document from Word.
- Include the details in the letter body. If the information just needs to appear once at the end of the letter, rather than on every page, type it at the bottom of the Content box, or add it via a merge field such as {UserSignature} for a signature.
Note: the Custom Text for Invoice Footer setting (User Menu > Account Settings > Billing > Invoices) applies only to invoices and statements—it does not carry across to letters.
If a built-in page footer for letters would help your practice, let us know through the Customer Ideas Portal (Help menu > Submit an Idea) so we can factor it into future planning.
💡 Tip: For signatures, add the {UserSignature} merge field to email or letter templates. When the logged-in user has uploaded a signature to their user profile, Zanda merges the signature image into manually created emails or letters.
You can add a letterhead or a business logo as an image to the top of your email or letter template.
-
In the Content block, click the Insert Image button on the toolbar'.
-
Depending on the format of the letterhead or logo image you have available, you can either
-
upload it from a storage folder on your device;
-
paste the image link
-
Or, if you already uploaded this image to your Zanda communication templates, select the image from the browse folder.
-
BizzyAI: Write is an AI-powered writing assistant that can help you create and refine your email and letter templates. This feature is available when editing Email or Letter templates (not available for SMS).
💡 Note: BizzyAI: Write requires the "Enable AI Features" add-on to be active in your account subscription. Navigate to User Menu > Account Settings > Practice > Subscription > Optional Features > BizzyAI Features to enable this feature. It is included with all Zanda accounts at no extra cost.
- When creating or editing an Email or Letter template, look for the AI Write button in the editor toolbar.
- Click it to open the BizzyAI: Write assistant.
- Type your instruction (e.g., "Write a professional appointment confirmation email" or "Make this more friendly").
- Review the AI-generated content and make any adjustments by continuing the conversation with BizzyAI.
- Click Replace to update your template content, or Insert to add the text at your cursor position.
💡 Tip: You can also select existing text in your template and click AI Write to improve, shorten, or change the tone of specific sections.
For more detailed information, see BizzyAI Write for Communication Templates.
Editing and Cloning Your Communication Templates
You are able to edit an existing template, or clone it to create a new template with the same settings and content, for further adjustment. Here is how:
1. In Tools > Communication > Templates, locate the template you need to edit or clone.
2. Click on the gear icon in the last column.
3. Select Edit to open this template settings and edit it, or
4. Select Clone to create an identical copy of this template for further adjustment.
Testing a template before sending it
Test email and SMS templates from a client profile so Zanda can merge the template in the same context clients will receive it. The template editor is for creating and saving templates, while the client communication workflow is where you select recipients, choose an appointment if needed, review the merged message, and send it.
To test an email or SMS template:
- Create or confirm a test client profile that uses your own email address or mobile number.
- Go to the test client profile.
- Open Communication > New Email or Communication > New SMS.
- Select the template you want to test.
- If the template uses appointment-specific merge fields, select the related appointment so Zanda can populate the appointment details.
- Review and send the message.
Letter templates work differently. When you create or edit a Letter template, click Save & Preview to preview the letter as a PDF document before using it with a client profile.
💡 Tip: If a template contains appointment-specific merge fields, use it from an appointment-related workflow, such as a manual appointment reminder or a client profile communication where you can select the related appointment. For general client emails or SMS messages, use client-level merge fields instead.
Testing a template before sending it
Test email and SMS templates from a client profile so Zanda can merge the template in the same context clients will receive it. The template editor is for creating and saving templates, while the client communication workflow is where you select recipients, choose an appointment if needed, review the merged message, and send it.
To test an email or SMS template:
- Create or confirm a test client profile that uses your own email address or mobile number.
- Go to the test client profile.
- Open Communication > New Email or Communication > New SMS.
- Select the template you want to test.
- If the template uses appointment-specific merge fields, select the related appointment so Zanda can populate the appointment details.
- Review and send the message.
Letter templates work differently. When you create or edit a Letter template, click Save & Preview to preview the letter as a PDF document before using it with a client profile.
💡 Tip: If a template contains appointment-specific merge fields, use it from an appointment-related workflow, such as a manual appointment reminder or a client profile communication where you can select the related appointment. For general client emails or SMS messages, use client-level merge fields instead.
Adding Merge Fields To Your Communication Templates
Merge fields is a powerful feature that lets you automatically add custom information to your templates.
When using communication templates that include appointment-specific merge fields (e.g., templates for sharing telehealth links), ensure you send the messages:
- As a manual reminder through the appointment panel or
- From the Client Profile > Communication > New Email or New SMS while selecting the related appointment.
⚠️ Sending these messages via the Text Messaging Panel on the Calendar will not populate appointment-specific details, including telehealth links.
❇️ To save time and ensure accuracy, consider setting up Pre-Appointment Automations for these communications.
- Here’s what a merge field looks like:
{ClientFirstName}
If you add this to your template, this merge field will automatically detect the client’s name, and replace itself with it. Let’s take this template as an example:
Hello {ClientFirstName},
This is a courtesy email to confirm your appointment.
When you send this template to a client named ‘John’, here’s what it will look like:
Hello John,This is a courtesy email to confirm your appointment.
Note:
Merge fields will only work when inserted in a template located in Tools > Communication > Templates. They won’t work if you paste them directly into the actual email you plan to send.
- To add merge fields to your templates, follow these steps:
- Go to Tools > Communication > Templates.
- Open an existing template or create a new one.
- Click on the Available Merge Fields button on the bottom-left corner of the text editor.
- Scroll the list to find the merge field of your choice. Move your mouse to the code and you’ll see the Copy option appear. Click it to copy the merge field to your device's clipboard to paste later.
- Copy/paste the code into your template in the exact location where you want the text to appear. Click Save.
- Use the available merge fields feature to add online form merge fields to your communication templates:
1. Find the necessary form link and copy it to paste to the communication template:
2. Return to your template and paste the online form merge field where you want the link to appear. This merge field will generate a unique online form in the client’s profile whenever you use this email or SMS template, and will automatically add a clickable link to the message that is sent to the client.
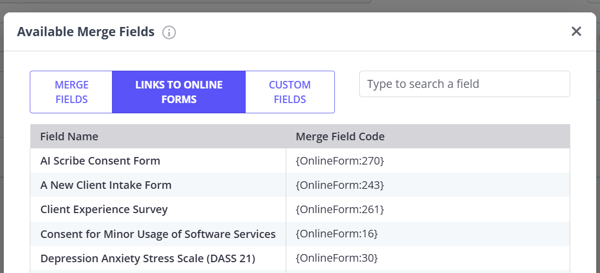
Note💡When working on Letter templates, use the 'Preview Template' feature to see how the letter will appear as a PDF document. Just click on the Save & Preview button at the bottom-right of the template setup page.
Managing Active and Inactive Communication Templates
- Zanda allows you to hide unused templates by making them inactive.
- In Tools > Communication > Templates, click on the gear icon next to a template you wish to make inactive.
- Select Deactivate and confirm the action.
This will make the template inactive and you will not see it in the list of your templates on this page, or when selecting a communication template when creating an SMS, email or letter.
- Should you wish to start using an inactive template again,
- go to Tools > Communication > Templates,
- turn on the Show Inactive switch at the top-right,
- Click on the gear icon next to a template you wish to make active. (It will have 'No' showing in the 'Active' column)
- select Activate.
Troubleshooting Merge Fields Not Populating
If you've added merge fields to a letter or email template but they're showing up in the final message as plain text (e.g. {ClientFirstName}), it's likely due to a formatting issue in the template's HTML or styling code.
To check:
-
Edit the template.
-
Click the Code View (
< >) button in the editor. -
Look for the merge field in the HTML.
If you see that the merge field is broken up by styling tags, like this it won’t populate correctly:
{Invoi<span>cePDFLink}To fix it, make sure the entire merge field is kept together, like this:
<span>{InvoicePDFLink}</span>
Keeping the merge field in one piece ensures it merges properly when the message is sent.
Frequently Asked Questions
❓ Why didn't my email template send when I clicked Save?
Clicking Save creates or updates the reusable template only. To send a saved email or SMS template to a group of clients, go to Tools > Communication > Bulk Send, select the template, click Choose Recipients, add the clients you want to include, and click Send Message. Bulk Send uses email and SMS templates for client communications; letter templates are created and saved in Tools > Communication > Templates, then selected from the letter workflow when you create a client or referrer letter.
❓ Can I use a specific template for Medicare (AU) claim emails?
Yes. Any active email template can be set as your Medicare Email Template under User Menu > Account Settings > Billing > Invoices. Once set, it is pre-selected whenever you email a submitted Patient Claim, Bulk Bill Claim, or DVA claim. See Customising Your Invoices/Receipts.
❓ Can I preview an automation email template?
Use the template editor to review automation email and SMS templates in Tools > Communication > Templates. Open the template, check the Email Subject and Content fields, and use Available Merge Fields to confirm the merge fields you inserted. When the automation sends the email, Zanda replaces the merge fields with the relevant client, appointment, or practice information.
The Save & Preview button is available for Letter templates only. Use it when you need to check how a letter will appear as a PDF document.
❓ Can I export or download my communication templates?
Communication templates (email, SMS, and letter) can't be exported or downloaded as reusable template files, and there's no option to transfer them in bulk between accounts. If you need the same templates in another Zanda account, recreate them there: open the template you want (gear icon > Edit), copy the content, then paste it into a + New Template in the other account.
A few related things you can do:
- Clone within the same account. To reuse a template's settings and content, click the gear icon next to the template and select Clone, then adjust the copy.
- Note and form templates work differently. Those can be exported one at a time—go to Tools > Note Templates or Form Designer, click the Actions gear next to a template and select Export, which downloads a .txt file you can then Import From File into another account. This is one template at a time; there is no bulk export.
- The account Data Export tool is separate. The Data Export tool (Tools > Data Export) exports your practice data—contacts, forms, payments, and so on—not your communication templates.
If exporting communication templates would help your practice, let us know through the Customer Ideas Portal (Help menu > Submit an Idea).
Related Articles
- Communication Templates for Zanda Automations - Use example email and SMS templates for automations.
- Available Merge Fields for Communication Templates - Find merge fields to add to communication templates.
- Managing Automations - Create, edit, activate, and deactivate automations.
- Sending Appointment Reminders Manually - Send appointment-related templates from an appointment workflow.
- Importing Session Note and Form Templates From Our Library - Export and import note and form templates between accounts.
- Exporting Your Data - Export your account's practice data as CSV files.