%20-%20120%20x%2044.svg)
You can easily set up a recurring appointment on your Zanda calendar, which allows the appointment to repeat at specified intervals. This feature saves you time by automatically scheduling the appointment for you, eliminating the need for repetitive manual entries.
Moreover, you have the flexibility to edit or delete these recurring appointments. You can choose to apply changes or deletions to individual occurrences, future instances, or all occurrences in the series.
In this article:
Important
We highly recommend that you go through the Creating, Editing and Deleting an Appointment article.
It provides a concise overview of the essential steps for creating, editing, and deleting appointments. Understanding these basics is crucial, as you can only convert an existing appointment in your calendar into a recurring one. However, if you're already familiar with these processes, feel free to continue with this article.
Creating a Recurring Appointment
Start by creating a simple client appointment on your calendar. Once done, follow these steps to turn it into a recurring appointment.
1. In your calendar, click the appointment you want to turn into a series of recurring appointments.
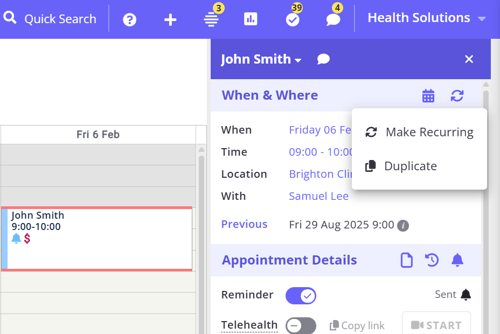
2. In the Appointment Settings Panel, click the Recurring Options icon located on the top-right corner of the When & Where section.
3. Select Make Recurring from the dropdown menu
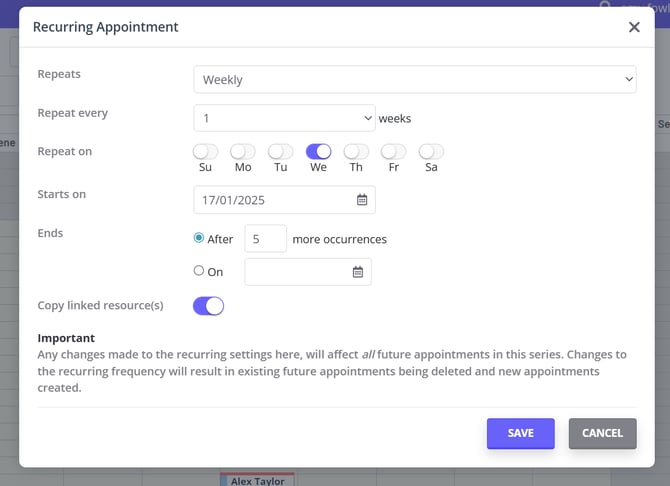
4. In the pop-up window, choose the Settings for your recurring appointment:
- Repeats: Choose how often you want your appointment to reoccur—Daily, Weekly or Monthly. For a yearly appointment, use Monthly with a 12-month interval; see Repeating an appointment yearly below.
- Repeat Every: Set how long the time-period between each recurrence will be. You can choose any number from 1 to 30. For example, if the appointment is weekly - after how many weeks should it reoccur i.e. 1 week, 2 weeks, 6 weeks etc.
- Repeat By (Monthly only): Choose whether the appointment repeats on the day of the month—the same date each time, for example the 14th—or on the day of the week—the same weekday position each time, for example the second Tuesday.
- Repeat On (Weekly only): Specify which days of the week an appointment can reoccur.
- Starts On: Set the starting date of the recurring appointment.
- Ends: Set whether you want the recurring appointment to end after a specific number of instances or at a specific date.
- Copy linked resource(s): Enable this option to automatically copy any resources linked to the initial appointment across all appointments in the series. You can update these copied resources for individual appointments in the series as needed.
- Once done, click Save.
Repeating an appointment yearly
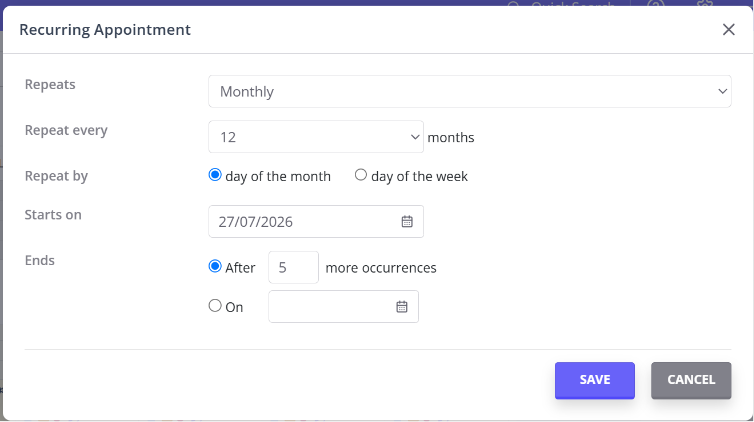
You can create a yearly appointment using the Monthly option with a 12-month interval. The Repeats list itself offers Daily, Weekly and Monthly:
- Follow the steps above to open the Recurring Appointment window.
- Set Repeats to Monthly.
- Set Repeat Every to 12 months.
- Set Repeat By to day of the month. This keeps the appointment on the same date every year—for example, every March 14. If you choose day of the week instead, the appointment lands on the same weekday position each year (for example the second Tuesday of March), so the date shifts from year to year.
- Set Starts On and Ends as you normally would, then click Save.
Note: Zanda does not create recurring appointments dated more than 8 years from today, so a long yearly series stops once it reaches that point. Any occurrences beyond it are simply not created, without a warning, so set up a new series when the current one runs out.
If you would like a true Yearly option added to the Repeats list, you can submit a feature request via Help > Ideas Portal.
Editing and Deleting a Recurring Appointment
Editing or deleting a recurring appointment is the same as editing or deleting a single appointment. However, anytime you make an edit, you will be prompted with the confirmation pop-up box.
Here’s what the three buttons on the confirmation box do:
- This One Only: Applies edits to or deletes the current appointment you’re clicking on.
- This & All Following: Applies edits to or deletes the current appointment, plus all future instances of that appointment.
- All Appointments: Applies edits to or deletes all instances of the current appointment (including past).
Note: When applying changes to This & All Following or All Appointments, not all appointment fields are updated across the series.
Fields such as appointment time, practitioner, appointment type, service, and appointment flags will be applied to the selected appointments in the series.
However, the Comments field is not copied across recurring appointments. Comments can only be edited on individual appointments, one at a time. If you need the same comments across multiple appointments in a series, each appointment will need to be updated manually.
If you would like to see this behaviour improved in the future, you can submit a feature request via Help > Ideas Portal.
Why editing a series can prompt a warning about invoices
When you apply a change with This & All Following, Zanda updates the future appointments in the series by rebuilding them with your new details. This happens even when your only change is small—for example, adding an appointment flag with no change to dates or times.
If any of those future appointments has an invoice that contains more than one item, or an invoice that already has a payment recorded, Zanda cannot update it automatically. Instead, you will see a confirmation headed Some appointments cannot be deleted without your confirmation, listing each affected appointment and its invoice. This is expected—it protects invoices that have been part-built or paid from being changed without your knowledge.
You have two options:
- To leave those invoiced appointments untouched: click Cancel. Your change is not applied, and no invoices are affected.
- To apply your change anyway: first open each listed appointment's invoice via Edit Invoice and remove the extra items or the payment, then repeat the edit. Alternatively, apply the change to appointments individually using This One Only so the invoiced occurrences are handled one at a time.