Custom Profile Fields let you add your own practice-specific fields to profiles in Zanda. They give you flexibility to capture and manage information that doesn’t fit into standard fields—without spreadsheets or workarounds.
You can use Custom Profile Fields to track things like:
-
Demographics or preferences
-
Funding, insurance, or program details
-
Risk flags or clinical admin information
-
Key dates or identifiers
-
Any other data your practice needs
Once created, Custom Profile Fields can be used consistently across:
-
Client, Contact, Shared, Referrer, and Third-Party profiles
-
Online forms (as linked profile fields)
-
Communication templates (email/SMS/Letter merge fields)
-
Data exports
In this article
-
Using Custom Profile Fields in Forms (Linked Profile Fields)
-
Using Custom Profile Fields in Communications (Merge Fields)
- Frequently Asked Questions
- Related Articles
Managing Custom Profile Fields
Where to manage Custom Profile Fields
All Custom Profile Fields are created and managed from:
User Menu > Account Settings > Clients > Custom Profile Fields
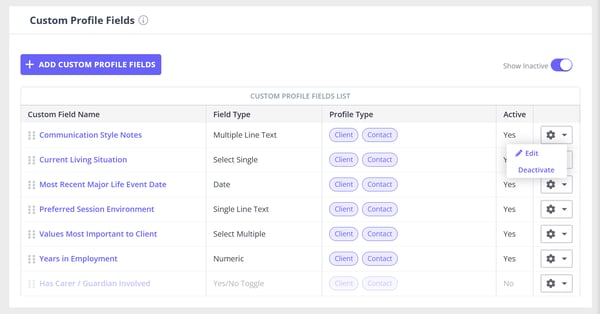
On this page, you’ll see a table of all existing fields, including:
-
Custom Field Name – the label shown to users
-
Field type – text, date, number, dropdown, yes/no, etc.
-
Profile Type Tags – which profile types the field appears on
-
Active – whether the field is currently in use
-
Actions (⚙️) – edit or activate/deactivate
-
Drag handle – reorder fields
-
The order set here controls how fields appear everywhere they’re used.
-
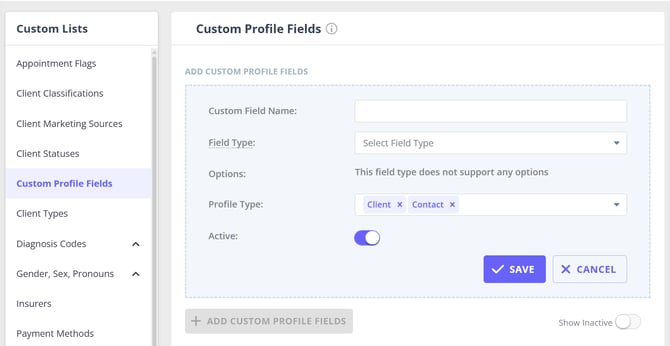
Creating a new Custom Profile Field
To create a field:
-
Go to User Menu > Account Settings > Clients > Custom Profile Fields
-
Click Add Custom Profile Field
-
Enter a Field Name (up to 40 characters)
-
Choose a Field Type:
-
Single line text – short text entries with 80 characters max length
-
Multiple line text – longer notes with 1000 characters max length
-
Numeric – numbers only
-
Date – date picker
-
Yes/No toggle – on/off
-
Select single – one option from a list
-
Select multiple – multiple options from a list
-
For Select single or Select multiple fields:
-
Add as many options as needed
-
Options can be hidden later, but not permanently deleted
-
Set the field as Active
-
Choose profile type tags (profile types where the field appears)
-
Click Save
Important: Once a field is created, its field type cannot be changed.
If you need a different type, create a new field.
Profile Type tags and profile-type visibility
Profile Type tags control where a Custom Profile Field appears.
You must choose at least one of:
-
Client
-
Contact
-
Referrer
-
Third Party
-
Shared (used together with other tags)
Examples
-
Client + Contact → appears on both profiles
-
Referrer only → appears only on referrer profiles
-
Third Party only → appears only on third-party profiles
If no active fields are tagged for a profile type:
-
Admin/master users will see a prompt to set them up
-
Non-admin users won’t see a Custom Profile Fields section
Editing, reordering, and deactivating fields
From User Menu > Account Settings > Clients > Custom Profile Fields, you can:
Edit a field
-
Update the field name
-
Add or hide options for select-type fields
-
Change tags (profile-type visibility)
-
Activate or deactivate the field
Reorder fields
-
Use the drag handle to move fields up or down
-
The new order applies everywhere (profiles, forms, exports)
Deactivate a field: Use Deactivate when you want to stop using a Custom Profile Field. Deactivation removes the field from active profile and form workflows while keeping the field available for future reactivation.
-
Removes it from profiles and forms
-
Keeps all existing data safely stored
-
Reactivating the field restores visibility
Inactive fields can be viewed by enabling Show Inactive.
Using Custom Profile Fields on Profiles
Where Custom Profile Fields appear
Custom Profile Fields appear in a dedicated section on each tagged profile type:
-
Client profiles
-
Contact profiles
- Shared profiles
-
Referrer profiles
-
Third-Party profiles
If no active fields apply to a profile type, the section won’t appear.
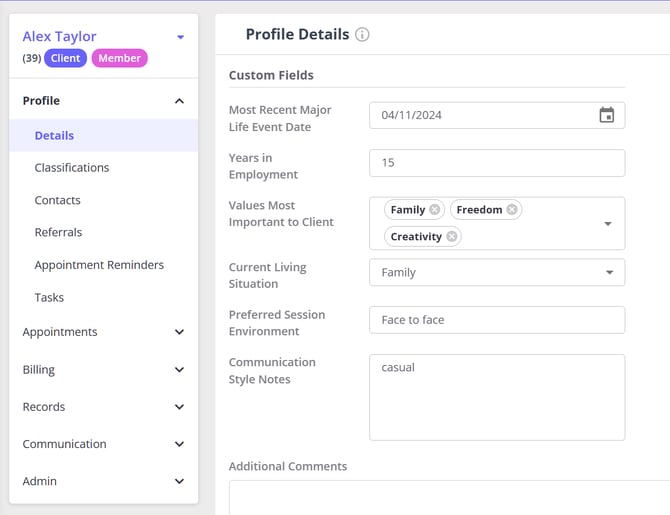
Entering and updating values
To update Custom Profile Fields:
-
Open the relevant profile
-
Scroll to Custom Profile Fields
-
Enter or update values:
-
Text fields – type text
-
Numeric – numbers only
-
Date – pick or type a date
-
Yes/No – toggle on or off
-
Select fields – choose one or multiple options
-
-
Click Save on the profile
These values can then be used across forms, communications, and exports.
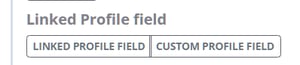
Using Custom Profile Fields in Forms (as Linked Profile Fields)
Custom Profile Fields can be added to forms as Linked Profile Fields, allowing forms to write data directly back to profiles.
Adding a Custom Profile Field to a form
-
Open a Form Template
-
Add a new question
-
Set the type to Linked Profile Field - Custom Profile Field
-
Choose the field to link
-
Only active fields appear
-
Fields already used on the form won’t be shown
-
The question type and options automatically match the linked field.
How linked fields behave
-
Field input matches the Custom Profile Field type
-
Select options stay in sync with custom profile fields settings
-
Fields can pre-populate from profile data (if enabled)
When the form is submitted:
-
Answers write back to the profile
-
Leaving a linked field blank does not overwrite existing data
This allows structured data collection without manual re-entry.
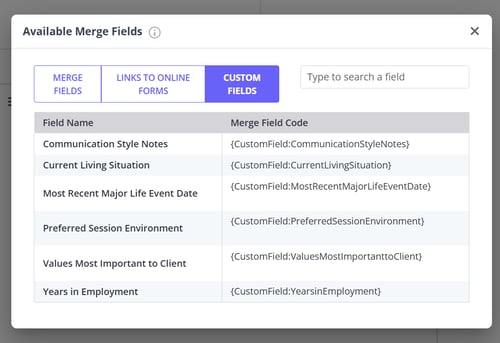
Using Custom Profile Fields in Communications (Merge Fields)
Custom Profile Fields can be used as dynamic merge fields in email, SMS and letter templates.
Inserting Custom Profile Field merge fields
-
Open a Communication Template
-
Click Available Merge Fields link below the template
-
Open the Custom Fields tab
-
Select a field to insert (e.g.
{CustomField:FundingType}) You can search by field name or code. - Copy the code and paste it on the template text where applicable.
- Save the template when its ready.
How merge fields work
When a message is sent:
-
Zanda pulls the current value from the profile
-
The merge code is replaced with that value
If no value exists, the field outputs nothing (blank).
If a field is later deactivated, existing templates still send safely.
Data Export and Custom Profile Fields
Custom Profile Fields are included in profile data exports.
Exporting profile data
-
Go to Tools > Data Export
-
Choose the profile type (Clients, Contacts, Referrers, Third Parties)
-
Run the export
In the exported file:
- Each active Custom Profile Field that is tagged for that profile type appears as its own column.
- Column headings use the current field names shown in Settings.
- Values are exported according to their type:
- Text fields → text values.
- Number / Date → standard numeric and date formats.
- Single‑select → the selected option’s text.
- Multi‑select → all selected options, typically separated by a delimiter.
- Yes/No → standard yes/no (or true/false) format used by the export.
If a client has no data for a particular Custom Profile Field, the cell is left blank.
Profile-type awareness
Exports respect field tags:
-
Client exports include only Client-tagged fields
-
Contact exports include only Contact-tagged fields, and so on
This keeps exports relevant and clean.
Privacy and Security
Custom Profile Fields follow the same privacy and security standards as all other data in Zanda:
- Data is collected for clear, practice‑defined purposes.
- Only team members with the right permissions can access or edit profile information.
- Information is stored securely and handled according to privacy principles such as:
- Only collecting what is needed.
- Keeping it accurate and up to date.
- Not retaining it longer than necessary.
This ensures flexibility combined while ensuring compliance and client trust.
Frequently Asked Questions
❓ How do I delete a Custom Profile Field?
Use Deactivate for Custom Profile Fields you no longer need. Deactivated fields are removed from active profiles and forms, and you can view them later with Show Inactive if you need to reactivate them.
At this stage, custom profile fields cannot be permanently deleted, even if they have never been used for entering information on any profiles.
Related Articles
- Using the Form Designer - Add Custom Profile Fields to forms as linked profile fields.
- Client Profile in Detail - Understand where client profile information is stored and organized.
- Available Merge Fields for Communication Templates - Use Custom Profile Fields as merge fields in communications.