You can email invoices/receipts directly to your clients. Emailed invoices/receipts are sent to your client as a PDF. In this article, we provide five methods of emailing invoices/receipts.
Additionally, you can allow clients access their invoices and receipts via your Zanda client portal. Clients will be able to view and download invoices and receipts as PDF, and pay individual or all outstanding invoices online via Zanda Stripe integration.
In this article:
- Method 1 - Quick Send From the Appointment
- Method 2 - From the Appointment Panel
- Method 3 - From the Edit Invoice Screen
- Method 4 - From the Client's Profile
- Method 5 - Using Unpaid Invoices Automation
- Where Sent Receipts and Invoices Are Automatically Saved
- Showing Client Invoices on Client Portal
- Frequently Asked Questions
Method 1 - Quick Send From the Appointment
1. Right click the appointment.
2. Select 'Email Invoice or Receipt'
3. Click 'Send Email'
Method 2 - From the Appointment Panel
1. Left click the appointment to open its booking panel.
2. On the panel, click the 'Email Invoice' envelope icon in the Invoice section.
3. Review and send the email with attached invoice/receipt.
Method 3 - From the Edit Invoice Screen:
1. Right click the appointment.
2. Select ' Edit Invoice'
3. Make necessary adjustments.
4. Save the changes.
5. Click ' EMAIL' button at the top-right
6. Send generated email with attached invoice/receipt.
Method 4 - From the Client's Profile:
1. Go to the client's profile > Billing > Invoices
2. Click Actions > "Email" next to an invoice/receipt you would like to email.
3. Click 'Send Email' under the generated email.
Method 5 - Using Unpaid Invoices Automation
The Invoicing Automation enables you to automatically email outstanding invoices to your payees.
💡 Sending invoices to multiple payees? Use invoicing automation when each payee needs an invoice-specific PDF link or PDF attachment. Bulk Send is designed for general client email and SMS campaigns that use client communication templates. 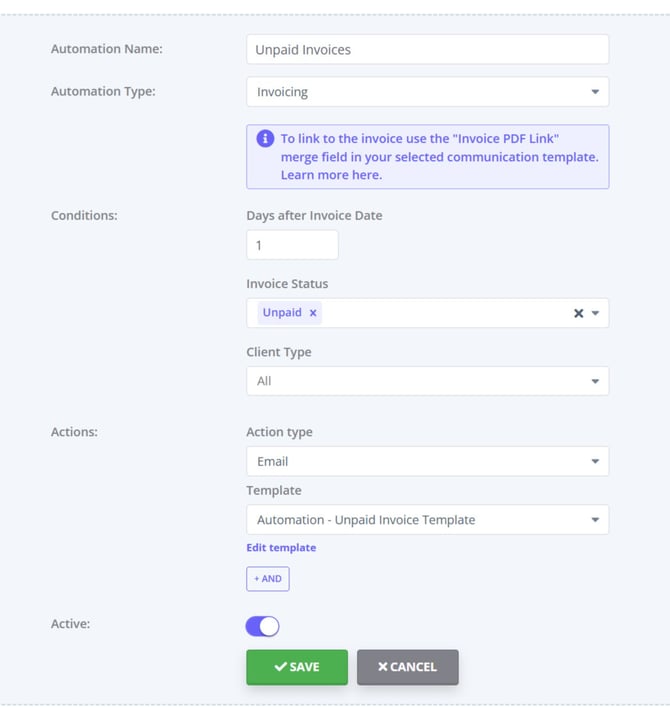
- Go to User Menu > Account Settings > Communication > Automations
- Click on the '+ Add Automation' button at the top of the page
- Enter the name of the Automation
- Select the Automation type 'Invoicing'.
- Set the Conditions for this automation. All conditions must be met for an automation to be triggered. The following conditions can be set:
- Days After Invoice Date - this is when the automation will be
- Invoice status ('Unpaid')
- In the 'Actions' dropdown, select the Action which defines what the automation will do. Either select an automated email or SMS to be sent or have a task created.
- Once the 'Actions' are selected, the 'Template' dropdown will appear. Click on it to select the message template that will be used for this automation.
- Use the {InvoicePDFLink} (SMS and email) or {InvoicePDFAttachment} (email only) in your communication templates to generate and add an invoice pdf link or pdf attachment to the automated message.
- An automation message will be sent to the invoice payee (which can be the client themselves, or their contact or a third party). You can view the sent message in the payee profile > Communication > Activity.
- You can add another action by clicking the '+AND' button and selecting an action then template. You can add as many additional actions as needed.
- Save the changes to finish creating the Automation.
- Once the Automation is created, it will be triggered for all invoices that meet the criteria you set up, including invoices that existed before you enabled the automation.
Where Sent Receipts and Invoices Are Automatically Saved
- The resulting email:
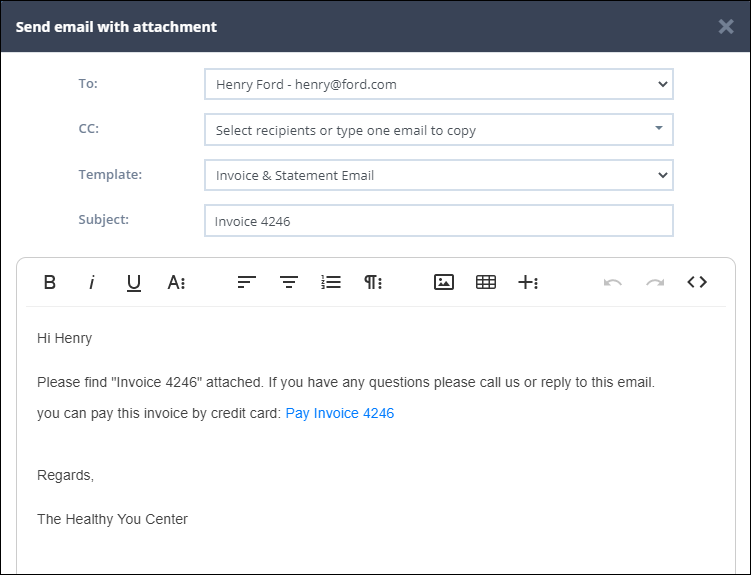
- The content for this email comes from the " Invoice & Statement Email" template.
- You can edit the template by going to Tools > Communication > Templates. Here, you can choose whether to include the payment link and otherwise edit the content. To use a different invoice email template, select it in User Menu > Account Settings > Billing > Invoices > Invoice Email Template.
- When an invoice / receipt is emailed, a record of a sent email is saved in the Payee Profile > Communication > Activity.
- In cases where an invoice was paid not by the client, you would need to look for the saved copy of the sent email in the actual payee (Contact or Third Party) profile.
Showing Client Invoices on Client Portal
- Clients are able to view their invoices and download them as PDF, and pay their invoices online (through Stripe integration) on the client portal, without needing to enable client bookings. Here are the steps to enable and use this feature:
- Navigate to User Menu > Account Settings > Schedule > Client Portal > Access and Settings.
- Enable the 'Show Invoices Page' switch.
- Share your client portal link with your clients. This will allow your existing clients to access the client portal using the email address already recorded in their client profile in your account, and create their password to log in to their client portal home page.
💡 User Pro Tip
You can also accept online bookings from your clients, and allow clients to view, complete and download online forms, using the Zanda client portal. Learn more here.
- When clients log in to their client portal home page, they will see the 'My Invoices' tab:
- If a client clicks the My Invoices tab, they will see the list of their existing invoices and receipts, past and future dated. This includes invoices for other clients that are billed to them (e.g. a child's invoices billed to a parent).
- The list can be filtered by All, Paid and Unpaid invoices.
- The general invoice/receipt information will be listed, including invoice number and date (same as appointment date), provider/practitioner name, provided service, client name, invoice total and amount paid.
- Clients will also be able to download their invoices and receipts as PDF files.
- If the online payments option is enabled, clients will be able to pay individual or all outstanding invoice via the client portal.
- When processing a payment, they will be offered to save their card details for future charges. Their card details will be securely stored in your linked Stripe account.
- Once the invoice is paid, a client can download the receipt from their client portal My Invoices list
Frequently Asked Questions
❓ Can I hide specific invoices—for example, future-dated invoices for recurring appointments—from the client portal?
No. When the Show Invoices Page switch is on, the My Invoices tab lists all of a client's invoices, past and future dated—including invoices created in advance for recurring appointments. There is no setting to hide individual invoices or to show only past-dated ones.
The only control is the Show Invoices Page switch under User Menu > Account Settings > Schedule > Client Portal > Access and Settings. Switching it off removes the invoices page from the client portal entirely, for all clients—invoice visibility is all-or-nothing.
If per-invoice or date-based invoice visibility would help your practice, you can submit the request through the Customer Ideas Portal.
❓ Can I email several invoices to the same payee together in one email?
Send a statement. A statement combines the invoices you choose into one document that you email once, which is the way to give a payee everything for a period in a single message:
- Open the payee's profile (the client, contact, or third party the invoices are billed to) and go to Billing > Statements.
- Click New Statement and choose the type: Activity (paid and unpaid invoices in the period) or Outstanding Invoices (unpaid only).
- Enter the date range you want to cover, such as the month just finished.
- Click Show Invoices and Payments, then tick the invoices and payments to include.
- Click Create Statement, then email the statement.
A statement created in a third party's profile can cover invoices for several of that payee's clients at once. For the full walkthrough see Creating Statements Billed to Third Parties, Creating Statements Billed to Contacts, or Creating Statements Billed to Clients, depending on who the payee is.
The invoice PDFs themselves still go out one per email. Every method above emails a single invoice, and the Invoicing Automation sends its own message for each invoice that meets its conditions.
💡 This section covers combining invoices into one email. For combining several appointments onto one invoice, see Creating, Editing, Printing and Emailing Invoices.