There may be a situation when a client has multiple Session Packs open, but they only need one. Another scenario is there is a Session Pack that needs to be deleted, but the system does not allow that because there is an invoice attached to it. Read this article to learn how you can fix this.
In this article:
- How To Remove Session Pack From Invoice
- How To Delete Incorrect Session Pack
- How To Apply Correct Session Packs To Invoices
- How To Allocate a Session Pack Retrospectively
- How To Track Partially Used Ongoing Referrals and Treatment Plans with Session Packs
Removing Session Pack From Invoice
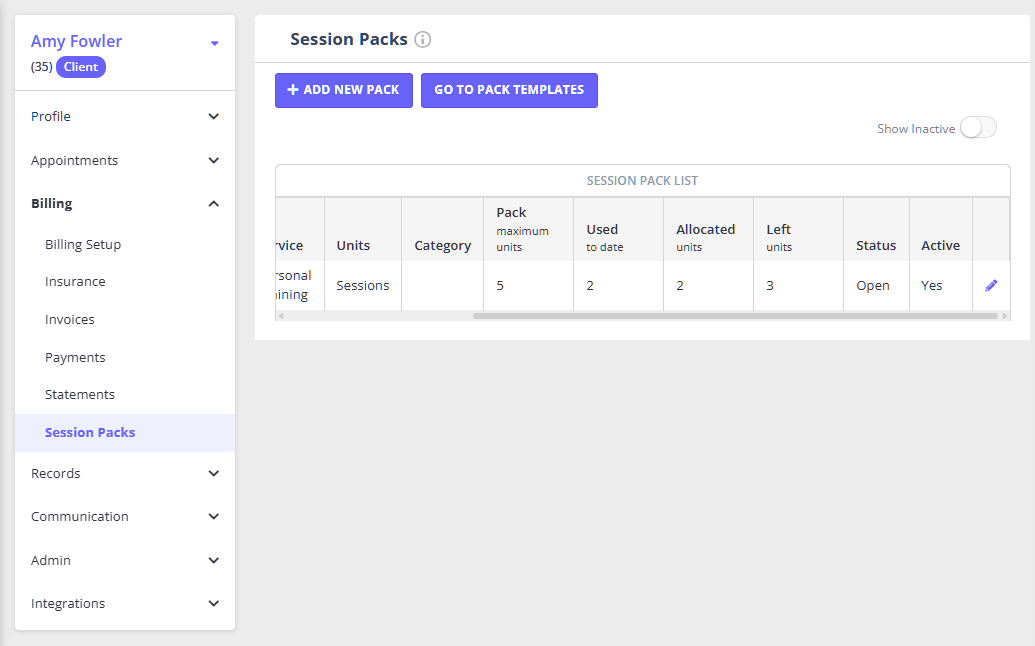
- Navigate to Client Profile > Billing > Session Packs.
- Find the session pack you need to delete and click on Edit (the pencil icon on the right-hand side).
- The Session Pack page will open, at the bottom, there will be a list of all invoices attached to this session pack.
- Open each invoice (it is recommended to do that in another tab)
- Click on the red X next to the session pack to remove it from this invoice.
- Save changes.
- Repeat for the other invoices, if applicable.
❗Important Note
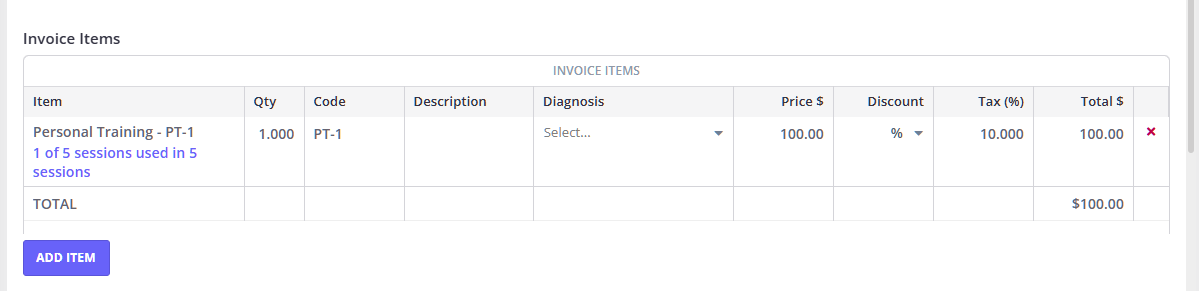
Can I hide the "X of Y sessions used" line on invoices?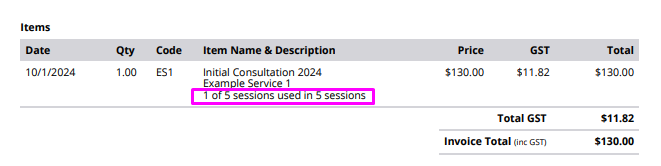
No. When a session pack is used to pay for or track a session on an invoice, the system automatically generates a line item description (e.g., "1 of 5 sessions used in [Pack Name]") to track usage.
This specific line cannot be hidden or removed from the invoice if you are using the session pack feature. It is a core system function designed to provide transparency to both the practitioner and the client regarding the pack's remaining balance.
Deleting Incorrect Session Packs
Once the session pack is removed from all the invoices it was attached to,
- Navigate to Client Profile > Billing > Session Packs
- Locate the Session Pack that was removed from the invoices.
- Click on Edit (the pencil icon on the right-hand side)
- Delete the Session Pack.

Applying Correct Session Packs to Invoices
Once you have deleted all the incorrect Session Packs, you can now
Option 1: Go to each appointment/invoice that needs to be updated
- If applicable, remove the Service that was previously applied (you may have already removed the service together with the incorrect session pack)
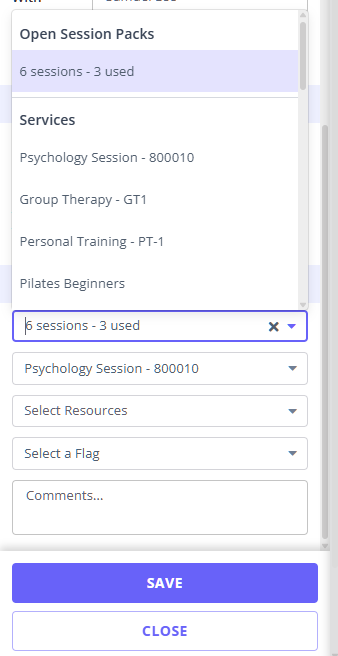
- Select the correct Open Session Pack (if there are no Open Session Packs available, scroll down to the Session Pack templates list)
- Select the Service again (you may skip this step if you have the default service applied to this session pack template)
- Save changes.
- Repeat the above steps for the other invoices, where applicable.
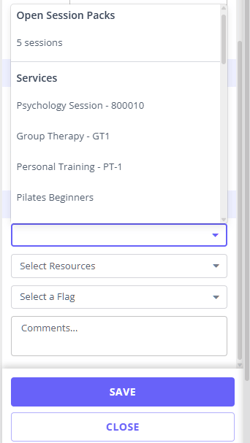
Option 2: Click on the appointment to open the appointment panel on the right-hand side
- In the Invoice section, if applicable, remove the existing Service
- Click on Select Service, Pack or Product
- Select the correct Open Session Pack (if there are no Open Session Packs available, scroll down to the Session Pack templates list)
- Select the Service again (you may skip this step if you have the default service applied to this session pack template)
- Save the changes
-
Repeat with the other appointments, if applicable.
How To Allocate a Session Pack Retrospectively
Zanda allows you to add a session pack to the already existing invoices, including in the situations when they were already paid. This enables you to correctly track sessions provided to a client under a specific agreement, when this agreement was reached after part of service was already provided (or if you decided to start using Zanda session packs for managing your clients records better).
Follow these steps to add a session pack to client's invoices retrospectively:
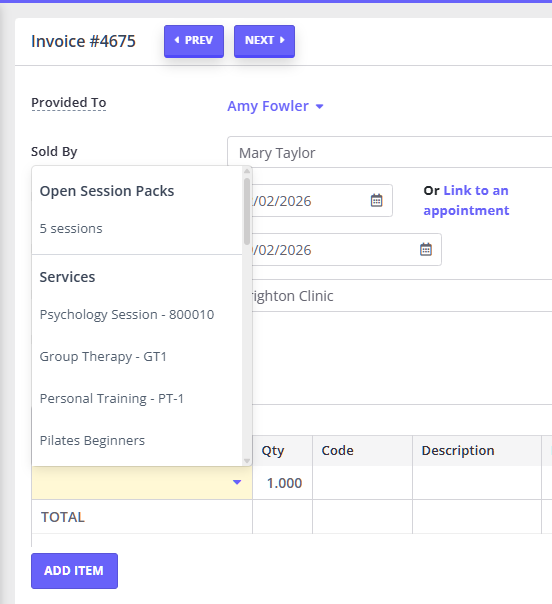
1. Open the relevant appointment panel and click the existing service that was already added to the invoice.
2. The drop-down list of your available services, packs or product will open. Scroll to the top to see the already open session pack of this client and select it.
Tip💡 If there is no open session pack, scroll down to the list of available packs and select the one you will use for this client's records. This will create an individual session packs for this client and allocate it to their invoice.
3. Once the pack is added, you will be able to select the service that was provided at this session.
Tip 💡 If you have a default service in the applied session pack template, this default service will be added automatically to the invoice. If necessary, you can still select a different service.
4. Save the changes.
5. The session pack count will be added to the appointment and invoice.
6. Repeat the above steps to other invoices, if necessary.
Note:
It is also possible to add a session pack on the invoice edit page.
How To Track Partially Used Ongoing Referrals and Treatment Plans with Session Packs
If a client joins your practice with an active referral but has already used some sessions at a different practice, you can use Zanda Session Packs to track the remaining available sessions.
This guide explains how to set up and manage a session pack in this scenario.
When to Use This
Use this workflow if:
-
The client has an active referral with a defined number of sessions.
-
Some sessions have already been used elsewhere.
-
You need to track and manage only the remaining sessions.
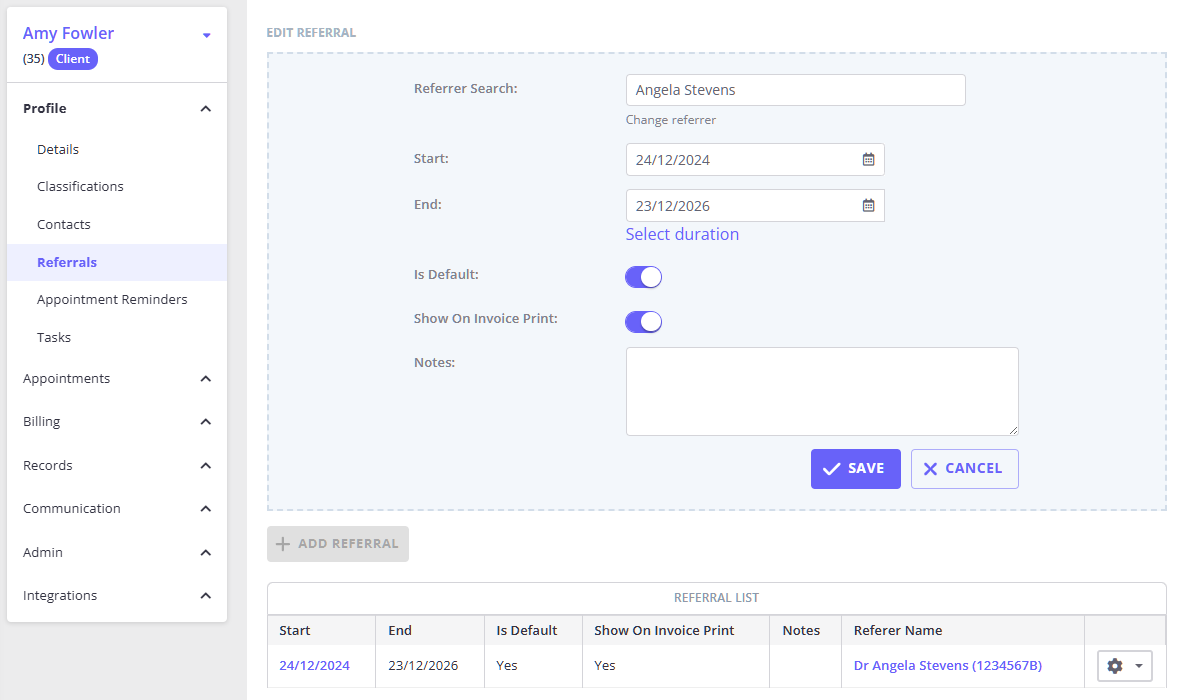
Step 1: Add a Referral to the Client’s Profile
-
Navigate to the client’s profile.
-
Click + Add Referral.
-
Select the referring provider and enter:
-
The start date (e.g. January 1st).
-
The duration (e.g. 12 months).
-
-
Save the referral.
Step 2: Create a Session Pack for the Remaining Sessions
-
Go to Billing > Session Packs.
-
Click + New Pack.
-
Choose the appropriate session type.
-
Enter the original number of sessions (e.g. 6).
-
Add a note to document prior usage (e.g. “Client used 3 sessions elsewhere”).
-
Set the expiry date (optional, e.g. December 31st if valid for 12 months).
-
In the Maximum Units field, enter the number of sessions remaining (e.g. 3).
-
Click Save.
💡 Even though the referral originally allowed 6 sessions, you're only tracking the 3 remaining sessions at your clinic.

Step 3: Use the Session Pack When Booking Appointments
-
Create a new appointment for the client.
-
On the appointment invoice, click Select Session Pack.
-
Choose the session pack created for this referral.
-
Save the appointment. One session will be deducted from the pack.
Repeat this process for each appointment.
What Happens When the Pack Is Used Up?
Once all remaining sessions in the pack are used:
-
A task notification will be generated at the top of your screen.
-
This serves as a reminder to:
-
Submit a report (if required).
-
Request a new referral (if applicable).
-