%20-%20120%20x%2044.svg)
You can invoice a third party instead of the client themselves. This is perfect for a situation when instead of the client, the responsibility of making payments lies with their employer, insurer or someone else.
In this article:
- Creating A Third Party Profile
- Assigning A Third Party To Pay A Client’s Invoice
- What de-identify invoices hides and shows
- Tips & Frequently Asked Questions
- Viewing Third Party Invoices
- Recording A Third Party Payment
- Related Articles
Creating A Third Party Profile
Before you can invoice a third-party on behalf of a client, you’ll need to create their profile in your account. To do so:
1. Navigate to People > Add on the left-hand menu on your dashboard. Alternatively, you can click the ➕ icon at the top panel and select Client.
2. Toggle the switch labelled Third Party and type in their name, mobile number, email address and business name.
- If you don’t have a person’s name for the third party profile, enter the business name only.
3. Click Next.
4. You will be redirected to the profile page of the third party. Here, add their relevant information such as business address, email, postcode and more (you can update later as well).
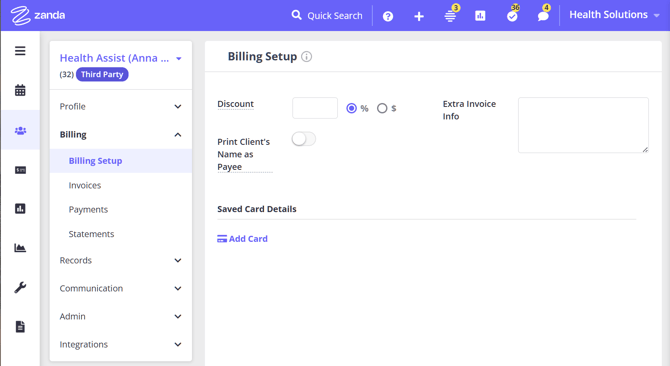
5. In the third party profile > Billing > Billing Setup you can set the following:
- Discount in % or $ amount - it will be applicable to all invoices billed to this third party;
- Print Client's Name as Payee switch - enable this to print, on each invoice or individual statement, the name of the client it belongs to in the 'Invoice to' section rather than the third party details. If the same third party pays for several clients, each invoice shows its own client's details;
- Extra Invoice Info - custom text to be added to invoices and statements billed to this third party;
- Saved Card Details - click Add Card or Update Card to add the third party bank card details for secure storing in your business Stripe account and to be used for processing 'card not present' and online payments.
Assigning A Third Party To Pay A Client’s Invoice
You can assign a third party to pay all invoices for a client OR you can assign a third party to pay specific invoice(s) for a client.
Option 1: Pay All Invoices For A Client
Go to the client’s profile page (whose invoices a third party will pay). Use the search bar on top of the dashboard to easily find the client profile. You can also right-click on their appointment in your calendar and then click on Client Details.
Now, follow these steps:
1. Navigate to Billing > Billing Setup.
2. In the Bill To field, choose the relevant third party name.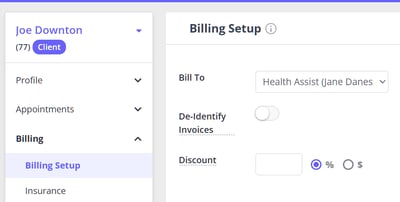
3. (Optional) Toggle the switch labelled ‘De-identify Invoices ’ if you do not want the client’s identifying details to appear on invoices sent to the third party. See What de-identify invoices hides and shows below.
4. (Optional) If the third-party is only paying for a specific service or session pack, select it in the drop-down menu next to 'Preferred Service Or Pack'.
5. (Optional) Choose a discount percentage if you want.
Click Save Changes.
💡 Tip: When you change the Bill To setting, a confirmation modal will appear. This allows you to optionally update all future dated invoices to be payable by this third party.
Option 2: Pay A Specific Invoice For A Client
In your calendar, click the client appointment whose invoice will be paid by a third party. When the appointment settings panel opens up:
1. Scroll down until you see the 'Invoice' section.
2. Click the Edit Invoice icon.
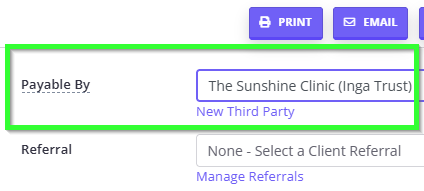
3. In the Payable By field, choose the relevant third party name. 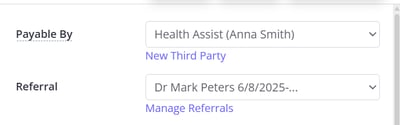
4. Click Save Invoice.
What de-identify invoices hides and shows
De-identify is useful when the payer should see what they are paying for, but not who the client is or when they were seen.
What it hides
With De-identify on, the invoice does not show:
- the client’s name—the client number appears in its place
- the client’s date of birth
- the client’s Medicare number, insurer names and insurer client numbers
- the appointment date and time
What it still shows
De-identify does not blank the whole invoice. These always appear:
- the invoice number, invoice date and due date. When the invoice was created from an appointment, the invoice date is that appointment’s date, so the date of service is still visible even though the Appointment line is hidden. Invoices not created from an appointment are dated the day you created them
- the service or product name, description, quantity, price, tax and amount owing
- the practitioner’s name and your practice’s contact details
- the third party’s own name and address in the Invoice To block. De-identify hides the client’s details, not the payer’s
- any text in the client’s Extra Invoice Info field (Client Profile > Billing > Billing Setup). If that field contains anything identifying, clear it before sending de-identified invoices
Two things to check before you rely on it
- If the third party’s own Billing > Billing Setup has Print Client's Name as Payee turned on, the client’s name and address are printed in the Invoice To block even when De-identify is on. Turn that setting off on the third party’s profile if you are de-identifying.
- The switch on the client’s profile is a default applied to invoices as they are created. Invoices that already exist, including future-dated ones, are not changed. To de-identify one of those, open the invoice’s Edit page, turn on the De-identify switch and click Save Invoice.
Trade-offs
De-identifying protects the client’s privacy from the payer, but it also makes the invoice harder for the payer to match to a person or a date, which can slow payment or reconciliation when one payer covers several clients. If the payer needs a reference, put a purchase order or contract reference in the third party’s Extra Invoice Info field rather than turning De-identify off.
Tips & Frequently Asked Questions
❓ Can I split one appointment fee between a client and a third party?
No, one invoice has one Payable By payer, so Zanda does not split a single appointment invoice between two payers automatically. The best workflow is to keep the appointment-linked invoice for one payer and create a separate standalone invoice for the other payer's portion.
1. Create or open the appointment invoice and set Payable By to the client or the third party who will pay that portion.
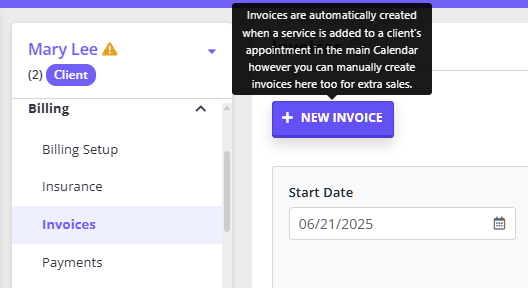
2. Create the second invoice from Billing > New Invoice or from the client's profile under Billing > Invoices.
3. Set Payable By on the second invoice to the other payer.
4. Add the relevant service or product line items to each invoice so the two invoice totals match the portions each payer should cover.
5. Save each invoice, then email, print, or record payments as needed.
💡 Tip: If both charges are being paid by the same payer, add multiple line items to the one invoice instead of creating a second invoice. For group appointments, the default group service or product applies one selected service or product when new participants are added; add extra invoice items manually when more than one item is needed.
❓ The invoice is billed to a third party, but I also need the client's own address
to appear on the invoice. How do I do this?
When an invoice is billed to a third party, the third party's name and address
automatically appear in the Invoice To section. The client's address does not
appear there by default.
To include the client's address on the invoice as well, follow these steps:
1. Go to the client's profile (not the third party profile).
2. Navigate to Billing > Billing Setup.
3. In the Extra Invoice Info field, type the client's address.
4. Click Save Changes.
The address you enter here will automatically appear on all invoices generated for
this client, including those billed to a third party. This is useful for maintaining
a clear record of the client's location on invoices sent to insurers, employers,
or other third party payers.
Tip: The Extra Invoice Info field on the client's Billing Setup is separate from the Extra Invoice Info on the *third party's* Billing Setup. The client field is for client-specific details (such as their address), while the third party field is for payer-specific details (such as a purchase order number or contract reference).
❓ Can I make de-identified invoices the default, so I don't have to switch it on for every new client?
Not at the moment. De-Identify Invoices is a per-client setting, so there is no account-wide default and no setting on the third party (the organisation, employer or insurer) that applies it to everyone billed to them. Discount, Print Client's Name as Payee, Extra Invoice Info and Saved Card Details do carry across every invoice billed to a third party — de-identification does not.
If you invoice an employer, EAP provider or insurer that must not see who attended, turn de-identification on as part of setting the payer, so it is never a separate step someone can forget:
1. Go to the client's profile > Billing > Billing Setup.
2. Set Bill To to the third party.
3. Turn on De-identify Invoices in the same screen, then Save Changes.
From then on, every invoice created for that client shows their client number instead of their name, and hides their appointment time.
💡 Tip: The setting only applies to invoices created after you turn it on — it does not change invoices that already exist, including future-dated ones. To de-identify an invoice that has already been created, open the invoice's Edit page, turn on the De-identify switch, and save.
Viewing Third Party Invoices
You can easily view all the (paid and unpaid) invoices you’ve billed to third parties on behalf of your clients.
If you want to view invoices from all the third parties in your account (or one), here’s how you can do that:
1. Navigate to Billing > Invoices on the left-hand menu on your dashboard.
2. On the Invoices page, in the drop-down menu next to Third Party, either choose All Third Parties or a specific third party from the list.
3. Apply other filters if you want, such as invoices' Start Date, End Date, Payment Status and more.
4. Click Search to see the list of invoices with your applied filters.
💡Pro Tip : If you want to view invoices from just one specific third-party, a better way would be to go to that third party’s profile (which you can search for in the search bar on top of your calendar).
From there, navigate to Billing > Invoices to see the list of all their invoices - and their statuses.
Recording A Third Party Payment
Did a third-party just pay your invoice on behalf of the client? Well, there are three ways you can record that payment.
Method 1: Record A Payment For An Appointment Invoice On The Calendar
To record a payment for an invoice of an appointment in your calendar, follow these steps:
1. Click on the appointment whose invoice the third party paid.
2. Scroll down to the Payments section. Click on +Add Payment.
3. From the drop-down menu, choose the method using which the payment was made (VISA, cheque, credit card, etc.). Also type in the amount paid if it isn’t entered already.
4. Click Save to record the payment.
Method 2: Quickly Record Multiple Payments One By One
If you want to record multiple payments by multiple third parties, the easiest way would be to:
1. Navigate to Billing > New Payment on the left-hand menu of your dashboard.
2. Type in the third party’s name in the search bar and select it from the drop-down menu.
3. Fill in the Payments Form with information such as date received, payment method and amount paid.
4. Click Save Changes to record the payment.
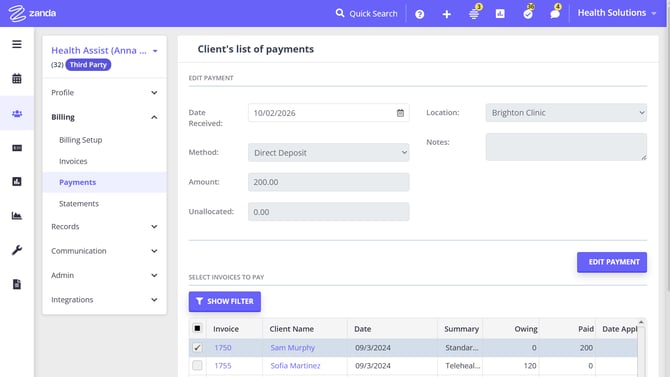
5. Once the payment is saved, you will see a list of unpaid invoices billed to this third party. Select the invoices you need to pay by checking boxes next to each invoice. Save again.
Method 3: Record A Third Party Payment In Their Profile
You can record a third-party’s payment(s) directly within their profile.
Start by going to the third party’s profile page by typing it in the search bar on top of your calendar. Now, to record a payment, follow these steps:
1. Navigate to Billing > Payments
2. Click + New Payment
3. Fill in the Payments form with information such as date received, payment method and amount paid.
4. Click Save Changes to record the payment.
5. Pay any invoices that were meant to be paid with this payment. (See the steps above)
Related Articles
- Creating, Editing, Printing and Emailing Invoices - Learn how to create standalone invoices, link an invoice to an appointment, and add multiple line items.
- Setting Up an Invoicing Automation - Learn how to automate invoice reminders, receipts, invoice PDF links, and follow-up tasks.
- Using Default Services for Group Appointments - Learn how group appointment default services or products create invoices for new participants.
- Managing Referrers and Referrals - When a referrer or funding body also pays for the sessions, set the payer up as a Third Party and bill to them.