%20-%20120%20x%2044.svg)
Master Users of Zanda Accounts and users with permission to Setup and Configure Zanda have the option to add more users to Zanda, allowing them to assist in managing accounts.
These users can perform tasks such as creating, editing, and deleting appointments, managing invoices, registering new clients, and more based on the permissions you assign to them.
💡 Note: If you are adding a new practitioner that will take on appointments, you’ll have to create a new practitioner first and then create their user to link them to it as the "Default Practitioner Profile".
User profiles and practitioner profiles are different. A user profile gives someone login access and permissions. A practitioner profile creates a practitioner calendar and is counted as an active practitioner while it is active. For admin, reception, billing, or practice-management team members who do not take appointments, create a user profile without a default practitioner profile and set the access level to Administrative.
In this article:
- User Details
- User Permissions
- How Users Can Manage Their Details
- Add and Edit a User
- Deactivate User Access
- Reactivate a User Account
- Frequently Asked Questions
- Related Articles
Managing User Details
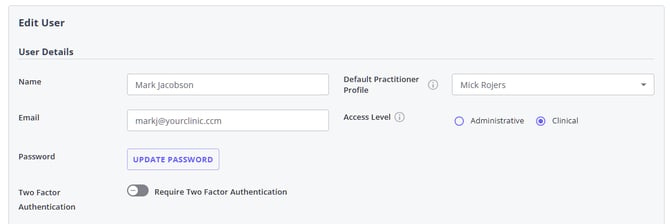
Each user account allows to set user details for a person who will be accessing Zanda with these user details:
- Name: this field is used to enter the name of the person who will log in to Zanda using this user profile.
- Email (used as Username): enter user email address here. This email address will be used for sending communication emails to this user and as their username for the login purposes.
-
- To change your own password while logged in :
Go to User Menu (top-right) > User Profile > [password field]. - To set a new password for a team member as an admin:
Go to User Menu > Account Settings > Team > Users > User Management , open the user's profile, and select Update Password. You enter and confirm the new password yourself, then pass it on to the team member. They receive an email letting them know their password was changed, so ask them to sign in and change it to something only they know.
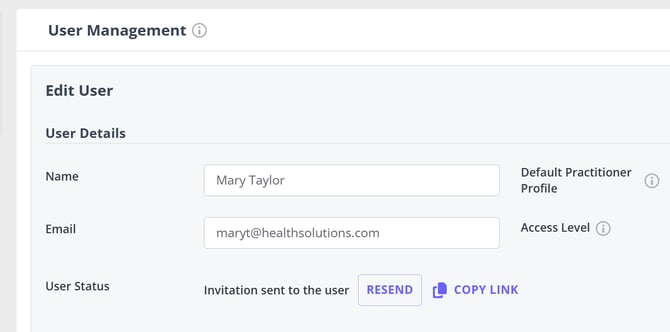
Update Password appears only once the person has completed registration. While their invitation is still outstanding, the profile shows a User Status row reading Invitation sent to the user , with Resend and Copy Link instead. On the Master User's profile, Update Password is greyed out unless you are signed in as that Master User, and the profile shows Only the master user can edit their account details. - To reset your password if you're locked out:
Select Forgot password? on the login screen.Password : Each user can set and reset their own password, and a Master User or a user with permission to Setup and Configure Zanda can set a new password for a team member who needs help.
- To change your own password while logged in :
- Default Practitioner Profile: Gives access to the assigned client profiles and the calendar for this practitioner. If the user profile belongs to a person who needs access to a certain practitioner's clients' confidential information and a practitioner's calendar, this practitioner needs to be selected here thus linking the user profile with the practitioner data. When a user profile is linked with a practitioner profile, this user may be given access to client profiles as their primary or assigned practitioner.
- Access Level: The access level determines whether the user can access the clinical records (notes, forms, files, correspondence, diagnosis) by default for clients where they are listed as a primary practitioner (based on the users default practitioner profile) or as a user with access.
- If they are granted "clinical" access they will see the clinical records for these clients (even if they don't have the permissions to access notes/forms/files/correspondence for all clients),
- whereas if they are granted "administrative" then they will not have access to view the clinical records by default (unless they are granted the permission to access the notes/forms/files/correspondence for all clients).
- Two Factor Authentication: (2FA for short) adds a second layer of security to your Zanda account. By turning this on, the user will be asked to enter a 6-digit code each time they log in - in addition to their standard email address and password. You can find the detailed instructions about using the 2FA here.
Managing User Permissions
Each user profile can be configured to allow this user access to certain data and features of your Zanda account. Only enable the features this user will need. You will be able to change the permissions for each user at any time, should their job requirements change.
Here is an in-depth description of the permissions. Read these features carefully to allow your users access based on their role within your business.
User Permissions
Pro Tips:
- Click the information icon ℹ️ next to each permission name to read its description tool tip
- Click 'See Explanation Text' to unfurl the detailed description of each user permission
Profile Access
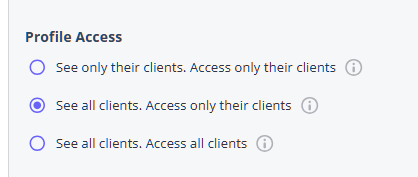
The Profile Access permission settings determine which client, contact, and shared profiles a user can view and access within Zanda. These settings help practices maintain appropriate privacy and data control, ensuring each team member can only access information relevant to their role.
There are three levels of Profile Access permissions:
- See only their clients. Access only their clients – The most restricted setting, ideal for practitioners who should only see and work with their own assigned clients.
- User will only see data for and have access to the profiles of clients, contacts, and shared profiles assigned to the user's default practitioner profile, or where the user is listed as a user with access to the profile. Will see basic details for contacts associated with clients/shared profiles assigned to them. All reports and lists will be locked for the user's default practitioner profile only.
- See all clients. Access only their clients – Allows visibility across all profiles in the system while limiting access to the user’s own clients.
- Use will see the data in the system for all clients, contacts, and shared profiles. Will only have access to the profiles of clients, contacts, and shared profiles assigned to the user's default practitioner profile, or where the user is listed as a user with access to the profile.
- See all clients. Access all clients – Grants full visibility and access to all profiles, typically reserved for administrators or practice owners.
- User can see and access the profiles for all client, contact, and shared profiles.
Scheduling
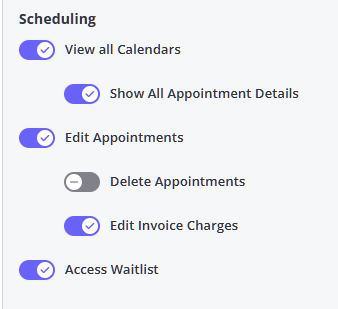
The Scheduling permission settings control what users can see and do on the practice calendar in Zanda. These settings allow you to manage how much visibility and control each team member has over appointments, invoices, and the waitlist — helping maintain both efficiency and privacy within your practice.
There are six key scheduling permissions:
- View all Calendars - user can see all of the practitioner’s calendars. If not granted, they will only see the calendar for their default practitioner.
-
If this is disabled the user will notice the following across the platform:
-
On the waitlist, users will only be able to view clients associated with their default practitioner profile, or clients who have been marked as waiting for an appointment with that practitioner.
-
In Billing > Invoices, Payments, and Claims (US only), users will now be restricted to viewing data solely for their assigned default practitioner profile.
-
-
-
- Show All Appointment Details - user can see the details for appointment bookings in all calendars. If not granted, can only see the appointment details in their default practitioners' calendar and all others will be shown as grey blocks.
- Edit Appointments - user can edit and add new appointments. If not granted, they will have read only access to the calendar and will not see the appointment panel.
- Delete Appointments - user can delete appointments. If not granted, they will only be able to update the appointment status to indicate non-attendance.
- Edit Invoice Charges - user an see the invoices charge for appointments in the calendar and can edit the invoice. If not granted, will not see the invoice charge nor be able to edit the invoice.
- Access Waitlist - user can access the waitlist to view, add to, or edit waitlisted clients. If not granted, will not have any access to the waitlist.
Administrative
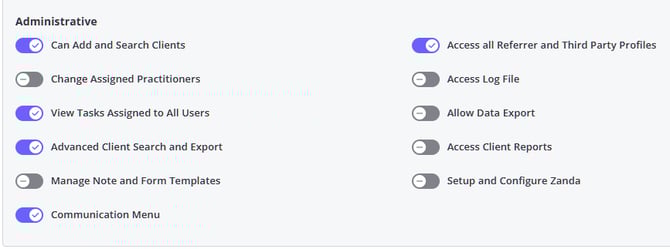
The Administrative permissions define a user’s level of control over client management, communication tools, templates, reports, and overall system configuration in Zanda. These settings are typically granted to practice administrators or team members responsible for managing operations, reporting, or communication setup.
These permissions cover actions such as adding clients, configuring account settings, exporting data, and managing templates or reports.
Below is a summary of each permission:
- Can Add and Search Clients - User can add new client, contact and shared profiles, and access the People menu and header quick search to find client, contact, or shared profiles that they can see.
- Change Assigned Practitioners - User can change the primary practitioner, assigned practitioners, and users with access for all clients they have access to. If not granted, can not change these fields for any clients.
- View Tasks Assigned to All Users - User can see tasks assigned to all users. If not granted, they will only see tasks assigned to them or to anyone.
- Advanced Client Search and Export - User can generate a list of profiles using the advanced search filters and export the list for all profiles they can see. Required to export to MailChimp, perform a bulk update, and bulk messaging. If not granted, can only search by name for any profiles they can see.
- Manage Note and Form Templates - User can add and edit note and form templates.
- Communication Menu - User can add and edit communication templates, export to Mailchimp, and bulk send communications (if granted access to advanced client search).
- Access all Referrer and Third Party Profiles - User can search for, run a list of, add, and access the profiles for all referrers and third parties. If not granted, can only see referrer or third party details in association with their clients.
- Access Log File - User can access the Log File to view user activity in the account. If no access to see all profiles, they will only see their own users activity.
- Allow Data Export - User can export data via Tools > Data Export. Requires access to all profiles to export all account data, otherwise they can only export data for their assigned clients.
- Access Client Reports - User can access Client and Practice reports that do not contain financial information.
- Setup and Configure Zanda - User can access the Account Settings menu and configure the account settings including adding and editing users and their permissions. Allows deleting and merging of profiles.
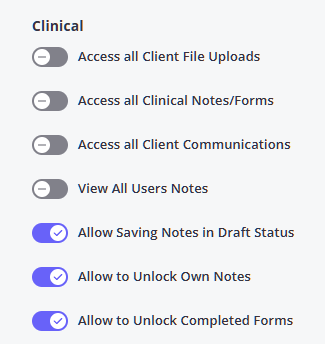
Clinical
The Clinical permissions control what users can view, create, and manage within client profiles and clinical records. These settings are designed to help practice owners and administrators maintain appropriate access levels for practitioners, ensuring that sensitive client information is shared only with authorized users.
Below is a summary of each permission:
- Access all Client File Uploads - User can view and access the file uploads for all profiles they have access to. If not granted, can only see and upload files for their assigned clients.
- Access all Clinical Notes/Forms - User can view and access clinical notes and forms for all profiles they have access to. If not granted, can only see notes/forms for their assigned clients.
- Access all Client Communications - User can view and send SMS, email, and letters for all profiles they have access to. If not granted, can only see communications for their assigned clients.
- View All Users Notes - User can view clinical notes created by all users in the profiles they have access to. If not granted, can only see notes that they have created.
- Allow Saving Notes in Draft Status - User can save notes in draft status which allows for editing at a later stage. If not granted, can only save notes as completed which locks them from further editing.
- Allow to Unlock Own Notes - User can unlock completed notes that they created. If not granted, can not unlock any completed notes.
- Allow to Unlock Completed Forms - User can unlock any completed form they have access to and return it to Draft status for editing. Off by default for non-master users. Master Users can always unlock completed forms, and this permission works independently of Allow to Unlock Own Notes.
Financial
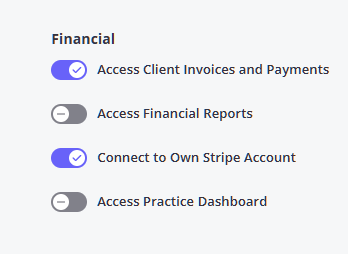
The Financial permissions manage what users can view and do within the financial areas of the system. These settings control access to invoices, payments, reports, dashboards, and Stripe connections, helping practices maintain clear boundaries around financial visibility and control.
Below is a summary of each permission:
- Access Client Invoices and Payments - User can view the list of invoices and payments for profiles they can access, including access to the Billing menu for all clients they can see. If not granted cannot view any client’s list of invoices and payments in their profile nor the Billing menu.
- Access Financial Reports - User can access Client, Financial and Practice reports that contain financial data.
- Connect to Own Stripe Account - User can connect their default practitioner profile to Stripe. Must have access to their practitioner profile to configure this.
- Users with access to their practitioner profile can access it via the user menu at the top right
-
- This access is enabled for all practitioners in a Zanda account in User Menu > Account Settings > Team > Users > User Settings.
- Access Practice Dashboard - User can access the practice dashboard to view statistics for the practice.
How Users Can Manage Their Details
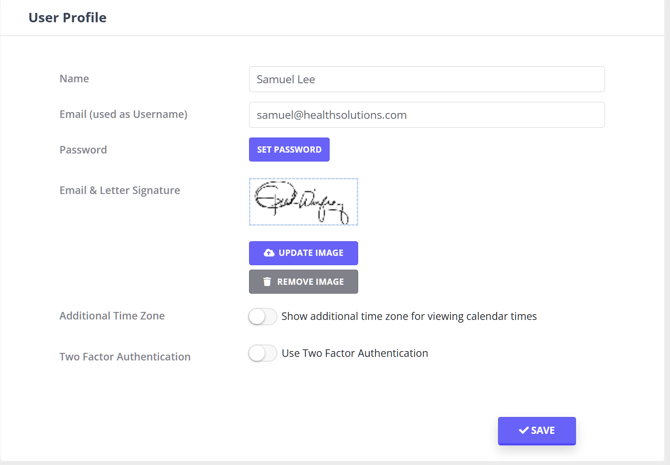
Each user will have access to their profile once they have logged in. This is accessible via the User Menu in the top right corner which shows the business name.
Managing Master User profiles: The email address and password used to create your Zanda account is the master user. The master user has total administration rights and can make changes to any user account they create. As such, the master user cannot be suspended or deleted.
However, master users can make changes to their profile. They have the option to change the name, email address, password, manage two factor authentication, and upload a signature for email/letters created by the master user.
Open the User Menu and select User Profile.
To access this page:
-
Log in to Zanda using the master user’s email address and password.
-
In the top-right corner of the dashboard, click on the business name. The User Menu will open, select User Profile.
-
Here you can edit the name, email/username, rest the password, upload a signature, and manage two factor authentication.
-
Click Save.
Add and Edit a User
Adding a New User
Adding a new user to your Zanda account is easy. Here’s how you can do that:
-
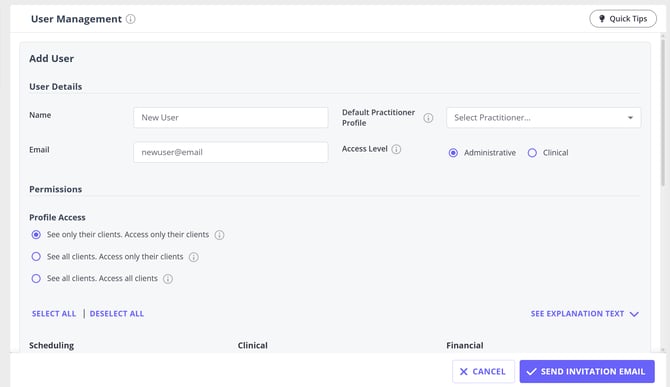
Navigate to User Menu > Account Settings > Team > Users > User Management. This will take you to the User Management page.
-
Click the Add New User button. This will bring up a form using which you can add the new user’s details - and setup which features they can access.
-
In the form, enter the new user’s name and email.
-
If they are a practitioner you can choose their practitioner from the default practitioner profile list.
-
Set their access level to "clinical" if you want them to have access to the clinical records for clients where they are the primary practitioner (or listed as a user with access), or else set it to "administrative" if you don't want them to have access to the clinical records for such clients.
-
Next, toggle the features you want them to be able to access.
-
Once done, click Send Invitation.
-
This will send an email to that user which they will have to open and follow the instructions to verify their account.
-
Once they do that, they will be able to access and use Zanda as normal.
- If their invitation email expires, 14 days after the invitation link was generated and sent, the user will be asked to contact you for a new invitation.
- You can resend the user invite by clicking the Resend button to send an automatic email, or you can click the 'Copy Link' button to copy the invitation link and send it via your preferred communication means.
Editing User Profile
To edit the profile information of an existing user, follow these steps:
1. Navigate to User Menu > Account Settings > Team > Users > User Management. This will take you to the User Management page. This will bring up a list of users in your Zanda account.
2. Click on the name (or the edit button on the far right) of the user whose details you’d like to edit.
3. The same form will appear using which you can edit the user’s information and feature access. Make the necessary edits.
4. On this page, you are also able to require the Two Factor Authentication to be enabled by the user. Toggle the switch on and save the changes. The user will be required to enable the 2FA upon their next login.
5. Once done, click Save.
Deactivate User Access
A Zanda account Master User and authorized users with permission to Setup and Configure Zanda can deactivate a user’s account. Here’s how:
-
Navigate to User Menu > Account Settings > Team > Users > User Management. This will take you to the User Management page.
-
In the user list, toggle the switch off next to the name of the user under the Active column. This deactivates their profile.
That’s it. From this point on, the user won’t be able to access their Zanda account and their name will disappear from the user list.
💡ProTip: It's best practice to proactively update the email address of any user you are deactivating. This ensures that the original email address can be reused by another user in the same account (useful for practices that use shared business email addresses), or by the same person in a different Zanda account. Doing this upfront helps streamline user management and avoids needing to contact the support team later.
To release an email address, simply add a few extra characters to the first part of the existing email. For example, to release `test@testmail.com`, you could update it to `test_released@testmail.com`.
Reactivate a user (fixing "Your account has been disabled" at login)
If someone sees the message "Your account has been disabled. Please contact an administrator for assistance." when they try to log in, their user profile has been set to inactive in your Zanda account. This commonly happens to a team member or virtual assistant whose access was switched off. The affected person cannot restore their own access. A Master User (or a user with permission to Setup and Configure Zanda) needs to reactivate them:
- Log in to the Zanda account and go to User Menu > Account Settings > Team > Users > User Management.
- Toggle on Show Inactive Users to reveal profiles that are currently inactive.
- Find the affected user and toggle the switch on in the Active column.
The user can then log in as normal.
Frequently Asked Questions
❓How do I resend an invitation to a user who has not completed registration?
Go to User Menu > Account Settings > Team > Users > User Management and open the invited user's profile. In User Status, click Resend to send the invitation email again. Click Copy Link to copy the invitation link and send it through another secure communication channel.
The Resend and Copy Link options appear only while the user is still listed as an invited user. The copied invitation link is generated for that user and is valid for 14 days.
❓Why is there no Resend or Copy Link button on a user's profile?
Because that person has already completed their registration. Resend and Copy Link sit in the User Status row, which appears only while an invitation is outstanding; once they set their password that row becomes the Password row, with Update Password in place of the two buttons. This is expected, not a fault.
You can tell the two states apart without opening a profile. In User Menu > Account Settings > Team > Users > User Management , anyone with an invitation still outstanding has (invited) after their name in the list.
An expired invitation is not the reason the buttons are missing. If someone let their 14-day invitation link lapse, Resend and Copy Link are still on their profile—open it and select Resend to send a fresh link.
Their login already exists, so they do not need another invitation. To get them back into the account:
- Ask them to select Forgot password? on the login screen and follow the email they receive, or
- Open their profile in User Management , select Update Password , set a new password, and pass it on to them.
If too many failed sign-in attempts have locked them out, the user list in User Management shows Locked till and a date in red beside their username, with an x beside it to reset the lockout. Setting a new password clears the lockout as well, so you do not need to do both.
If they are seeing "Your account has been disabled" at login rather than a password problem, their profile has been switched off—see Reactivate a user above.
💡 Note: A user profile and a practitioner profile are different things. Re-inviting someone or resetting their password affects their login only; it does not create or change a practitioner profile or their calendar.
❓My practitioner has the invitation link, but still can't log in
When a practitioner clicks their invitation link and can't complete registration, they'll see "User Registration Unavailable" with a message saying the link has expired. That message shows for three different reasons, not only an expired link, so check which one applies before sending anything new:
- They already registered. Open their profile in User Menu > Account Settings > Team > Users > User Management. If Resend and Copy Link are gone and a Password row with Update Password has taken their place, they already have a working login. Ask them to use Forgot password? on the login screen, or set a new password for them from Update Password.
- Their profile was deactivated. Toggle on Show Inactive Users in User Management to check. If they're listed there with Active switched off, reactivate them (see Reactivate a user above), then have them try the link, or a fresh one, again.
- The 14-day link expired. If they're still shown as invited and Active, open their profile and click Resend, or Copy Link, to send them a new invitation.
The wording on the error screen doesn't tell you which of these applies. Use the checks above instead.
❓Will an admin user add another practitioner to my subscription?
A user profile on its own does not add another practitioner to your subscription. Subscription billing is based on active practitioner profiles, so only create a practitioner profile for someone who needs their own calendar for appointments, services, availability, practitioner-specific billing details, or practitioner integrations.
For an admin, receptionist, biller, or practice manager who does not take appointments, go to User Menu > Account Settings > Team > Users > User Management, create or open their user profile, leave Default Practitioner Profile unselected, set Access Level to Administrative, and enable the permissions they need. If an admin user currently has an unnecessary practitioner profile, you can deactivate that practitioner profile from User Menu > Account Settings > Team > Practitioners by opening the profile, turning Active off, and clicking Save.
❓ Can I restrict an admin user to only see clients or appointments for one location?
Use practitioner and profile access for this workflow. The supported controls are practitioner/profile-based rather than location-only.
If the location is tied to one practitioner, select that practitioner as the user's Default Practitioner Profile. Then choose See only their clients. Access only their clients and make sure the relevant clients are assigned to that practitioner or list the user as a user with access on those profiles.
For check-in and check-out tasks, keep the user set to Administrative access, then enable only the permissions they need. Edit Appointments lets them add and edit appointments, View all Calendars controls whether they can see every practitioner's calendar or only their default practitioner's calendar, and Can Add and Search Clients lets them find profiles they are allowed to see.
If clients need invoices or receipts that describe a service in a specific way, create or edit the service name and description. When that service is added to an appointment or invoice, Zanda uses the service name and description on the invoice item.
❓ Can I give a user access to only some practitioner calendars, but not all of them?
Not as a permission. Calendar visibility is set per user and has two states rather than a pick list:
- View all Calendars turned off - the user only sees the calendar for the practitioner set as their Default Practitioner Profile.
- View all Calendars turned on - the user sees every practitioner's calendar.
There is no setting that grants a user a chosen subset of calendars, such as two practitioners out of five.
If the goal is privacy, there is a middle ground. You can let a user work across the whole calendar while keeping other practitioners' appointment details hidden. Go to User Menu > Account Settings > Team > Users > User Management and open the user's profile, then under User Permissions :
- Select the practitioner they work with most as the Default Practitioner Profile.
- Turn View all Calendars on.
- Leave Show All Appointment Details off.
- Click Save.
The user can then see and work in their default practitioner's calendar as normal. On every other practitioner's calendar, appointments appear as plain grey blocks with no client name, invoice, or appointment status, and they cannot be opened, moved, resized, or deleted.
💡 Note: Show All Appointment Details stays greyed out until View all Calendars is on and Profile Access is set to see all clients, so it is already off while it is unavailable.
If the goal is a tidier calendar rather than restricted access, use a practitioner group. Go to User Menu > Account Settings > Team > Practitioners , select Groups , and create a group containing only the practitioners you want to see together. Anyone can then select that group from the calendar selector to display just those practitioners. A group is a display filter for the calendar view, not a permission: a user with View all Calendars can switch back to All Practitioners at any time. See Using Practitioner Groups.
If per-calendar access control matters to your practice, submit it as a feature request. Click the ? help menu in the top-right corner of Zanda and select Submit an Idea to open the Customer Ideas Portal.
❓ Can I stop users logging in from outside our practice, for example by IP address or location?
Zanda controls access through the user's own credentials and permissions rather than by where they are signing in from, so there are three supported ways to tighten it:
- Require two-factor authentication. Go to User Menu > Account Settings > Team > Users > User Management, open the user, turn on Require Two Factor Authentication and click Save. The user is asked to set up 2FA at their next login and enters a 6-digit code each time they sign in.
- Limit what each user can reach. Under User Permissions, set Profile Access to See only their clients. Access only their clients and enable only the permissions the role needs. A login from anywhere then still only reaches that user's own clients.
- Remove access straight away. In User Management, toggle the switch off next to the user under the Active column. This takes effect immediately, even if they are currently signed in.
Zanda does not restrict logins by IP address, network, or physical location, so an active user can sign in from anywhere with their email address, password, and two-factor code if one is required.
To review which IP addresses your team has been working from, go to Tools > Log File. Each entry records the date, user, page, IP address, and browser, and you can filter by user, date range, or IP address. Log File entries are kept for twelve months.
If IP or location-based login restriction matters to your practice, submit it as a feature request. Click the ? help menu in the top-right corner of Zanda and select Submit an Idea to open the Customer Ideas Portal.
Related Articles
- Video: Adding and Editing Account Users - Watch the full walkthrough for creating and updating user profiles.
- User Permissions for Reception/Admin Staff - Review recommended permissions for admin and reception team members.
- Activating Two Factor Authentication - Add a second layer of security to user logins and require it for a user.
- Recording and Reviewing the User Activity Log File - Review account activity with the user, page, IP address, and browser recorded for each entry.
- Using Practitioner Groups - Group practitioners to filter which calendars are displayed together.
- How to Submit an Idea on the Customer Ideas Portal - Send a feature request to the Zanda product team.
- Archiving, Deleting, Unarchiving and Restoring Clients - See which permissions a user needs to archive, unarchive, or delete a client profile.