In this article:
- Message Visibility and Notifications
- Practice Hive Settings
- Frequently Asked Questions
- Related Articles
Practice Hive Overview
The Zanda Practice Hive is your go-to space for staying up to date with everything happening in your Zanda account.
- You’ll find it conveniently located in the app bar at the top of your screen, under the beehive icon.
- If you have unread notifications, you'll also see a counter on the icon so you know at a glance if there’s something new to check out.
- You can resize the Practice Hive window and move it around your Zanda screen for your convenience.
So, what is the Practice Hive?
The Practice Hive serves as your central notification hub, providing each user with a tailored overview of all practice activities. From new client registrations and appointment updates to critical system alerts, Practice Hive ensures you stay informed—without ever needing to navigate away from Zanda. It also features integrated Zanda product release notes and an in-app team chat, making it easy to communicate and collaborate with your team directly within your workflow.

Here's what's included in the Practice Hive:
- Notifications:
- All
-
Client Portal
-
Forms
- Uploaded Files
- Waitlist Requests
- Warnings
- Invoice Payments
- Release Notes
- New features and enhancements
- Improvements
- Resolved
- Zanda Tips
- Quick workflow tips
- Practical steps
- Links to detailed guides
- Team Chat
- Personal messages
- Group Chats
- Channels
Your Practice Hive is Personalized for Each User
- Users are sent notifications based on their associated practitioner profile under User Menu > Account Settings > Team > Users.
- Notifications regarding booked or cancelled appointments in the client portal will be sent exclusively to the practitioner assigned to that appointment.
- Clients primary practitioner and assigned practitioners will be notified about completed forms and uploaded client files. (You can check who they are in each client profile > Admin > Manage settings.)
- Your Zanda account default practitioner will be notified about new clients registered via the client portal.
- Only users associated with the practitioner profile (check this in User Menu > Account Settings > Team > Users) will be notified about if their Google or Outlook calendar sync failed.
💡 Important Note
If you are not receiving notifications where you should be, please check the following:
- Navigate to User Menu > Account Settings > Team Users, open your user profile and make sure your Default Practitioner Profile is selected.
- Open a client profile whose notifications you are not receiving, and check that you are added as a Primary Practitioner or an Assigned Practitioner in this client profile > Admin > Manage page.
- If you do not have access to the Settings Springboard menu and client profile > Admin > Manage pages, reach out to your Zanda account owner or authorized user, such as your practice manager, to add you as a primary or assigned practitioner.
- You can still receive your client portal notifications via email or SMS, as set in User Menu > Account Settings > Client Portal > Notifications.
- You can still be notified about submitted online forms via email, as set in Tools > Form Designer, > in each online form template.
System Messages

Notifications
1. Client Portal Notifications
In addition to an email, you’ll now get updates directly in Zanda when:
-
A new client registers
-
A new appointment is booked (if a client added a note at the time of booking, it will be added to the notification entry in the Practice Hive)
-
An appointment is cancelled
- An appointment is rescheduled
- A client submitted a waitlist request
These notifications will include quick-access links, like:
-
The client’s name (click to open their profile)
-
Appointment details (click to view on your calendar)
2. Forms Notifications
- You’ll be notified when your client submits a form.
- Click 'View Form' to open the submitted form in client's profile.
3. Uploaded Files Notifications
- You'll receive a notification whenever a Zanda user uploads a file to a client profile in Records > Files or Admin > Admin Files, provided you are assigned as the primary practitioner, an assigned practitioner, or have access to that client profile
💡 Pro Tip: If you aren't seeing new notifications alerts for your clients' uploaded files, enable them in Practice Hive Settings at the bottom left.
4. System Warnings Notifications
To start with, we’ve included two important calendar sync-related warnings:
-
Google Calendar Sync Failed
-
Outlook Calendar Sync Failed
These help you stay on top of calendar connection issues without delay.
5. Invoices Payment Notifications
An invoice payment notification appears when a client or an assigned invoice payee fully pays an invoice online via the Stripe integration from:
- The Client Portal
- An Invoice Pay Link
Each notification includes a quick action button to open the invoice directly.
Important: Invoice payment notifications are triggered only when an invoice is paid in full. Partial payments do not generate a notification.
Who can see invoice payment notifications?
Invoice payment notifications are visible only to users who meet both of the following criteria:
1. Client access
The user must have access to the relevant client as one of the following: (as assigned in client profile > Admin > Manage)
- The primary practitioner for the client
- An assigned practitioner for the client
- A user with access to the client
OR
- A user with Profile Access: See al clients, access all clients
2. Billing permission
The user must have the Edit Invoice Charges permission.
If a user does not meet both criteria, the notification will not be shown, even if invoice notifications are enabled for the practice.
Tip: To review a user’s permissions, go to User Menu > Account Settings > Team > Users, then open the user profile.
Managing Notifications
Practice Hive gives you full control over how you view and manage your alerts:
-
Filter by type (e.g., only show Client Portal notifications). You can do this in the Practice Hive Settings (find them in the bottom-left of the Practice Hove modal window)
-
Click to open the notification, then click an available link and go straight to the relevant page in your Zanda account.
-
Mark as read/unread to update the counter.
-
Dismiss notifications you no longer need.
- Enable/Disable notification alerts: You can easily control the yellow alert counters that appear when you have unread notifications. To adjust these counters, click the Settings gear icon at the bottom left of the Practice Hive window, then use the switches to enable or disable each notification alert as needed.
Release Notes
Stay up to date with the latest changes in Zanda Health using the Release Notes section.

This feature provides a central place where you can easily review new features, system updates, performance improvements, and bug fixes. Whether you're looking for recent enhancements or tracking long-term development progress, the Release Notes help keep you informed. You can access this feature directly from your Zanda dashboard to see what’s new and what’s improved.
- New: Highlights brand-new features and major additions to the platform. These may include new tools, integrations, or user interface options that expand what you can do in Zanda.
- Enhancement: Covers enhancements to existing functionality, such as performance upgrades, workflow refinements, design updates, or usability tweaks. These updates make using Zanda smoother, faster, and more intuitive.
- Resolved: Lists bugs and technical issues that have been identified and fixed.
🔑 Pro Tip: Click the 'Release Notes' link at the top-right to open the release notes webpage to view the comprehensive list of release notes and filter by date.
Using Zanda Tips to Work Smarter
Zanda Tips are short, practical in-app guides that help you discover useful ways to work smarter in Zanda. You’ll find quick workflow ideas, time-saving suggestions, and feature tips directly inside the Practice Hive, so you can learn small improvements without leaving your current workflow.
Zanda Tips are different from Release Notes. Release Notes help you see what is new, improved, or resolved in Zanda. Zanda Tips help you understand practical ways to use Zanda more efficiently in your day-to-day work.
Enable Zanda Tips in Pracice Hive settings.
Zanda Tips include:
-
Helpful workflow suggestions
-
Step-by-step instructions
-
Links to related Knowledge Base articles or guides
- Supporting screenshots or images
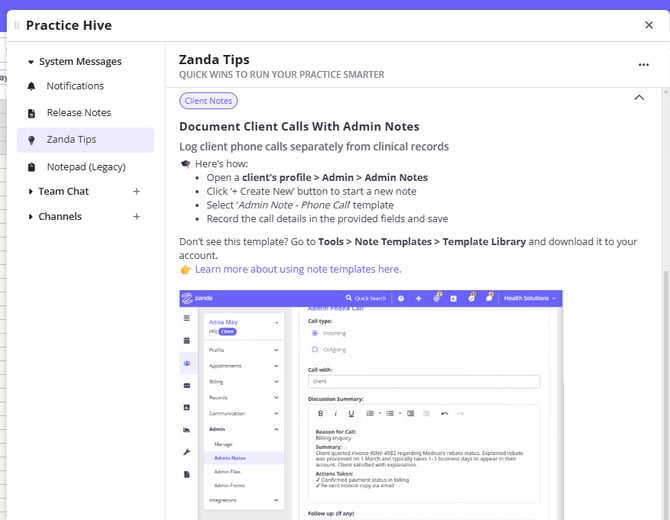
Where to find Zanda Tips
To open Zanda Tips:
- Select the Practice Hive icon in the top app bar.
- In the left side panel, go to System Messages.
- Select Zanda Tips.
- Browse the list of available tips.
- Select the arrow icon on the right of a tip to expand it.
- Read the quick steps, view a supporting image, and select a linked guide for more information.
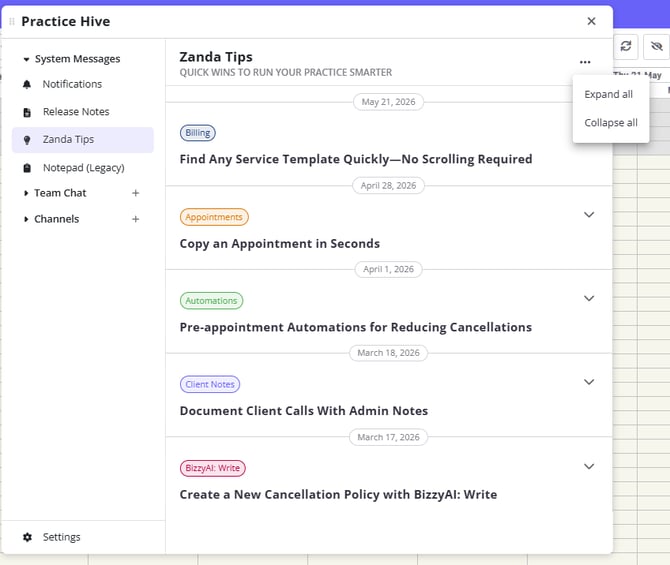
Expanding and collapsing tips
You can open tips one at a time, or use the three-dot menu in the top-right corner of the Zanda Tips page to manage the full list.
Select:
-
Expand all to open all visible tips
-
Collapse all to close all visible tips
This makes it easier to quickly scan available tips or focus only on the ones most relevant to your current task.
Practical ways to use Zanda Tips
Zanda Tips can help your team:
-
Learn quick ways to save time in common workflows
-
Discover useful features they may not be using yet
-
Find practical examples for billing, appointments, automations, notes, and more
-
Access related guides when they need more detailed instructions
-
Review small workflow improvements without searching the full Knowledge Base
💡 Tip: Check Zanda Tips regularly to find quick wins that can help your practice reduce admin, stay organized, and make better use of the tools already available in Zanda.
Team Chat

Where to Find Team Chat
-
Open the Practice Hive from your Zanda dashboard.
-
You’ll find Team Chat in the left side panel.
-
A notification badge will appear to indicate any unread or outstanding messages.
Personal Chat
- When Team Chat opens, users will land in their personal chat — a private space where they can leave notes for themselves, save links, images, or reminders.
- No other user can view this space.
Who can see Team Chat messages
Team Chat visibility depends on the type of conversation:
- Personal chat: only you can view your personal chat.
- One-on-one chat: only you and the other user can view the conversation.
- Group chat: only users added to the group chat can view the conversation.
- Channels: only users added to the channel can view that channel.
Group Chat
A group chat in the Practice Hive is a direct message conversation between three or more people (up to nine participants).
Group chats are useful when:
-
You need a quick discussion with a small group without creating a full channel.
-
You want to coordinate on short-term tasks with just a handful of colleagues.
-
You prefer privacy, and don’t need the visibility or structure of a channel.
Starting a Group chat
To start a group chat:
-
Click the Plus icon at the top of the team chat panel.
-
In the New Message modal, search or scroll to find the users you want to message.
- Select the users names from the drop list, click Start Message.
- Begin typing and hit Send.
💡 Note: Once you select Start Message the group chat is created and users will immediately see the chat in their list.
Adding more members to a Group chat:
Users can add members to a group chat at any time, here's how:
- Open the group chat.
- Click the member menu in the top right-hand corner of the chat.
- Click on + Add More Members.
- Search or scroll to find the users you want to add to the group chat.
- Select the user names from the drop list, click +Add More Members.
- The users are now added to the group chat.
Starting a One-on-one Chat
To message another user:
-
Click the Plus icon at the top of the chat panel.
-
In the New Message modal, search or scroll to find the user you want to message.
-
Select their name and click Start Message.
-
Begin typing and hit Send.
💡 Note: Until you send the first message, the other person will not see the chat in their list.
Team Chat Features

Once you start chatting, you can:
-
Send messages in real-time
- Send reactions to messages in personal chats, group chats and channels
-
Edit messages
-
Edited messages show an "Edited" label
-
-
Delete messages
-
Deleted messages display: "This message has been deleted."
-
-
Use emojis
-
Format text with:
-
Bold
-
Italics
-
Strikethrough
-
Hyperlinks
-
Bullet (unordered) lists
-
Numbered lists
-
Files and images: You can upload, drag and drop or copy-paste images/files directly into the chat
-
Managing Chat History
Use message deletion when you need to remove an individual message. Deleted messages remain visible in the conversation as "This message has been deleted."
You can hide Team Chat conversations from your sidebar when you no longer need them in view. Downloading or exporting chat history is not currently supported, and entire conversations are hidden rather than permanently erased.
Channels
Channels are dedicated spaces in Practice Hive where teams can share messages, files, and updates around a specific topic, project, workflow, or group of people.
You can create channels for your whole practice or limit them to selected users. Channels can have an unlimited number of members, and each channel can have a custom name that reflects its purpose.
For example, you might create channels for:
- Admin updates
- Finance or billing discussions
- Practitioner team communication
- Weekend staff coordination
- Internal projects
- Shared business documents
Unread messages are highlighted with a counter badge in the Team Chat and Channels sidebars, helping users quickly see where new messages are waiting.
Note: User active/inactive indicators are not currently available in Practice Hive.
Practical Ways to Use Channels
Channels can help your practice keep important conversations, updates, and shared resources organised in one central place. They are most useful when they are created around clear teams, topics, or workflows, so users know where to post updates and where to find important information later.
Share team-wide practice updates
Create a channel for general practice announcements, such as workflow changes, policy updates, meeting reminders, or important operational notices. This helps keep key updates visible and easy for the team to refer back to later.
Organise department or role-based communication
Create channels for specific groups, such as Admin, Finance, Practitioners, or Weekend Staff. This helps keep conversations focused and makes it easier for each team to find the information that is relevant to their role.
Coordinate projects or workflow changes
If your practice is working on a specific project, such as updating intake forms, preparing for a new service, or reviewing internal processes, you can create a dedicated channel to keep related messages, files, questions, and decisions in one place.

Creating a Channel
To start a new channel:
- Click the Plus icon by the channel title.
- Give the channel a unique name by typing in the channel name field.
- Select All Users to have all active users on the account added to the channel or select Selected Users to choose who is added to the channel.
- Select Create.
- If you have selected All Users, the channel will now be created.
- If you have selected Selected Users, search or scroll to find the users you want to add to the new channel.
- Once you have added all the users, click Add to create the new channel.
Adding Channel Members
Users can add members to a channel at any time, here's how:
- Open the channel.
- Click the member menu in the top right-hand corner of the chat
- Click on + Add More Members.
- Search or scroll to find the users you want to add to the channel.
- Select the user names from the drop list, click +Add More Members.
- The users are now added to the channel.
Removing Channel Members
Each user can leave a channel from their own member row. Other members remain in the channel until they leave.
Leaving A Channel
Users can leave a channel at any time, here's how:
- Open the channel.
- Click the member menu in the top right-hand corner of the channel.
- Click on Leave next to your user name.
- Click Leave on the confirmation pop up.
- You have now left the channel.
Renaming A Channel
Users can rename a channel, here's how:
- Open the channel.
- Click the three dot menu in the top right-hand corner of the channel.
- Click Edit Channel Name
- Type the new channel name in the channel name field.
- Click Save Changes.
- The name is now updated
Message Visibility and Notifications
-
Unread messages are highlighted with a counter badge in the Team Chat and Channel sidebars.
-
Users currently don’t have active/inactive indicators, but this may be added in the future based on demand.
Practice Hive Settings
Use Practice Hive settings to turn notifications on or off, so you only see what matters to you. The Settings button is located at the bottom left of the Practice Hive modal window.
-
Toggle on 'Enable Notifications' to start receiving all practice hive notifications. If toggled off, no notifications will be received.
-
Toggle on 'Enable Client Portal Notifications' to start notifications on the practice hive about your clients booking, cancelling or rescheduling appointments with you on your client portal.
-
Toggle on 'Enable Form Notifications' to start receiving notifications when your clients complete forms.
-
Toggle on 'Warning Notifications' to start receiving notifications about your external calendar syncs failing.
- Toggle on 'Enable File Notifications' to start receiving notifications for when a user uploads a file into your client's record.
- Toggle on 'Enable Client Portal Waitlist Notifications' to start receiving notifications about your clients adding themselves to the waitlist via the client portal.
- Toggle on 'Release Notes' to start receiving notifications about Zanda updates.

💡Notes:
-
Practice Hive settings are specific to users only.
-
You can re-enable notifications at any time.
-
You'll only receive new notifications created after it's turned back on.
-
There is no permission required for users to access the Practice Hive.
Frequently Asked Questions
❓ Are Practice Hive chats and channels encrypted?
Practice Hive Team Chat and Channels use the signed-in Zanda web app session, which is protected by HTTPS. They are built into Practice Hive, so your messages stay within Zanda rather than a separate messaging app, and conversation visibility is limited to the personal chat owner or the users added to the chat or channel. Practice Hive file access is also protected through signed file access.
For formal security certificates, compliance details, and region-specific data hosting information, review Zanda Security or contact Zanda Support for the latest compliance wording.
Related Articles
- Notepad Is Moving to Practice Hive - Learn how legacy Notepad workflows connect to Practice Hive and Team Chat.
- Managing Practitioner Notifications - Configure appointment, Client Portal, and other practitioner notification preferences.
- Understanding Continuous Software Updates - Learn where release notes appear and how Zanda shares product updates.