%20-%20120%20x%2044.svg)
In this article
- Post-Appointment Automations Overview
- Using Post-Appointment Automations For Sending Communication After An Appointment
- Sending All Automation Communication to Clients' Contacts
- Frequently Asked Questions
- Related Articles
Post-Appointment Automations Overview
Post-appointment automations help your practice follow up with clients after an appointment without needing to track each appointment manually. You can use them to send follow-up emails or SMS messages, share aftercare instructions, request feedback, send rebooking prompts, remind clients about next steps, or provide links to forms and resources after their session.
You can also use post-appointment automations to create internal tasks for your team. For example, you might create a task to follow up with a client, review post-session paperwork, check whether a client needs another appointment, or complete an admin action after a specific service.
Post-appointment automations are especially useful when different appointment types need different follow-up communication. You can set up targeted follow-ups based on conditions such as days after the appointment, appointment location, appointment status, service, appointment flag, client status, client type, client classification, or whether telehealth was enabled.
Use this article to set up automated post-appointment emails, SMS messages, and tasks for client follow-up, rebooking reminders, aftercare instructions, post-session communication, feedback requests, practitioner-specific follow-ups, service-specific workflows, telehealth follow-ups, and internal team tasks.
Important note about timing
Post-appointment automations are not sent immediately after an appointment ends. They are processed daily at 2:00 PM (14:00) local time for each account, based on the number of days after the appointment date that you set in the automation conditions.
For example, if the automation is set to run one day after the appointment, the message or task will be processed at 2:00 PM local time on the following day, provided the appointment meets all selected conditions.
Using Post-Appointment Automations For Sending Communication After An Appointment
This is how you will set this up:
- Navigate to User Menu > Account Settings > Communication > Automations
- Click on '+ Add Automation'
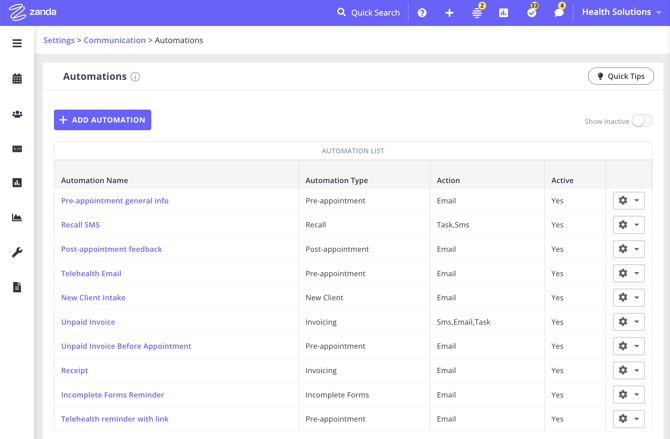
- Name the Automation based on its purpose.
- Select the 'Post-Appointment' Automation Type.
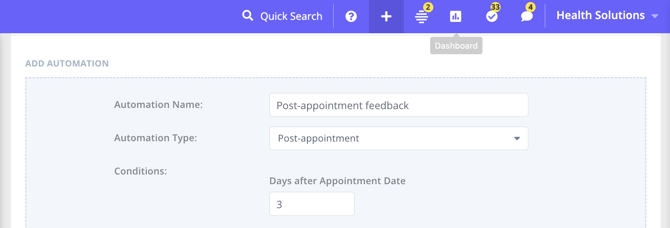
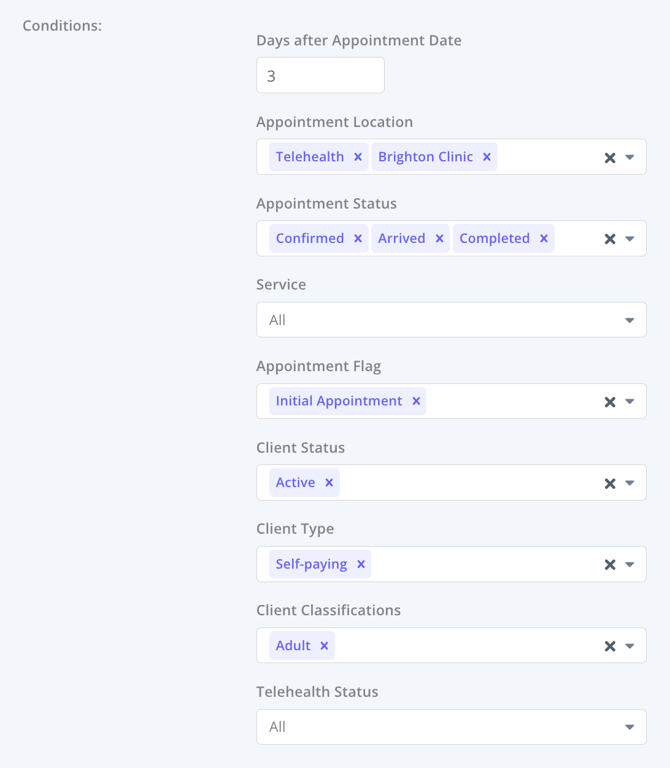
- Set the Conditions for this automation. All conditions must be met for an automation to be triggered. The following conditions can be set:
- Days after Appointment Date - this is when the automated message will be sent for the past appointment. Minimum time period for setting this automation is 1 day after the appointment date.
- Appointment Location - leave as all, or select one or more locations.
- Appointment Status - leave as all, or select one or more statuses.
- Appointment service - leave as all, or select one or more services linked to the appointment.
- Appointment flag - leave as all, or select one or more flags.
- Client Status - leave as all, or select one or more statuses.
- Client Type - leave as all, or select one or more types.
- Client Classifications - leave as All, or select one or multiple client classifications.
- Telehealth Status - refers to appointments with telehealth links on or off, select All, Enabled or Disabled.
⚖️ How Matching Works
-
Within a single condition (for example, selecting multiple Services or Client Classifications), the system applies OR logic. Example: If you select Therapy and Massage, the automation will trigger if the appointment is for either Therapy or Massage.
-
Across different conditions (for example, Days after Appointment + Service + Location), the system applies AND logic. Example: The automation will trigger only if the appointment was 2 days ago AND is for Therapy AND is at the Melbourne location.
| Logic Type | Example | Result |
|---|---|---|
| OR (within one condition) | Appointment Service = Therapy OR Massage | Triggers if the appointment is for either service |
| AND (across conditions) | Days After Appointment = 2 AND Service = Therapy AND Location = Melbourne | Triggers only if all match |
💡 Tip: Multiple selections inside one condition = OR, while multiple conditions together = AND.
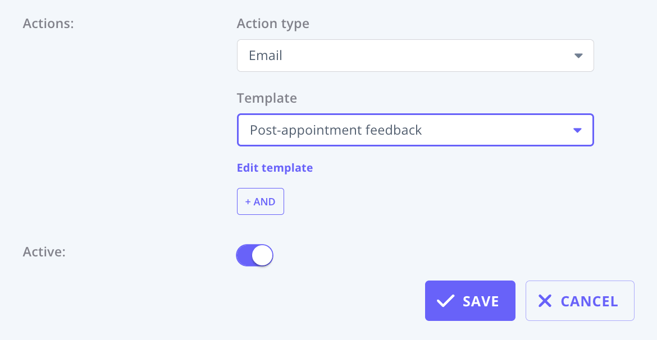
6. Click on the 'Action Type' dropdown to set the action type, SMS, email, or task and select the communication template you created to use for this Automation.
7. You can add another action by clicking the '+AND' button and selecting an action, then choosing your template. You can add as many additional actions as needed.
8. If you selected a Task action, in addition to selecting a communication template, you can also add an internal note for your team in the Task Details field. The automation task will appear in your main Tasks dashboard and will be visible to all users.
9. Save the changes.
Sending a one-time online review request by SMS
You can use a post-appointment automation to send an SMS template that includes your online review link (for example, Google review) after a matching appointment.
To set this up:
- Create an SMS communication template that includes your online review request and link.
- Create a Post-Appointment automation.
- Set the Days after Appointment Date condition and any other conditions that should identify the appointments that qualify for the review request, such as Appointment Status, Service, Appointment Flag, Client Type, Client Status, or Client Classifications.
- Set the Action Type to SMS, then select your online review request template.
- Save the automation.
Post-appointment automations do not include a built-in send once per client setting. They send when an appointment matches the automation conditions. The Client Classifications condition also works as a positive match: when you select one or more classifications, the automation applies to clients who have one of those classifications.
For a controlled one-time review request, use a positive filter your team can manage. For example, create a dedicated appointment flag for review requests, select that flag in the automation's Appointment Flag condition, and apply the flag only to the completed appointment that should trigger the SMS. You can also use a client classification as the positive filter if your team has a clear process for adding and removing that classification after the request is sent.
Sending All Automation Communication to Clients' Contacts
You can send automations communications, such as pre-appointment messages, follow-ups, invoices reminders, recalls and so on, directly to a client’s contact.
How It Works
- Open the relevant client Profile > Contacts tab and select their connected contact, or add the contact who will be receiving their automation communication messages.
- Each connected contact profile includes a Send all automation communication toggle. You’ll find this setting just below the Send reminders toggle in the connected contact’s settings. Turn this toggle on.
- Save the changes. When this option is turned on, all automated messages that would normally go to the client will also be sent to that contact. This includes any automations triggered by reminders, invoices, recalls, or similar workflows.
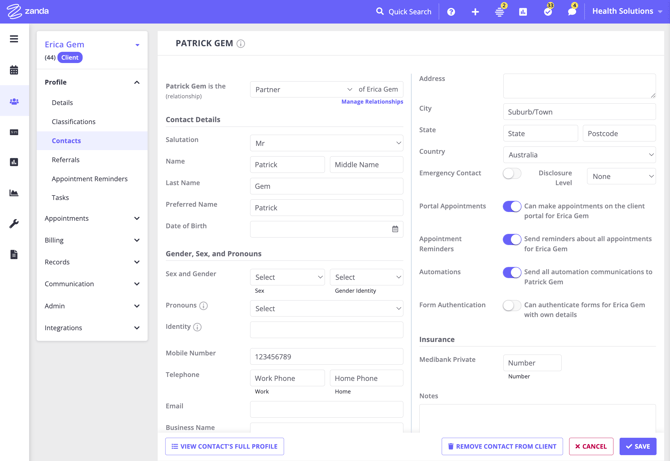
Example: If a parent, guardian, or carer is listed as a contact and the Send all automation communication option is enabled, they will receive the same automated messages as the client.
💡 Tip: Before enabling this setting, make sure you have the contact’s consent to receive communications on behalf of the client. This helps maintain privacy and ensures compliance with communication and data protection standards.
Frequently Asked Questions
❓ Can I send a post-appointment automation only when the client has no future appointment booked?
Post-appointment automations do not include a built-in No future appointment booked condition. Use a post-appointment automation when the follow-up should be based on the past appointment, such as its Appointment Status, Service, Appointment Flag, Client Status, Client Type, Client Classifications, Appointment Location, or Telehealth Status.
For rebooking reminders that should only go to clients with no future appointment booked, use a Recall automation. Recall automations are designed for this workflow and only trigger after the set number of days when the client's latest appointment matches the recall criteria and they have not booked another appointment.
If your team needs a status-specific follow-up after a cancelled, rescheduled, or missed appointment, set up a post-appointment automation with the relevant Appointment Status and Days after Appointment Date. The day count is based on the appointment date, so choose the number of days after the appointment rather than counting working days. To narrow the audience further, use one of the available conditions, such as Appointment Flag, Client Status, or Client Classifications. These values need to be maintained by your team so the automation can identify the right clients or appointments.
Related Articles
- Setting Up a Recall Automation - Learn how to send rebooking reminders to clients who do not have a future appointment booked.
- Managing Automations - Learn how automation actions, timing, and automation types work in Zanda.
- Communication Templates for Zanda Automations - Use ready-to-edit message templates for automation emails and SMS messages.