%20-%20120%20x%2044.svg)
Availability Feature Overview:
The availability functionality is designed to indicate which times in each calendar are marked as available (displayed in white or a custom color) and which are unavailable (displayed in grey).
This visual distinction allows users to quickly assess availability within the calendar. Additionally, practitioners' availability is crucial for determining when and where they can accept appointments booked by clients through the Client Portal.
These availability settings act as a visual guide; however, receptionists still have the flexibility to schedule appointments during "greyed out" (unavailable) times if necessary.
- When appointments for clients are scheduled in a practitioner's calendar, the availability settings determine the appointment location. If a client is booked at a time that falls outside of the designated available hours, the appointment will automatically default to the practitioner's pre-set location. You can find this default location by navigating to User Menu > Account Settings > Team > Practitioners.
- If your clients have access to the client portal, they will be able to schedule appointments only during the time slots designated as "available." This is determined by the availability settings and the 'Client can book online' option being enabled.
In this article:
- Setting Up and Editing Standard Weekly Availability
- Understanding the Availability Management Screen
- Using the 'Availability Override' feature
- Using Availability with Multiple Locations
- Cloning Availability
- Frequently Asked Questions
- Related Articles
Setting Up and Editing Standard Weekly Availability
- Navigate to User Menu > Account Settings > Team > Availability.
- Select the calendar from the left-hand side menu.
- If there is an existing Weekly Availability, click 'Edit', otherwise click "+ Add Availability".
- Set the Period of the availability. This will require a start date of when this Availability will commence in the calendar. You can either enter an end date or leave it as 'Ongoing' so that the Availability is implemented for all future dates.
- Add an optional Description (this is only shown on the Availability page for your own reference).
- Set the Location for the Availability (new appointments booked during the available period will be linked to this location).
- Set the frequency that you would like this to recur (i.e. repeat after one week, two weeks (fortnightly), three or four weeks (monthly)).
- Under Days and Times, you can go through each day and add your availability. To add a block of availability for a day click "+ Add Availability" and then use the filter to set the start and end time of the block.
- If you use the client portal and would like to allow your clients to book in during this available time tick 'Clients can book online' and this will display this time block as available for the client. If this is not ticked, this time block will show as unavailable in the client portal.
- Click 'Save'.
Important — Timezone: All availability times are stored and displayed in your account’s business timezone (User Menu → Account Settings → Practice → Business Info → Time Zone). This applies even when practitioners are viewing the calendar from a different location.
If a practitioner is temporarily working in a different timezone, do not change the account timezone. This can shift existing appointments and affect the entire practice.
Instead, use the Additional Time Zone display feature and Availability Overrides to reflect their actual working hours. See Working Remotely from a Different Timezone for a step-by-step guide.
- The availabilities whose end date is in the past will be hidden from the list of availabilities. Use the 'Show Past Availability' switch at the top-right to see the list of past availabilities and edit them if necessary.
Understanding the Availability Management Screen
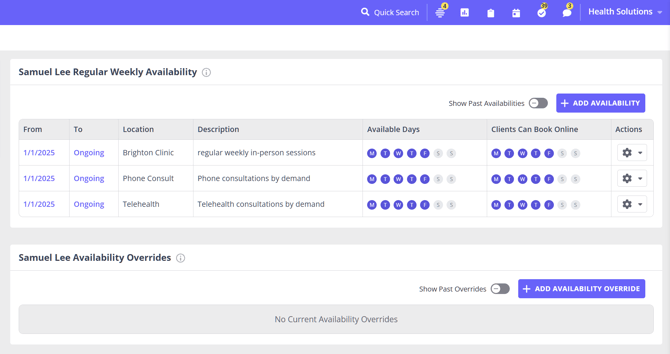
This section of the Availability page gives you a clear, structured overview of a practitioner’s regular weekly schedule as well as any one-off changes. It’s designed to help you quickly understand where, when, and how a practitioner is available, and how these settings affect client bookings through the Client Portal.
Regular Weekly Availability
The top panel lists all active weekly availability schedules for the selected practitioner. Each row represents a repeating block of availability linked to a specific location—for example, a clinic site, a telehealth service, or a phone consultation calendar.
Here’s what each column provides:
-
From / To - Indicates the start date of the availability period and whether it is ongoing. This helps you manage long-term schedules or prepare for future roster changes.
-
Location - Specifies the location the practitioner will be working from during these available times. This determines how the appointment is categorized and where it appears on reports.
-
Description - A simple internal note to help you identify the purpose of the schedule (e.g., “weekly in-person sessions” or “Telehealth consultations by demand”).
-
Available Days - Shows which days of the week this availability block repeats and includes visual indicators for each day. Admins can quickly confirm the practitioner’s weekly rhythm at a glance.
-
Clients Can Book Online - Indicates the days clients can self-book through the Client Portal. When a day is highlighted, it means this availability is visible and open to clients for online scheduling. This allows practices to fine-tune online booking options without restricting internal scheduling flexibility.
- Actions Menu (⚙️) - Provides two tools:
- Edit an existing availability
- Clone to… another practitioner or location
Availability Overrides
The second panel displays any temporary or one-off changes to a practitioner’s schedule, such as public holidays, leave, or special extended hours.
-
If no overrides exist, you’ll see a clear message stating “No Current Availability Overrides.”
-
Clicking Add Availability Override lets you mark specific dates or hours as available or unavailable.
-
The Show Past Overrides toggle allows you to review or edit past exceptions if needed for auditing or record-keeping.
Overrides always take priority over weekly availability, giving practices complete control when the standard schedule needs to be adjusted.
Why This View Is Valuable
This consolidated layout gives Zanda users:
-
Full visibility at a glance — instantly see the practitioner’s weekly schedule across all locations.
-
Confidence in online booking rules — clearly identify which days clients can and cannot book through the portal.
-
Simplified schedule management — edit, clone, and manage availability without navigating multiple pages.
-
Operational flexibility — add overrides to handle last-minute changes while keeping the core schedule intact.
-
Accurate calendar behavior — availability determines calendar colours, booking rules, and location assignment, helping reduce errors and streamline admin work.
This view becomes especially powerful for practices managing multiple practitioners, hybrid telehealth/in-person schedules, or complex location rotations, offering both clarity and control in one place.
Using the 'Availability Override' feature
An Availability Override lets you set specific dates and hours that differ from the Regular Weekly Availability—a public holiday, annual leave, a temporary location change, or a week that simply does not follow your usual pattern. Availability Override settings take priority over the Regular Weekly Availability:
- User Menu > Account Settings > Team > Availability.
- Select the practitioner.
- Select "+ Add Availability Override".
- Select whether you will be Available or Unavailable.
- Enter the Period and Time.
Important: If you select a period longer than one day, all the hours between the From and To dates will be included in the Availability Override
6. Select the Location.
7. If you set Available to Yes and you want clients to book this time through the Client Portal, turn on Clients Can Book Online. This option only appears once Available is set to Yes. If you leave it off, the time is available for your team to book manually on the calendar, but clients will not be offered it on the portal.
8. Enter an optional " Description" details for your reference.
9. Click Save.
Hint 💡You can edit or delete your Availability Override settings at any time.
Adjusting Availability for a Temporary Change in Location or Timezone
If a practitioner is working from a different timezone for a period (for example, interstate or overseas telehealth), use an Availability Override to reflect their working hours—without changing the account timezone or their regular weekly schedule.
How to adjust availability
- Calculate the practitioner’s desired working hours in the account’s business timezone.
(Example: If they want to work 9am–5pm in a location that is 3 hours behind the account timezone, enter 12pm–8pm in the override.) - Add an Availability Override for the travel period using those converted times.
- Add a clear Description (e.g. “Travel to Perth — adjusted hours”) so your team understands the change.
- Set an Additional Time Zone in the practitioner’s Profile so they can view their local time alongside the business timezone on the calendar.
Note: Availability Overrides temporarily replace regular availability and will not permanently change the practitioner’s schedule.
When the travel period ends, the override will stop applying (if an end date is set) or can be removed manually. The practitioner’s regular availability will then resume automatically.
For a step-by-step walkthrough and worked example, see Working Remotely from a Different Timezone.
Using Availability with Multiple Locations
If you have more than one location you would create a Standard Weekly Availability linked to each location. This will allow you to reflect your availability at each location. Each location can have a colour attached which is reflected in the calendar to help you easily identify which location you are working in each day. To associate a colour with each location please follow these steps:
- Access the location via User Menu > Account Settings > Practice > Locations.
- Edit an existing location, or click "Add Location".
- Use the colour picker provided to select the desired colour for the location.
Once you have created an Availability for each location, your calendar would then be displayed with the background colour indicating which location they are available in for that time slot.
Cloning Availability to the Same and Other Practitioners
Zanda's Clone Availability feature is designed to make it easier to manage and set up availability schedules for sole practitioners and practices with multiple locations and practitioners. This tool is especially useful in scenarios like duplicating availability for telehealth sessions and in-person appointments, or when adjusting weekly schedules, such as removing a day. Practitioners can quickly replicate their existing availability and apply necessary changes with ease. Additionally, this feature is a valuable asset for practice managers or administrative teams responsible for coordinating schedules across multiple practitioners and locations*.The following steps outline how to effectively use the Clone Availability feature:
- Navigate to User Menu > Account Settings > Team > Availability;
- If you just started setting up a practitioner, create a new availability or an availability override for them, or
- Locate the availability or the availability override schedule you'd like to replicate for this or other practitioners;
- Click on the cog icon for this availability;
- Select the 'Clone to...' option;
- A pop-up window will appear to allow you to select which practitioner(s) to clone this availability to, giving you the options to select
a) the same practitioner and/or other practitioners;
b) all practitioners in your account. To prevent duplication, when cloning availability to all practitioners, the system will automatically exclude the practitioner whose availability is being cloned. - Once the practitioners are selected and you are ready to proceed, click on the 'Clone' button, or select 'Cancel' to cancel the action.
- If you chose 'Clone', this will make an exact copy of the availability for the selected practitioners.
- Make any necessary adjustments (for example, you can change the Location of the cloned availability schedule) and save those changes.
*Note: Users accessing the availability via the practitioner profile will only be able to clone availability to that practitioner, not to all practitioners.
Frequently Asked Questions
How do I show a break between availability blocks?
You can show a break by creating separate time slots for the same day in Days & Times. Click Add Availability, use the add icon in the Add/Remove column to insert another time slot for that day, and set the first time slot to end before the next one starts.
I can't set an availability time like 3:45 PM — it isn't in the dropdown, and typing it isn't accepted
The start and end time fields in Availability are dropdowns, not free-text fields. They only offer times that match your account's Minute Increments on Time Picker Dropdown setting, so if that setting is 10 minutes (the default) you will see 3:40 PM and 3:50 PM but not 3:45 PM. Typing a time that isn't on the list won't be accepted, and the field will fall back to a time that is.
This is an account-wide setting rather than a per-practitioner one, which is why the same times are missing for every practitioner.
To make quarter-hour times such as 3:45 PM selectable:
- Go to User Menu > Account Settings > Schedule > Calendar Display.
- Set Minute Increments on Time Picker Dropdown to 15 (or 5 , if you also need times such as 3:35 PM).
- Select Save Changes.
- Go back to User Menu > Account Settings > Team > Availability , select the practitioner, and set the availability block — 3:45 PM will now be in the dropdown.
The same setting controls the time pickers on the Appointment Panel and the Update Availability pop-up, so changing it affects those too.
If your availability times are selectable but don't appear clearly on the calendar, that's a different setting — see Minutes Per Calendar Block in Editing Your Calendar Display. If instead your calendar stops at a certain time of day and hides everything after it, see My availability runs later than my calendar shows below.
My availability runs later than my calendar shows — the last slot is earlier than my availability End Time
Your calendar is only drawn between the Calendar Start Time and the Calendar End Time set for your account. An availability block that runs past the Calendar End Time is still saved and still applies, but the calendar stops drawing at the Calendar End Time, so the last block you can see and click is the one before it.
For example, with availability set through to 7:00 PM, a Calendar End Time of 5:00 PM and 30-minute calendar blocks, 4:30 PM is the last block on the calendar — even though the practitioner is available for another two hours.
Zanda flags this when you save the availability:
Your roster has been saved, however some times are outside of your Calendar display times and may not be visible. Please edit these here
The here link takes you straight to the Calendar Display settings.
To show the whole working day:
- Go to User Menu > Account Settings > Schedule > Calendar Display.
- Set the Calendar End Time to an hour at or after your latest availability End Time. It is a whole-hour dropdown, and 11:00 PM is the latest hour available.
- Select Save Changes.
You don't need to change the availability itself — only what the calendar draws. The same applies at the start of the day: availability that begins before your Calendar Start Time won't be drawn either.
Client Portal booking is separate. The Calendar Start Time and Calendar End Time only control what your team sees on the calendar in Zanda. They do not limit the times clients can book through the Client Portal. If clients can't book a later time, check that the availability block covers that time and has Clients can book online ticked, then check your Client Portal settings under User Menu > Account Settings > Schedule > Client Portal — see Why Is My Client Portal Booking Link Not Working (or Not Bringing in Bookings)?.
Can I set a different calendar color for each practitioner?
Use location colors to control the background color shown for available time on the calendar. Go to User Menu > Account Settings > Practice > Locations, edit the location, and choose the color for that location. When a practitioner's availability is linked to that location, available time displays in the location color.
Practitioner profiles do not have a separate color picker for the practitioner. If you want to make appointments stand out by type, status, or workflow, use Appointment Flags instead. Each appointment can have one appointment flag at a time, and that flag color appears on the appointment block.
Unavailable time appears in the standard gray calendar color. To change which location is used when an appointment is added during unavailable time, update the practitioner's Default Location for Unavailable Times in User Menu > Account Settings > Team > Practitioners > Settings.
How do I change a practitioner's location for one day?
If the location change only applies to an existing appointment, edit the appointment from the Calendar and update the Where field in the When & Where section. If the change needs to affect bookable availability for clients, use an Availability Override for the relevant date and location instead.
For a one-off change where clients should no longer book the practitioner at their usual location and should be able to book them at a temporary location, you may need two location-specific overrides: one Unavailable override for the usual location, and one Available override for the temporary location with Clients Can Book Online turned on.
I work from two locations under one profile and my days change week to week. How do I let clients book online without being double-booked?
Use Availability Overrides to control which location is open for online booking on each day. Overrides take priority over your Regular Weekly Availability, so you can set an irregular pattern without changing your standard schedule.
First, the part you do not need to manage: your locations are protected against double-booking. When a time is booked at one location, that time is removed from your bookable slots at every location, because the Client Portal works from your calendar as a whole rather than one location at a time. Your account's Minimum Gap Between Bookings is applied around the booking in the same way. See Setting Up Online Bookings on Client Portal for more on how these portal booking rules work.
To set the pattern:
- Optional, but worth doing once: add a Regular Weekly Availability for each location under User Menu > Account Settings > Team > Availability. This gives each location its own calendar colour and sets the default location for appointments booked in that time. It is not required for online booking to work—an override can open portal time on its own.
- For a day that differs from the usual pattern, select the practitioner and choose + Add Availability Override.
- Set Available to Yes, enter the date and hours, choose the Location you are working from that day, and turn on Clients Can Book Online.
- If a weekly availability at your other location also covers that day, add a second override for that location with Available set to No, so clients are not offered both.
- Add a Description so your team can see at a glance which location the day belongs to, then select Save.
Repeat as your pattern changes. You can edit or delete an override at any time, and past overrides stay visible with the Show Past Overrides switch.
Note: these rules govern what clients can book themselves on the Client Portal. Your team can still add an appointment from the calendar at any time, including over an existing one, so check the practitioner's calendar before saving a manual booking.
I removed a day from my availability, but it still shows as available (white or coloured) on the calendar. Why?
A day shows as available (white, or your location colour) whenever any active availability still covers it, and only turns grey when nothing does. If a day is still coloured after you edited one schedule, another setting is usually keeping the practitioner available that day. Check each of these under User Menu > Account Settings > Team > Availability (select the practitioner):
- A second weekly availability. If the practitioner has more than one Regular Weekly Availability — for example, one per location — each one colours the days it covers. Removing the day from one schedule will not grey it out while another schedule still includes it. Review every row in the Regular Weekly Availability panel and remove the day from each schedule that still lists it.
- An active Availability Override. Overrides take priority over the weekly schedule, so an 'Available' override will keep a day coloured even after you remove it from the weekly availability. Check the Availability Overrides panel (turn on Show Past Overrides if needed) and edit or delete any override that still covers the day.
- You unticked 'Clients can book online' instead of removing the block. Unticking that option only hides the day from online (Client Portal) booking — the day still shows as available on the main calendar so your team can book it manually. To make the day itself unavailable, remove the availability block for that day rather than just unticking online booking.
Once no active weekly availability or override covers a day, it will display as grey (unavailable) on the calendar.
Can I delete or shorten a practitioner's availability directly from the calendar?
No. Available and unavailable time is drawn as the background colour of the calendar, not as a block you can click, drag or right-click, so there is no way to delete, shorten or edit availability from the calendar screen. The right-click menu on the calendar only acts on appointments. Availability is always changed under User Menu > Account Settings > Team > Availability.
The calendar can only work in the other direction: if you save an appointment in greyed-out time, Zanda offers to add an availability override so that time becomes available. There is no equivalent prompt for taking time away.
To make a practitioner unavailable for one hour on one day
- Go to User Menu > Account Settings > Team > Availability and select the practitioner.
- Select + Add Availability Override.
- Set Available to No.
- Enter the same date in From and To , and set the times to the hour you want to remove.
- Select the Location that the practitioner's availability for that time is linked to.
- Add a Description so your team knows why, then select Save.
The hour turns grey on the calendar and clients can no longer book it through the Client Portal. You can edit or delete the override later from the same screen.
Note: an Unavailable override only removes availability for the location you set it on. If the practitioner has a second weekly availability at another location that also covers that hour, add a second override for that location too, or they will still show as available there.
A quicker option, with one trade-off
If you only need to stop that hour being booked, add a personal appointment over it instead. You can create it on the calendar in a couple of clicks and remove it just as quickly by right-clicking it and selecting Delete Appointment , with no trip to Account Settings. Personal appointments stop clients booking that time through the Client Portal. See Creating and Managing Personal Appointments.
The trade-off is reporting. A personal appointment does not reduce the practitioner's Available Hours in the Practitioner Utilization Report, so the hour is still counted as unutilised time. Use an Unavailable override when you need the hour out of the utilization figures as well.
Related Articles
- Setting Up and Using Multiple Locations - Learn how locations affect appointments, availability, and default locations.
- Using Coloured Appointment Flags - Learn how to set up appointment flags for appointment-level color coding.
- Creating, Editing and Deleting a Client Appointment - Learn how to edit an appointment from the Calendar.
- Editing Your Calendar Display - Change the time increments offered in availability time pickers, the Calendar Start Time and Calendar End Time, and how the calendar is displayed.
- Why Is My Client Portal Booking Link Not Working (or Not Bringing in Bookings)? - Work through the settings that control which times clients can book online.