Setting Up Online Bookings on Client Portal - Legacy
The Client Portal is a dedicated web page where your clients can book appointments with you online, access their invoices and download them or pay online, and see and complete online forms.
This article will show you how to set up online bookings on your Client Portal.

In this article:
- Clients Can Book With Any Practitioner
- Require Clients to Register/Login First
- Allow Group Bookings
- Show Service Price
- Request Payment When Booking
- Earliest Time Clients Can Book
- Limit How Far Clients Can Book
- Minimum Gap Between Bookings
- Cancelation policy
- Default Flag Applied to Bookings
- Display Start Times Every
- Booking Terms and Conditions
- Set Your Available Times and Services
- Related Articles
💡 User Tip
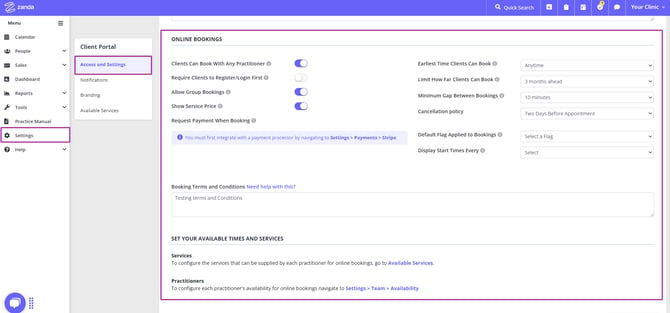
- To access the online booking settings page, navigate to Settings > Schedule > Client Portal > Access and Settings.
- On this page, scroll to the Online Bookings section and go through each setting. You can work on those before you enabled your client portal for clients accessing online bookings.
- For more instructions on enabling your client portal and other client portal features, refer to this detailed article: Setting up Your Client Portal
Clients Can Book With Any Practitioner
If enabled, clients can book with all practitioners with availability. If not enabled, clients can only book and see availability with their primary or assigned practitioners.
Note:
- In accounts where clients can only book with their assigned practitioners, contacts will see both their own and the client’s assigned practitioners - making it easier to ensure the right person is booked with the right practitioner.
Require Clients to Register/Log In First
If enabled, clients must log in or register to access the portal. If new client registrations are not allowed, this setting will be enabled by default to only allow existing clients to access the portal.
Allow Group Bookings
If enabled, clients will see the option to book into groups that have not yet met their maximum number of participants.
Show Service Price
If enabled, clients will see the price when viewing the list of services to book. This setting is enforced when payments are optional or required.
Request Payment When Booking
It is possible to set up credit card payments via the Client Portal when clients book individual sessions or book a class:

You have the option to have the payment of the associated individual or group service
- Disabled which means there will be no option to pay for a service online via the Client Portal.
- Required which means clients cannot book without paying upfront.
- Optional which means the credit card details are prompted but it is not compulsory to book an appointment.
Payments will only be taken if the practitioner for the appointment is linked to Stripe, or if the account has a business Stripe account connected.
Earliest Time Clients Can Book
Select the earliest interval in which a client can book an appointment from the current time.
This setting allows you to control the earliest time clients can schedule an appointment with you. For instance, if you configure it to 'three days ahead', clients will not have access to your availability for the upcoming three days. Therefore, if today is Monday, they will be able to view and book appointments starting from Thursday of that week.
Limit How Far Clients Can Book
With this setting, you can restrict availability end to the period chosen. For example, if you set this to '3 months ahead', your clients will not be able to see your availability later than three months ahead to book an appointment with you. If now is January the 1st, the clients will only see your availability up to March, the 31st this year.
Minimum Gap Between Bookings
Sets the period that appointment start times are offered in the portal. If there is an existing booking in the calendar, the start times shown will be based on the end of that appointment and any minimum gap set.
To understand how this setting works, first, we need to understand how your availability is displayed for your clients:
- Your appointment availability is shown in 'slots'. The slots that appear depend on the duration of your service that the client has selected, plus your availability.
- For example, if your service is 30 mins in length, and you've set yourself as available for 9:00-5:00 pm, your availability will display in 30 min slots from 9:00-9:30, 9:30-10:00.
- However, you might not want your clients to book appointments back to back with you and instead would like to add a buffer between appointments.
- To do that, you can use this gap setting. For example, if you select 15 mins, your appointment slots will display like this: 9:00-9:30, 9:45-10:15, 10:30 - 11:00.
🚨 Important Note
The gap between appointments does not apply to Personal Appointments. If you have a time slot blocked by a Personal Appointment, the Client Appointment will be booked straight after it without the configured time gap buffer.
Cancellation Policy
- You can allow your clients to cancel the appointments they have booked via the Client Portal, or restrict them from doing so via this setting. You can even select the date range as to how many days before an appointment your clients can cancel an appointment - and not before that. They will instead receive a message asking them to contact you directly regarding the cancellation.
- If the 'Cancellation Policy' is set to 'No Cancellations Via Portal', clients will not see the 'Cancel Appointment' red X next to their appointment.
🚨 Important Note
- If cancellations are allowed via the portal and there are no payments associated with the cancelled appointment, the generated invoice will be deleted.
- If a payment is associated with the appointment, the invoice and payment will remain active. In this case, you will need to unallocate the payment and delete the invoice manually if required.
Default Flag Applied to Bookings
Select a flag to be applied by default to every booking made via the portal. Useful for viewing and reporting on the source of bookings in the calendar.
Display Start Times Every
Define the minute interval in which appointment times are offered to clients. Determined by the availability and existing appointments.
With this setting, you can define the start times of available appointments from the first available time slot.
For example, your availability starts at 9 AM, your appointments last for 50 minutes, and you select the 60-minute interval in Display Start Times Every setting.
- When no appointments are booked yet, the available times will display as 9 AM, 10 AM, 11 AM and so on.
- When the first 50-minute appointment is booked, the client portal will display availability for this day as 9:50 AM, 10:50 AM, 11:50 AM and so on. If you still wish every appointment to start on the hour, add a 10-min gap between client appointments.
Booking Terms and Conditions
Any sensitive policies or conditions regarding booking/payments can be displayed here. Clients need to click the text " terms and conditions of use" in order for this to show and be read before clicking Book Now. The character limit for this field is 1900 characters, if your text exceeds this limit you are able to enter a hyperlink to link to a separate page.
Set Your Available Times and Services
Services
To configure the services that can be supplied by each practitioner for online bookings, go to Settings > Schedule > Client Portal > Available Services.
Please note that session packs cannot be sold via the client portal.
Practitioners
To configure each practitioner's availability for online bookings navigate to Settings > Team > Availability.
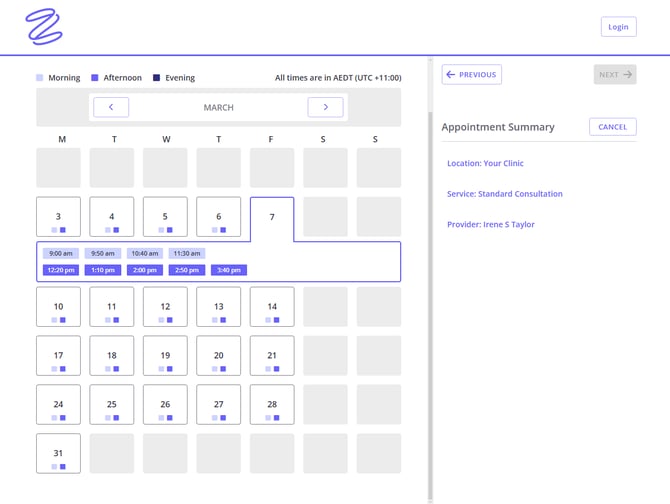
✴️Here's an example of a practitioner's availability showing on a client portal for a specific service at a selected location:
Once you've configured the online booking settings, save them. You can enable the client portal for your clients at any time when you are ready - your online booking settings will be already in place.