%20-%20120%20x%2044.svg)
Resources can include rooms, equipment, and any other items that are used for the appointment. When setting up Resources, there are two categories – Resource Groups and Resource Items. Resource Groups are the collection of similar items, such as “Rooms”. Each room would be a Resource Item and would belong to the Room's Group. These may be named such as Room 1 and Room 2 for example, or you may have named them unique to your clinic. This article will cover how to set up Resource Groups and Items, and give more information about how they operate.
In this article:
Adding Resource Groups
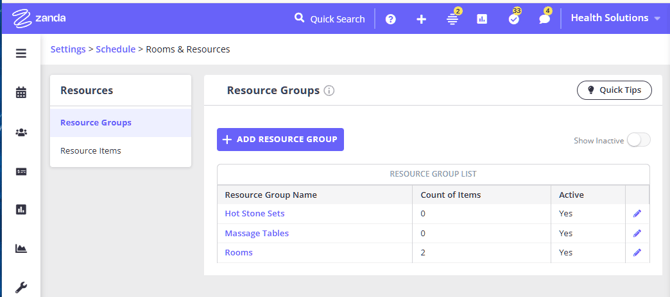
A Resource Group is a collection of similar Resource Items. For example, you may make a group for “Rooms” or “Laptops”. All Resource Items must belong to a Group. Here's how to set up a Resource Group:
- Go to User Menu > Account Settings > Schedule > Resources.
- On the Resource Groups page, click “Add Resource Group”.
- Enter a unique name for the Resource Group, e.g. Rooms.
- Click Save.
After you have created the Group, you will see it listed with a Count of Items column. This number is the count of active Resource Items that belong to that Group. The next section explains how to add an Item for a Group.
Hint 💡If a Resource Group has linked Resource Items, then when you attempt to deactivate the Group, you will be given the option to either:
- Unlink the Items from the Group and re-assign them to another Group, or
- Set all the linked Items as inactive. To be reactivated, they must be assigned to another Group.
Adding Resource Items
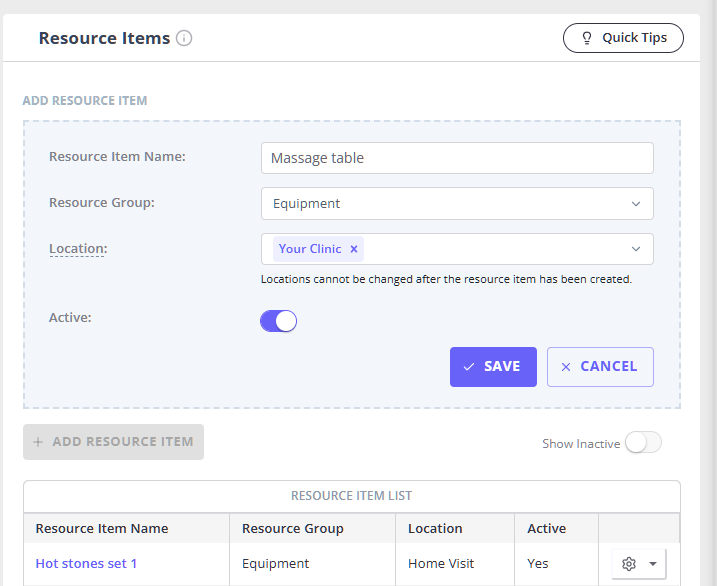
A Resource Item is the individual item that will be assigned to a booking. For example, you may have six rooms and therefore have each room listed as an item numbered from 1 to 6. Each Resource Item must belong to a Group, and is linked to one or more Locations. The Locations determine which bookings the Item can be allocated to. Here's how to set up your Resource Items:
- Go to User Menu > Account Settings > Schedule > Resources.
- On the Resource Items page, click “Add Resource Item”.
- Enter a unique name for the Resource Item, e.g. Room 1.
- Select the Resource Group that the item should belong to.
- Select the Locations this Item should be available in. You can choose more than one, and each choice appears as a tag. To make the Item available everywhere, choose All Locations at the top of the list.
- Check the Locations before you save. ⚠️ Locations cannot be changed after the Resource Item has been created. If you need a different set later, create a new Resource Item.
- Click Save.
What All Locations means
- Choose All Locations and the Item is available everywhere, including any new Location you add in future.
- Choose a specific set of Locations and the Item is available in those Locations.
Selecting every one of your active Locations individually has the same effect as choosing All Locations. The Item is stored as available everywhere, so a Location you add later will include it automatically. If you want an Item limited to your current Locations only, leave at least one Location unselected.
An existing Resource Item with no Location recorded against it is treated as All Locations, so it can be booked at any of your Locations.
❇️ To learn how to allocate and manage these resources for your appointment, read our article on Managing Resources for Appointments.
Frequently Asked Questions
❓ Where does the Count of Items number come from?
The Count of Items number on the Resource Groups page comes from the active Resource Items assigned to that Resource Group. For example, if the Rooms group has three active rooms assigned to it, the count will show three.
To review or change the items included in the count, go to User Menu > Account Settings > Schedule > Resources, then open Resource Items. From there, you can add a Resource Item, assign it to a different Resource Group, or activate and deactivate existing Resource Items. Deactivated Resource Items are not included in the Resource Group count.