%20-%20120%20x%2044.svg)
The Billing Menu feature in Zanda is a dashboard allowing users to record new invoices and new payments, and generate reports of recorded payments and invoices based on multiple criteria.
In this article:
How to Record a New Invoice
Billing > New Invoice is the fast path for creating an invoice for a client without going through the Calendar. You'll find it in the main navigation under Billing > New Invoice.
Most invoices are created for you automatically when you add a service to an appointment. Use New Invoice only when you need to bill a client for something that isn't tied to an appointment — a retail sale, a package, a one-off product, etc.
This section covers:
- Where to find it
- Filling in the "Create a New Invoice" window
- What happens after you click Create Invoice
- Validation messages and things to know
- Permissions required
- Frequently asked questions
Where to find it
Open the Billing menu and select New Invoice. The Billing menu also contains:
- New Invoice — the flow covered in this article
- New Payment — record a new payment
- Invoices — a report of invoices issued
- Insurance (or Claims, depending on your region) — insurance claims, claim payments, and eligibility
- Payments — a report of payments received
Clicking New Invoice opens a small pop-up window — you don't leave the page you're on until you've chosen a client.
Step 1: Fill in the "Create a New Invoice" window
The window is titled Create a New Invoice, under a section heading Invoice To. It asks for:
- Services and Products Provided To: Search for and select the client this invoice is for.
- Sold By: The practitioner the sale is attributed to.
- Insurance: Only appears once you've selected a client who has a default insurer on file. Lets you add or remove an insurer for this invoice via Select Insurer... , or add a new one to the client's profile (a + icon, tooltip "Add new client insurance").
- Who Will Pay This Invoice?: Defaults to Client (the person selected above). Change it if a third party — an employer, insurer, or other organization — is paying instead. Next to the field: "Third Parties can be createdhere.", a link to create a new third party on the spot.
- Location: The practice location the sale is being recorded against.
Once everything is filled in, click Create Invoice.
Step 2: Add items and finish the invoice
Clicking Create Invoice creates a blank invoice for the selected client and takes you straight to the full invoice editor, where you build out what's actually being charged. This section won't go into that page in depth, but in short:
- Click Add Item to add a line to the Invoice Items table. Each item is picked from your practice's configured services/products list — you can't free-type an arbitrary item — and has its own Qty, Price, Discount, Tax (%), and computed Total.
- Click Add Payment in the Invoice Payments table if you want to record a payment against the invoice immediately (this is a shortcut to the same payment functionality covered in the New Payment article).
- The invoice isn't linked to an appointment by default; if you need it to be, use the Link to an appointment option to attach it to one of the client's existing appointments that doesn't already have an invoice.
Validation and things to know
- No client selected: "The Client field is required." — you can't submit the window without picking a client.
- No default location configured for your practice: "Default Location required. Please specify the default account location by going to Setup> Configuration> Locations and ticking 'Default'." Ask your practice administrator to set a default location under Setup > Configuration > Locations if you see this.
- Creating a new invoice does not automatically add any items — you always add at least one item afterward on the invoice editor before it represents an actual charge.
- If the client you searched for doesn't exist yet, typing a new name and continuing will create a new client record for you automatically.
Permissions required
Creating an invoice requires both of the following permissions on your user account:
- "Access Client Invoices and Payments" — "Allows the user to view the client's invoice and payment history."
- "Edit Appointments: Invoice Charges" — "If this is granted the user can see the invoices' charges."
Without the first permission, the entire Billing menu (including New Invoice) won't appear for you at all.
Frequently asked questions
Do I need to add invoice items right away?
No — creating the invoice just gives you a blank invoice for the client. You add the actual services/products afterward, on the invoice editor that opens automatically.
Will this create a duplicate invoice if the client already has an appointment booked?
Yes — those invoices are created automatically when you add a service to the appointment. Use New Invoice for sales that aren't tied to an appointment.
Can I bill someone other than the client?
Yes — use the Who Will Pay This Invoice? field to select a third party instead of the client themselves. If the third party doesn't exist yet, you can create one right from the same window.
How To Record A New Payment
New Payment is the fast path for recording a payment from any client without first navigating to their profile. You'll find it in the main navigation under Billing > New Payment.
This article covers:
- Where to find it
- Choosing who the payment is from
- Entering the payment details
- Allocating the payment to invoices
- Card payments (Stripe / Tyro)
- Validation messages and things to know
- Permissions required
- Frequently asked questions
Where to find it
Open the Billing menu and select New Payment. The Billing menu also contains:
- New Invoice — quickly create a new invoice
- New Payment — the flow covered in this article
- Invoices — a report of invoices issued
- Insurance (or Claims, depending on your region) — insurance claims, claim payments, and eligibility
- Payments — a report of payments received
Tip: This is the same New Payment button you'll see at the top of the Payments report — both take you through the exact same flow described below.
Step 1: Choose who the payment is from
Clicking New Payment opens a small pop-up window titled New Payment, asking:
"Who is the payment from?"
Search for and select the client (or company, contact, or other profile type) the payment is from. Once selected, you're taken straight to a payment form for that client.
Step 2: Enter the payment details
The payment form's heading reads New Payment, and asks for:
- Date Received: Defaults to today.
- Method: The method the payment was made with (placeholder: Select Payment Method...). Required — if left blank you'll see "Payment method is required."
- Amount: The total amount received.
- Location: The practice location the payment is being recorded against. This is the payment's own location—it's independent of the location of any appointment or invoice the payment is later applied to, so you can record which site actually took the payment. When you add a payment directly from an invoice, it defaults to that invoice's location; you can change it here, or later via Edit Payment.
- Notes: Optional free-text notes.
- Paid By: (US practices only) Whether the payment was made by the Client or the Insurer (placeholder: Select Payer).
If your practice has card payments enabled, you'll also see a Process Credit Card Payment link. Selecting a card-based payment method (or clicking this link) opens a secure card-payment dialog instead — the charge is processed there rather than through the fields above.
Once you're happy with the details, click SAVE CHANGES.
Step 3: Allocate the payment to invoices
After saving, the page relabels itself Edit Payment, the basic details you just entered become read-only, and a new section appears: Select invoices to pay. This is where you decide which of the client's unpaid invoices this payment should be applied to.
- Click Show Filter to narrow the list of unpaid invoices by Start Date:, End Date:, Practitioner: (defaults to All Practitioners...), or Statement: (defaults to All Statements...), then click Update invoice list.
- The grid shows each unpaid invoice's Invoice number, Client Name, Date, Summary, and amount Owing.
- Tick a row's checkbox to allocate the full remaining balance of that invoice, or type directly into the Paid column to allocate a specific (including partial) amount — you can also set the Date Applied for that allocation.
- You can split one payment across several invoices this way. If the payment amount is more than what you've allocated, the leftover shows in the Unallocated field on the payment — it isn't lost, it's simply held as a credit on the client's account until you (or they) apply it to a future invoice.
- Once you've made changes, a You have unsaved changes label appears — click the Save button at the bottom to confirm the allocations.
- Need to change the amount, method, date, location, or notes afterward? Click Edit Payment to unlock those fields again (this temporarily hides the invoice-allocation grid while you make changes).
Card payments (Stripe / Tyro)
If your practice processes card payments through Stripe or Tyro, selecting one of those payment methods bypasses the normal Save flow — a secure card dialog opens instead, pre-filled with the amount, client, location, notes, and payer you've entered. The actual charge is captured by the payment processor once you complete it there, and you're returned to the same payment record afterward.
Tyro payments can't be edited once created — if something needs to change, the payment has to be refunded instead.
Validation and things to know
- No payment method selected: "Payment method is required."
- Amount out of range: "Amount must be between -99999999.99 and 99999999.99"
- Zero or negative amount: the payment amount must be greater than zero — you can't save a $0 or negative payment through this form.
- Allocating more than the payment amount: "The amount allocated cannot be greater than the new amount." — the total you allocate across invoices can never exceed the payment's Amount.
- Overpaying is allowed — you can record a payment larger than any invoice it's applied to; the excess simply sits as an unallocated credit.
- There's no option to print or email a receipt directly from this flow.
Permissions required
Recording a payment requires the "Access Client Invoices and Payments" permission on your user account — "Allows the user to view the client's invoice and payment history." Without it, the entire Billing menu (including New Payment) won't appear for you at all.
A second permission, "Access all Calendars", affects which unpaid invoices you can see and allocate against — without it, you'll only be able to allocate payments to invoices billed under your own practitioner record.
Frequently asked questions
Can I split a payment across multiple invoices?
Yes — in the Select invoices to pay section, tick or enter a Paid amount against as many unpaid invoices as you like, as long as the total doesn't exceed the payment amount.
Why is the invoice list missing an invoice I expected to see?
The Select invoices to pay grid only shows unpaid invoices for the selected client, filtered by whatever Start/End Date, Practitioner, or Statement filters are applied. If you don't have the "Access all Calendars" permission, it will also only show invoices billed under your own practitioner record.
The Invoices Report
The Invoices report gives you a complete, searchable list of every invoice that has been issued in your practice. You'll find it in the main navigation under Billing > Invoices. As the page description puts it: "This is a list of all the invoices that have been issued."
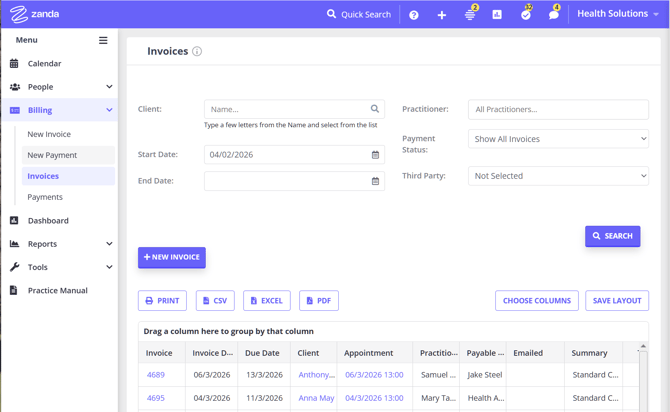
This section covers:
- Where to find the report
- What each column means
- How to filter and search
- What you can do with each invoice from the report (edit, email, print, view appointment)
- How grouping and totals work
- How to export or print the report
- Frequently asked questions
Where to find it
Open the Billing menu and select Invoices. The Billing menu also contains:
- New Invoice — quickly create a new invoice
- New Payment — record a new payment
- Invoices — the report covered in this article
- Insurance (or Claims, depending on your region) — insurance claims, claim payments, and eligibility
- Payments — a report of payments received
Tip: Invoices are normally created automatically when you add a service to a client's appointment in the Calendar. You only need to use the New Invoice button to manually create an invoice for an extra sale that isn't tied to an appointment.
Understanding the columns
The report is a grid, and every column can be sorted by clicking its header. Depending on your region, you'll see some or all of the following columns:
| Column | Description |
|---|---|
| Invoice | The invoice number. Click it to open the invoice. |
| Invoice Date | The date the invoice was issued. |
| Due Date | The date payment is due. |
| Appointment | The date/time of the appointment the invoice was generated from (if any). Click it to open the appointment. |
| Client | The client the invoice belongs to. Click it to open their profile. |
| Location | The practice location the invoice was issued from. (Hidden by default — see Choose Columns to show it.) |
| Practitioner | The practitioner associated with the invoice. |
| Payable By | Who the invoice is payable by (relevant when a third party is billed on the client's behalf). |
| Emailed | The date and time the invoice was last emailed to the client. Blank if it has never been emailed. |
| Summary | A short text summary of the line items on the invoice. |
| Total | The total invoice amount. |
| Paid | The amount that has been paid against the invoice so far. |
| Due | The outstanding amount owing on the invoice. |
| Claims | Links to any insurance claims associated with the invoice. (US practices only.) |
| Notes | Internal notes on the invoice. Hidden by default. |
| Actions | Opens the actions menu for that row (see below). |
Money columns (Total, Paid, Due) display a summed total at the bottom of the grid, and are included when you group the report (see Grouping and totals).
Searching and filtering
Fill in any combination of the following and click Search:
- Client: — search for and select a specific client by name
- Start Date: / End Date: — restrict results to invoices issued within a date range
- Practitioner: — filter to invoices for a specific practitioner (defaults to All Practitioners...). If your user account doesn't have permission to see all calendars or all client profiles, this is locked to your own invoices.
- Payment Status: — one of:
- Show All Invoices
- Show Paid Invoices Only
- Show Unpaid Invoices Only
- Third Party: — filter to invoices billed to a specific third party (e.g., an insurer or organization paying on the client's behalf), or leave at All Third Parties
Row actions
Click the Actions (gear) icon located on the right-hand side of any row to open a menu with the following options:
- Edit — opens the invoice for editing
- Email — opens the email dialog to send (or resend) the invoice to the client
- Print — prints the invoice
Note: The Invoices report doesn't support selecting multiple rows for bulk actions (like bulk email or bulk export) — actions are performed one invoice at a time from the row menu.
Grouping and totals
You can group the report by any column by dragging its header into the grouping bar above the grid (labeled "Drag a column here to group by that column").
When you group by Client, each group header shows a running summary for that client:
- Total Invoiced: — sum of the Total column for that group
- Total Paid: — sum of the Paid column for that group
- Total Due: — sum of the Due column for that group
You can remove grouping at any time by dragging the column back out of the grouping bar.
Customizing the grid
Above the results grid you'll find two buttons:
- Choose Columns — show or hide individual columns (for example, turning on the hidden Location or Notes columns)
- Save Layout — saves your current column visibility, sort order, and grouping so it's remembered the next time you open the report. You'll see a confirmation: "Report settings saved."
You can also change how many rows are shown per page at the bottom of the grid — choose 20, 50, or 100 rows per page.
Exporting and printing
Above the results grid, four export/print options are available:
| Button | What it does |
|---|---|
| Opens a printable version of the current report results | |
| CSV | Downloads the report as a CSV file |
| EXCEL | Downloads the report as an Excel (.xlsx) file |
| Downloads the report as a PDF |
A few things to know:
- All four exports respect your current filters, sorting, and column visibility — the Actions column is never included in an export.
- The exported file (Print/PDF) includes a summary of the filters you searched with, so you always have a record of exactly what the report contained.
- PDF export is limited to 1,000 rows. If your filtered results exceed that, you'll see: "PDF output is not allowed for more than 1000 records. You can still generate a pdf file from print option." Narrow your date range or filters, or use the PRINT option instead, which has no row limit.
Frequently asked questions
Why don't I see a Location filter? Location isn't currently a search filter — it's available as an optional column (via Choose Columns) if you want to see which location each invoice was issued from.
What counts as "Paid" vs "Unpaid"? An invoice is Paid once the total amount paid equals the invoice total. Any invoice with an outstanding balance — including partially paid invoices — is treated as Unpaid for filtering purposes. There is no separate "Overdue," "Partially Paid," "Void," or "Draft" status shown on this report.
Can I select multiple invoices to email or export at once? Not from this report — actions like Email and Print are performed on a single invoice at a time from that row's Actions menu. Exporting via CSV/Excel/PDF/Print exports the entire filtered result set at once, though, so that's the best way to work with many invoices together.
Why is the Practitioner filter greyed out for me? This happens if your user account doesn't have permission to access all calendars or see all client profiles — in that case the report is automatically locked to showing only your own invoices.
Where's the "Invoices & Payments Report"? That's a different report, found on your practice Dashboard, which shows practice-wide financial summaries. The report covered in this article is the day-to-day operational invoice list under Billing > Invoices.
The Payments Report
The Payments report gives you a complete, searchable list of every payment your practice has received. You'll find it in the main navigation under Billing > Payments. As the page description puts it: "This is a list of all the payments that have been received."
This section covers:
- Where to find the report
- What each column means
- How to filter and search
- What you can do with each payment from the report (edit, delete)
- How grouping and totals work
- How to export or print the report
- Frequently asked questions
Where to find it
Open the Billing menu and select Payments. The Billing menu also contains:
- New Invoice — quickly create a new invoice
- New Payment — record a new payment
- Invoices — a report of invoices issued
- Insurance (or Claims, depending on your region) — insurance claims, claim payments, and eligibility
- Payments — the report covered in this article
Tip: You don't have to leave this report to record a new payment. Click New Payment at the top of the page, search for the client the payment is from, and you'll be taken straight to a new payment form for them.
Understanding the columns
The report is a grid, and every column can be sorted by clicking its header. Rows load sorted by payment date, newest first. Depending on your region, you'll see some or all of the following columns:
- Date: The date the payment was received. Click it to open the payment for editing.
- Received From: The client who made the payment (for third-party/company clients, the company name is shown instead). Click it to open their profile.
- Practitioner: The practitioner(s) whose invoices this payment has been applied to. If the payment hasn't been applied to an invoice yet, the client's assigned practitioner is shown instead.
- Location: The practice location the payment itself was recorded against. This can differ from the location of the appointment the payment relates to.
- Payment Method: The method selected when the payment was recorded (e.g. Cash, Credit Card, EFTPOS).
- Notes: Any free-text note entered on the payment.
- Amount: The total amount of the payment.
- Unallocated: The portion of the Amount that hasn't yet been applied to an invoice — i.e. the payment's remaining credit/prepayment balance.
- Paid By: Whether the payment was paid by the Client or the Insurer. (US practices only.)
- Actions: Opens the actions menu for that row (see below).
Money columns (Amount, Unallocated) display a summed total at the bottom of the grid, and are included when you group the report (see Grouping and totals).
Searching and filtering
Fill in any combination of the following and click Search:
- Start Date: / End Date: — restrict results to payments received within a date range. On first load, this defaults to the last 7 days.
- Practitioner: — filter to payments for a specific practitioner (defaults to All Practitioners). Type to search, and click to add (click the × on a tag to remove one). If your user account doesn't have permission to see all calendars or all client profiles, this is locked to your own name only.
- Include All Prepayments: — an on/off toggle. When it's on (the default), results include prepayments/credits a client has paid that haven't yet been applied to any invoice. Switch it off to see only payments that have been allocated to at least one invoice.
Row actions
Click the Actions (gear icon on the right) icon on any row to open a menu with the following options:
- Edit Payment — opens the payment for editing, where you can adjust the amount, method, notes, and allocate the payment against the client's invoices
- Delete — removes the payment, after a confirmation prompt ("Are you sure you want to delete?")
Note: The Payments report doesn't support selecting multiple rows for bulk actions — payments are edited or deleted one at a time from the row menu.
Grouping and totals
You can group the report by any column by dragging its header into the grouping bar above the grid (labeled "Drag a column here to group by that column").
Each group header shows a running summary for that group:
- Total Amount: — sum of the Amount column for that group
- Unallocated: — sum of the Unallocated column for that group
You can remove grouping at any time by dragging the column back out of the grouping bar.
Exporting and printing
Below the results grid, four export/print options are available once your search returns at least one result:
| Button | What it does |
|---|---|
| Opens a printable version of the current report results | |
| CSV | Downloads the report as a CSV file |
| EXCEL | Downloads the report as an Excel (.xlsx) file |
| Downloads the report as a PDF |
A few things to know:
- All four exports respect your current filters, sorting, and grouping — the Actions column is never included in an export.
- PDF export is limited to 1,000 rows. If your filtered results exceed that, the PDF button is disabled and you'll see: "PDF output is not allowed for more than 1000 records. You can still generate a pdf file from print option." Narrow your date range or filters, or use the PRINT option instead, which has no row limit.
Frequently asked questions
Why don't I see a Payment Method filter?
Payment Method isn't currently a search filter — it's shown as a column on every row so you can see (or group by) how each payment was made.
What does "Unallocated" mean?
It's the part of a payment that hasn't been applied to an invoice yet — for example, a prepayment or credit sitting on the client's account. A fully applied payment will show $0.00 here.
Can I select multiple payments to delete or export at once?
Not from this report — Edit Payment and Delete are performed on a single payment at a time from that row's Actions menu. Exporting via CSV/Excel/PDF/Print exports the entire filtered result set at once, though, so that's the best way to work with many payments together.
Where's the "Invoices & Payments Report"?
That's a different report, found under Reports > Financial > Invoices & Payments, which is an invoice-centric report with its own filters for payment status and sale type. The report covered in this article is the day-to-day payment ledger under Billing > Payments.
Can I report on the site (location) a payment was taken at, rather than where the appointment took place?
Yes. Each payment records its own Location—set when the payment is recorded (it defaults to the invoice's location if you add the payment from an invoice) and editable afterward via Edit Payment. To see takings per location, run Billing > Payments for your date range, then drag the Location column header into the grouping bar—each location group shows its own Total Amount and Unallocated totals, and you can export the grouped report via CSV, Excel, or PDF. The Practice Dashboard's Income payments-received figures also follow the payment's own location when you filter by location. Note: payments processed through Tyro can't be edited, so their location can't be changed after the fact.
Why don't I see a Location filter?
Location isn't currently a search filter on the Payments report—it's shown as a column on every row. To break payments down by location, group by the Location column instead.