%20-%20120%20x%2044.svg)
You can upload files and scanned documents to your client's profile, and share them securely with clients via the Client Portal.
In this article:
- Uploading Files or Documents
- Downloading Files or Documents
- Deleting Uploaded Files or Documents
- Sharing Files with Clients on the Client Portal
- Renaming a File or Document
- Understanding File Options and Columns
- Moving a File Between Admin Files and Records
- Files Uploaded by Clients
- Frequently Asked Questions
- Related Articles
Uploading Files or Documents
Quick Notes 💡
- The current maximum file size for an individual document is 30MB.
- Client file uploads support common document, image, spreadsheet, text, HTML, HEIC, and ZIP formats. Audio and video formats (including MP3 recordings) are not currently supported for upload.
- Uploaded files are sorted in descending order based on the date uploaded.
- If you attempt to upload an unsupported file type, a system notification will alert you to the issue.
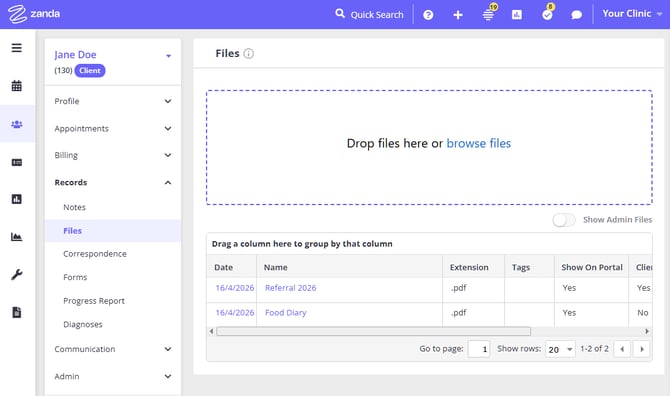
To upload files and documents to a client's profile:
- Open a client's profile (double-click on an appointment or use our universal search).
- Go to Records > Files or Admin > Admin Files.
- Select Drop Files Here or browse to the file you want to upload.
Upload Troubleshooting Advice:
If you're unable to upload a file despite meeting the file size and type requirements, check the file name for any unexpected characters. Special characters or symbols in the file name can prevent successful uploads. Ensure the file name only contains standard alphanumeric characters, underscores, or dashes before attempting to upload again.
Downloading Files or Documents
- Open the client's record.
- Click Records > Files or Admin > Admin Files and then click on the name of the document you would like to download.
- If it's a commonly-used file type (like PDF or image) you'll first be able to preview the file within Zanda without downloading. If you are not able to preview a PDF file, please enable the PDF viewer in the browser you are using.
Hint 💡
For example, when using Chrome:
- Select the three vertical dots in the upper-right corner.
- Choose Settings > Advanced > Privacy and security.
- Select Site Settings > PDF documents.
- Use the toggle switch next to Download PDF files instead of automatically opening them in Chrome to turn the feature on and off.
Known Limitation
When previewing files on a mobile device (like an iPhone or iPad) you'll only be able to see the first page of an uploaded document. If you need to see multiple pages, tap Download to open it outside of Zanda.
Deleting Uploaded Files or Documents
- Open the client's record.
- Click Records > Filesor Admin > Admin Files and then click the cog icon in the Actions column for the file you'd like to delete.
- Select Delete.
- Click OK to confirm.
What happens to a deleted file
When you delete a file it's removed from the client's Files list, and there's no self-service option in Zanda to restore a file you've deleted yourself. Each deletion is recorded in your account's user activity Log File, so you can always see who deleted a file and when.
Deleting a file doesn't immediately and permanently destroy it—Zanda keeps a copy on the backend. If you delete a file in error, or need to retrieve an original document (for example, for a records-retention or legal request), contact Zanda support and we may be able to recover it for you.
Sharing Files with Clients on the Client Portal
If the Client Files feature is enabled on your client portal, you can share specific files with clients so they can view them in their portal under My Documents.
If you have just enabled Client Files in the Client Portal settings, refresh or reopen Records > Files or Admin > Admin Files before editing a file. The Show to Client on Portal option and portal-related columns load when the Files page opens.
To share a file with a client:
- Open the client's profile.
- Go to Records > Files or Admin > Admin Files.
- Upload a file, or locate an existing one.
- In the Actions column, click the gear icon and select Edit.
- Switch Show to Client on Portal to ON.
- Save.
The file will appear in the client's My Documents section on the portal.
Tip: To stop sharing a file, switch Show to Client on Portal to OFF and save.
If the Show to Client on Portal option is not visible after the setting has been enabled and saved, refresh the file list or leave the client profile and open it again.
Renaming a File or Document
- Open the client's profile.
- Go to Records > Files or Admin > Admin Files.
- In the Actions column, click the gear icon and select Edit.
- Update the Name field.
- Save.
The file extension (like .jpg or .pdf) is kept automatically—you only need to edit the name itself, not the extension.
Tip: Photos captured directly from a mobile device are sometimes saved with a generic default filename. If you upload more than one with the same name, rename them here so they're easy to tell apart in the file list.
Understanding File Options and Columns
When 'Client Files' feature is enabled, each file includes additional options and two extra columns appear in the file list.
File options (accessible via Edit):
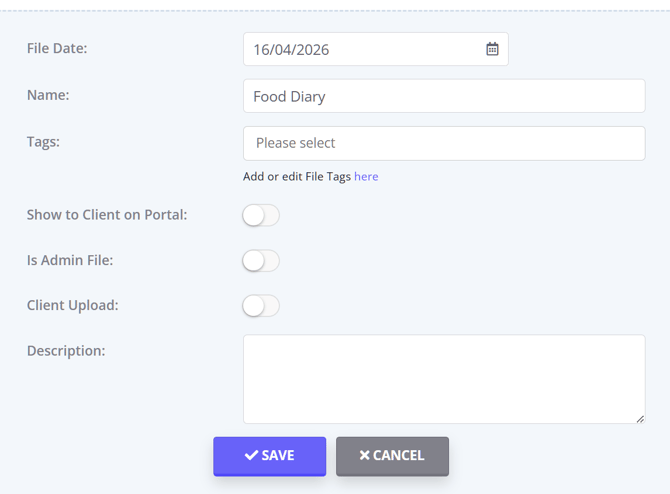
| Option | Description |
|---|---|
| Show to Client on Portal | ON — file is visible to the client under Your Documents. OFF — file remains internal. Controlled manually for each file. |
| Is Admin File | ON — file appears under Admin > Admin Files. OFF — file is treated as clinical and appears under Records > Files. |
| Client Upload | Indicates the file was uploaded by the client via the portal or an online form. This is system-managed and cannot be edited manually. |
Note: Is Admin File appears when you edit a file from Records > Files. It is not shown when you edit a file from Admin > Admin Files. See Moving a File Between Admin Files and Records below.
File list columns:
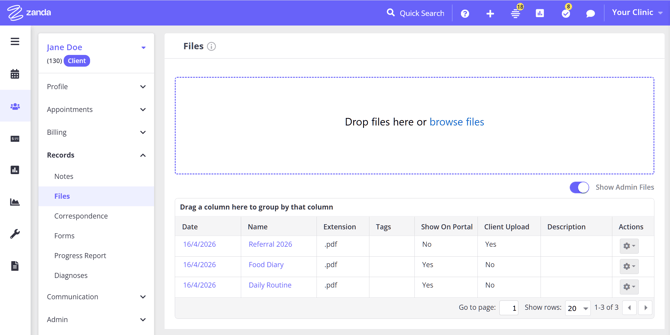
| Column | Description |
|---|---|
| Show on Portal | Displays "Yes" if the file is currently shared with the client |
| Client Upload | Displays "Yes" if the file was uploaded by the client |
These columns let you quickly review visibility and file origin across a client's full file list.
Moving a File Between Admin Files and Records
Every client file is either an admin file, listed under Admin > Admin Files, or a clinical file, listed under Records > Files. You move a file between the two lists by switching its Is Admin File option, and the file appears in the other list. There is no separate move action.
The Is Admin File option appears when you edit a file from Records > Files. It is not shown when you edit a file from Admin > Admin Files, so start from Records > Files whichever direction you are moving the file.
To move a file from Admin > Admin Files to Records > Files:
- Open the client's profile.
- Go to Records > Files.
- Switch on Show Admin Files above the file list. Admin files now appear in the list alongside clinical files.
- Find the file, then in the Actions column click the gear icon and select Edit.
- Switch Is Admin File to OFF.
- Save.
The list refreshes and the file now sits under Records > Files.
To move a file from Records > Files to Admin > Admin Files:
- Open the client's profile.
- Go to Records > Files and find the file.
- In the Actions column, click the gear icon and select Edit.
- Switch Is Admin File to ON.
- Save.
The file moves out of Records > Files and appears under Admin > Admin Files. You do not need Show Admin Files for this direction, because the file is already in the clinical list.
Tip: If Is Admin File is missing when you edit a file, check which page you opened the file from. The option appears only when you edit from Records > Files, so go there, switch on Show Admin Files, and edit the file from that list.
Files Uploaded by Clients
Clients can upload documents directly through the portal, which are saved to their profile automatically.
When a client uploads a file through the Client Portal:
- It is automatically added to Records > Files.
- It is marked as a clinical file by default (you can switch on Is Admin File if needed).
- It is labelled Client Upload.
- The client's primary practitioner is notified via Practice Hive.
Note: Only users linked to the client as a primary practitioner will receive this notification.
Files uploaded through an online form are handled similarly:
- They remain attached to the form submission.
- They are added to Records > Files.
- They are marked as Client Upload and visible on the portal by default.
- If submitted via an admin form, they are also marked as Is Admin File.
Frequently Asked Questions
❓ How do I delete a file that was uploaded through an online form?
Files uploaded through an online form are linked to the submitted form as well as the client's Records > Files list. To remove this type of file, open the submitted form and remove the file from the file upload field.
- Open the client's profile.
- Go to Records > Forms and open the submitted form that contains the uploaded file.
- If the form is completed, unlock the form. A user with permission to unlock forms may need to do this step.
- Click the edit option for the form.
- Find the file upload field that contains the uploaded file.
- Select the delete icon on the file, then click Delete to confirm.
- Save the form.
❓ Can I delete a file from Records > Correspondence?
No. Records > Correspondence shows the communication record and any system attachment name saved with that communication; it is not the place to manage the uploaded file itself. To delete an uploaded file, go to Records > Files or Admin > Admin Files, open the file's Actions menu, select Delete, and confirm.
If the correspondence item is an unsent draft, its Actions menu may include Delete for the draft message record. Sent or locked correspondence records can be opened or printed from Correspondence, while the uploaded file is managed from Records > Files or Admin > Admin Files.
❓Can I attach an existing client file to an email from Communication > New Email?
Not from the email editor browse or folder icon. To email a file already saved on a client's profile, open the client's profile, go to Records > Files or Admin > Admin Files, find the file, and use the file's email action from the Actions column. Zanda opens a Sending File email window with that file attached, and the sent email is saved to the client's correspondence record.
The browse or folder icon in the email editor is for reusable editor files or images. It is not connected to the selected client's Records > Files or Admin > Admin Files list.
❓Can I attach or upload an audio file, like an MP3, in Zanda?
Not currently. Audio and video files aren't in the list of formats Zanda accepts for upload to a client's profile (Records > Files or Admin > Admin Files), so they can't be added there—and because they were never uploaded, there's no file to attach via the file's email action either. They also can't be attached by browsing to a file on your computer while composing a new email: that option only inserts reusable editor files or images, not client-specific attachments in any format. If you need to get an audio file to a client, use a method outside Zanda for now.
❓Can I change the default email message when emailing a client file?
When you email a file from Records > Files or Admin > Admin Files, the Sending File email window opens with a standard pre-filled message. This pre-filled text is the same for every account, and there is no setting that changes it. You can use your own wording in two ways:
- Edit the message before sending. The message text in the Sending File window is fully editable—adjust it as needed before you send.
- Apply a communication template. Use the Template drop-down in the Sending File window to select one of your saved email templates, which replaces the pre-filled message. To create a template, click Create Template in the window, or go to Tools > Communication > Templates. See Creating and Managing Email, SMS and Letter Templates.
❓Can I share a client's file with a third party, such as an NDIS support coordinator?
Not through the Client Portal. The portal only ever shows a person their own documents, so a support coordinator, plan manager, or other external contact cannot sign in and see your client's files. To get a file to someone outside your practice, email it from the client's profile.
- Open the client's profile.
- Go to Records > Files or Admin > Admin Files.
- Find the file and use the file's email action from the Actions column.
- In the Sending File window, choose a recipient in To, add the third party in CC, adjust the message if you need to, and send.
Choosing the recipient
The To drop-down lists only people already linked to that client: the client themselves, their contacts, a third party set as their payer, and their active referrers. You select a name from that list rather than typing an address. Each name is listed with its email address beside it, so if you see dashes instead of an address, add an email address to that person's profile first.
The CC field works differently. You can choose from the same list, and you can also type one email address per message that is not on the client's profile. Type the address and select Send copy to: "..." when it appears. If you try to add a second address that is not on the profile, Zanda asks you to create a profile for that person instead.
That gives you two ways to reach a support coordinator:
- A one-off—send the file to the client (or another linked recipient) and CC the coordinator's email address.
- Ongoing sharing—add the coordinator to the client's profile so they appear in the To and CC lists every time. See Adding Client Contacts Manually and Understanding Third Party Profiles.
The sent email is saved to the client's Records > Correspondence.
Check your own consent and privacy obligations before sending a client's information to anyone outside your practice.
❓How can I access files for a client who has been archived?
Archiving a client profile does not delete their uploaded files. To access them:
- Go to People > Clients > Advanced Search.
- Set the Archived filter to Archived Clients Only.
- Click Show Filtered List and open the client's profile.
- Go to Records > Files to view and download their documents
❓What should I check if a file upload fails or I get logged out during upload?
Zanda checks the file size, file name, and file type before saving a client file. Start by confirming the file is under 30MB, uses a supported format, and has a simple file name with letters, numbers, underscores, or dashes. To rule out file name issues, try a file name with only lowercase characters.
If those checks are fine:
- Refresh your Zanda session by signing out and back in.
- Try the upload in a current browser or a private/incognito window.
- Clear your cache and cookies, then restart the browser.
- If the issue continues, contact the Zanda team with the file type, approximate file size, browser, and whether the issue happens in a private/incognito window.
❓Can admin users view client files, or are they only available to clinicians?
Admin users can view client files when their user permissions allow access to the relevant client profile and to client file uploads. In the user's profile, check Profile Access first, then check the Clinical permission Access all Client File Uploads.
The Access all Client File Uploads permission lets a user view and access file uploads for all profiles they can access. Without this permission, users can only see and upload files for their assigned clients.
To review or update these settings, open the relevant user profile in User Management and review the Profile Access and Clinical permissions.
❓ Can admin users view client files, or are they only available to clinicians?
Admin users can view client files when their user permissions allow access to the relevant client profile and to client file uploads. In the user's profile, check Profile Access first, then check the Clinical permission Access all Client File Uploads.
The Access all Client File Uploads permission lets a user view and access file uploads for all profiles they can access. Without this permission, users can only see and upload files for their assigned clients.
For confidential client documents, use Records > Files or Admin > Admin Files on the relevant client profile, then control access with the user's profile and client file upload permissions. Admin > Admin Files keeps administrative documents separate from clinical files, but it is still part of the client profile rather than a separate manager-only document area.
To review or update these settings, open the relevant user profile in User Management and review the Profile Access and Clinical permissions.
Related Articles
- Managing Users - Configure user profiles, Profile Access, and feature permissions.
- User Permissions For Reception/Admin Staff - Suggested permissions for admin and reception team members.
- Organizing Client File Uploads - Use file tags to organize uploaded client files.