Accepting waitlist requests through your client portal gives your clients a simple, convenient way to let you know they’re waiting for an appointment — without needing to call or email your practice. This enhancement helps you capture demand more efficiently, link requests to client profiles automatically, and reduce manual admin for your team. In this article, you’ll learn how to enable waitlist requests on your client portal, what the experience looks like for clients, and how to set up automated notifications to keep both your clients and your team informed whenever a new request is submitted.
In this article:
- Enabling Waitlist On Your Client Portal
- How Clients Can Join Your Waitlist From Client Portal
- Using the Waitlist When One Logged-In Client Manages Multiple Client Profiles
- Set Up Client Portal Notifications When Waitlist Request Submitted
- Frequently Asked Questions
- Related Articles
Enabling Waitlist On Your Client Portal
Your existing and prospective clients can easily add themselves to your waitlist directly through your client portal. To do that,
- Navigate to User Menu > Account Settings > Schedule > Client Portal > Access and Settings.
- In the Portal Access section, turn on the 'Accept Waitlist Requests' switch.
- Save the changes.

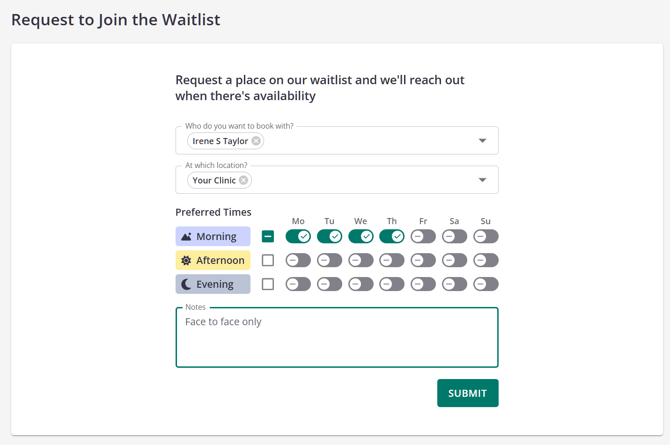
How Clients Can Join Your Waitlist From Client Portal
Once the waitlist requests are allowed on the client portal, this is what the clients will see on your client portal home page.
To add themselves to the waitlist,
- Existing clients will simply log in to their account.
- New clients can register if new client registration is enabled.
- After logging in or registering, their Zanda profile will be linked with the Waitlist entry.
Here's how a client will add themselves to the waitlist:
- Click 'Waitlist'
- 'Who do you want to book with?' - Select appointment practitioner or any practitioner for the requested appointment
- 'At which location?' - Select specific location(s) or any location for the requested appointment
- Select preferred days and times
- Type in any notes
- Click 'Submit'
Clients are also able to join the waitlist when
- booking an appointment
- OR booking a class
- they will be asked to complete the same steps to request a place on your waitlist.
Using the Waitlist When One Logged-In Client Manages Multiple Client Profiles
In some cases, a single person logging into your client portal can manage appointments and waitlist requests for more than one client. To support this, Zanda automatically displays a “Who do you want to place on the waitlist?” drop down whenever the logged-in person is authorized to submit waitlist requests for multiple profiles. This section explains when this dropdown appears, how it works, and what your clients can expect to see.

When the Client Selector Dropdown Appears
Clients will see the profile selector on the waitlist form when:
-
They are a client themselves and are also authorized to manage more than one client profile as their contact, or
-
They are a contact submitting requests on behalf of someone else.
❗ If a logged-in person has access to only their own client profile, the dropdown won’t appear — the waitlist request will simply be submitted for that single profile.
Situations Where Multiple Profiles Are Available
Zanda supports several real-life scenarios where one person may legitimately manage appointments for others. The waitlist available on the client portal automatically adapts to these situations.
1. Parent / Guardian or Contact Managing Children or Dependents
This is the most common scenario.
How it works:
-
A parent, guardian or authorized contact is linked to one or more client profiles.
-
They have the permission “Can make appointments on the client portal for XX client name XX”
-
When they log in, they can choose which linked client to place on the waitlist.
Example:
Mary logs in to manage her children’s bookings. She sees the dropdown:
-
Eve Doyle
-
Peter Doyle
- Adam Doyle
She simply selects the child who needs the appointment and submits the waitlist request.
2. Shared Profiles (Family or Group Accounts)
Some practices create a shared family or household profile, used jointly by multiple members alongside their own personal profiles.
How it works:
-
A shared profile (e.g., “The Smith Family”) exists.
-
Each member linked to the shared profile is authorized to manage portal appointments.
-
When a member logs in, they may see:
-
Their own individual profile
-
The shared family profile
-
Example:
Jordan logs in and sees:
-
Jordan Smith
-
The Smith Family
He can submit a waitlist request for either his personal profile or the family account.
3. Contact-Only Persons (Without Their Own Client Profile)
Some persons have permission to manage clients but are not clients themselves.
How it works:
-
They are set up as a Contact only (not a Client).
-
They can manage appointments for the clients they are linked to.
-
They will only see the profiles they are authorized to manage — not their own.
Example:
A family coordinator Maggy Jones logs in. They see:
-
Mary Taylor
-
Alex Taylor
They can select either profile to submit a waitlist request, but they cannot add themselves because they don’t have their own client profile.
What Clients Will See in the Portal
When multiple profiles are available
Clients will see a dropdown titled:
Who do you want to place on the waitlist?
-
The list includes all profiles they are authorized to manage.
-
One profile will be selected automatically.
-
They can change the selection before submitting the request.
When only one profile is available
-
No dropdown "Who do you want to place on the waitlist?" appears.
-
The waitlist request is automatically submitted for this single profile.
💡 Tips for Clinics
-
If your practice works with families, children, team coordinators, or carers, this feature helps ensure requests are always attributed to the right person.
-
To enable someone to manage another client’s bookings, ensure they are linked as a Contact or Member and have “Can make appointments on the client portal for XX client name XX” enabled.
-
Shared profiles can be useful for families or organizational groups that operate from a single client record.
Set Up Notifications When Waitlist Request Submitted
Option 1 - Sending Email / SMS notifications via the Client Portal
You can use the client portal notifications feature to send email or SMS automatic notifications to clients and your team members when a client adds themselves to your waitlist.
1. In Tools > Communication > Templates, create your templates to use for these notifications. You can create your own, or copy the ones provided here.
Email Name: Client Portal - Waitlist Confirmation to Client
Description: Email to confirm the client has added themselves to the waitlist via the Client Portal.
Email Subject: You're on the {BusinessName} waitlist – we’ll be in touch!Content:
Hi {ClientFirstName},
Thanks for adding yourself to our waitlist. We’ve received your request and will let you know as soon as an appointment becomes available that matches your preferences.In the meantime, you’re welcome to log in to the Client Portal anytime to check appointment availability.
If you have any questions or need to update your request, feel free to reach out at {BusinessPhone}.
We’ll be in touch soon!
{BusinessName}
SMS Name: Client Portal - Waitlist Confirmation to Client
Hi {ClientFirstName}, you were added to {BusinessName} waitlist. We’ve received your request and will let you know as soon as an appointment becomes available that matches your preferences.
Email Name: Client Portal - Waitlist Notification to User
Description: Email to notify a user when a client has added themselves to the waitlist via the Client Portal.
Email Subject: A client has joined your waitlistContent:
Hi there,
Heads up – a client has just added themselves to your waitlist via the Client Portal. Here are their details:
Name: {ClientFullName}
Mobile number: {ClientMobilePhone}
Email: {ClientEmailAddress}You can review and manage waitlist requests directly from your Zanda account waitlist.
Your Zanda Client Portal
2. After your communication templates are ready, go to User Menu > Account Settings > Schedule > Client Portal > Notifications.
3. Scroll to the 'Waitlist Request Submitted' section.
4. Review and enable the recipients' settings. You can select to send notifications to
- Client's Primary Practitioner
- The Client
- These Email Addresses - Comma separated list of email addresses manually entered by you.
5. For each recipient type, select a notification template that Zanda will automatically use whenever a client adds themselves to your waitlist.
6. Save changes.

Once you've set up these notifications, they will be triggered every time a client submits a request to join your waitlist from your client portal.
Option 2 - Receive Practice Hive Notifications In Zanda
You can enable Practice Hive Waitlist notifications to alert you every time a client submits a waitlist request via your Zanda client portal. Each Zanda user can choose to enable or disable these notifications in the Practice Hive for themselves.
- Click the Practice Hive icon at the top toolbar.
- Click Settings at the bottom-left of the Practice Hive modal window.
- Turn on or off the switch for Enable Client Portal Waitlist Notifications. Save.
- If you have the setting ON, you will see a new alert on the counter every time a client adds themselves to the waitlist via the client portal.
- A new notification will show under the CLient Portal label.
- The notification entry will include the client name and the the link to the waitlist request record allowing you to quickly navigate to the client's profile and to their waitlist record in just one click.

Frequently Asked Questions
Can clients choose a date range for waitlist availability?
No. Waitlist requests do not include a date range picker. Clients can choose preferred days and time periods, select their preferred practitioner and location, and add notes if they want to explain a specific date window or scheduling need.
In your Zanda waitlist, these requests appear with the client's Available days and times, Waiting Since date, Date Added, practitioner, location, and notes. You can use those fields to review who matches a newly available appointment time, then check the notes for any date-specific preference the client entered.
Related Articles
- Adding And Managing Clients In Waitlist - Learn how to add clients to the waitlist, filter by availability, send messages, and remove clients.
- Setting Up Online Bookings on Client Portal - Configure appointment booking rules, online booking limits, and client portal appointment settings.