%20-%20120%20x%2044.svg)
In this article:
- Adding Insurers to Your Account
- Adding Insurances to Client Profiles
- Capturing Client Insurance Details Via Online Forms
- Related Articles
Adding Insurers to Your Account
Zanda allows you to create a custom list of all the insurance companies with whom you work:
1. Navigate to User Menu > Account Settings > Payment > Insurers.
2. Click the blue +Add Insurers button.
3. Search the insurance company name or free type, then select the name from the suggested list.
4. Enter the Payer ID.
5. Select the type of insurance.
6. Complete any other fields as necessary and save the changes.
7. Use the 'Actions' column to deactivate an insurer when needed to remove them from the insurer's list.
8. You will be able to reactivate that inactive insurer at any time:
- Enable the 'Show Inactive' switch
- Click the gear icon in the last column next to an inactive insurer you want to activate
- Select 'Activate
Adding Insurances to Client Profiles
Each client can have multiple insurances added to their Zanda client profile.
1. Navigate to Client Profile > Billing > Insurance and click the blue +Add Insurance button: 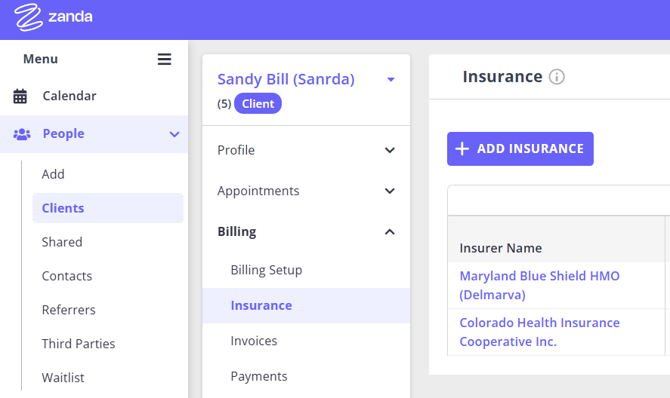
2. Complete the insurance form
3. Save the changes.
Note: When a client has a secondary insurance recorded here and the primary insurer on the invoice is Medicare, the secondary insurance details are automatically carried onto the client's CMS-1500 form (the Other Insured fields 9, 9a and 9d). See Populating the Claim Information for details.
Capturing Client Insurance Details Via Online Forms
Adding Insurance Linked Profile Field to Form Templates
1. Navigate to Tools > Form Designer.
2. Open an existing form template or create a new one.
3. In the ' What type of field would you like to add?' section, select the 'Linked Profile field' option.
4. The linked profile field settings will open. You may skip entering the question title at this stage. Click the ' Select the Profile Field' dropdown.
5. Select ' Insurance Details' from the dropdown list
6. You can select the insurer to pre-populate it to your form template, or leave it blank for the clients to choose from your available list of insurers. (This list is set in Account Settings > Payments > Insurers.
7. Switch on Require an answer for this field if the client must provide insurance details before they can submit the form. When this is on, the client has to complete Insurer, Insurance type, Relationship to Insured, Member ID Number, and Effective Start Date. Effective End date and Copay Amount ($ amount) stay optional either way.
Hint: Leaving Require an answer for this field switched off does not always mean the whole insurance block is optional. An Insurance Details block is treated as started as soon as any part of it holds a value, and once a block is started the same five fields listed above become required in that block, so you receive a complete insurance record rather than a partial one.
8. Add more questions to the form template as necessary. Save the template once done.
Helping a client submit a form with insurance fields
A client may see This field is required on the insurance fields even though Require an answer for this field is switched off, and even though the insurance section looks empty on screen. This happens when part of an Insurance Details block still holds a value while the rest is blank, so the block counts as started.
Here is what to check, and what to tell the client:
- The client added an extra insurer and left it blank. If Allow client to add multiple insurances is switched on and the client clicked + Add Another Insurer without filling the new block in, that empty block still has to be completed. Ask them to click Remove Insurer underneath it before submitting. The first block cannot be removed.
- The client entered insurance details and then cleared them. Clearing the fields does not always release the requirement, and the form is saved as a draft, so reopening the same link will not reset it. Ask the client to complete the insurance fields, or send them a new copy of the form.
- Form Pre-Population is switched on and the client has no default insurer on their profile. The first insurance block can be marked required as soon as the form opens, before the client has touched anything. Switch off Pre-Populate Linked Fields on Forms for that template, or send a template that does not include the Insurance Details field.
💡 Pro Tip: If many of your clients do not have insurance, keep the Insurance Details field on its own form and send it only to the clients you need it from. That way an intake form never blocks on insurance a client does not have.
Collecting Client Insurance Details
1. Send the online form link to a client using one of the methods explained here.
2. Once a form link is generated, a draft on the form can be seen in the client profile > Records > Forms, or Admin > Admin Forms.
3. Here is a preview of the insurance details field that a client will see when they access their online form via a link you provided.
4. Once the form is submitted by the client, it will be saved as completed in their client profile > Records > Forms.
5. The 'Insurance Details' linked profile field will also automatically add the insurance record to the client profile > Billing > Insurance and save all the insurance details the client provided, there.
6. You will be able to enter the additional insurance details to use for billing.
Related Articles
- Collect Multiple Client Insurance Records Automatically Using Online Forms - Let clients add more than one insurer on a single form.
- Sending Online Forms to Clients - Ways to get a form link to your clients.
- Using the Form Designer - Build and edit the form templates that carry the insurance field.