%20-%20120%20x%2044.svg)
In this article, you will learn how to send online forms to your clients. Before you start, make sure you have already created an online form template in the Form Designer.
In this article:
- Send a Form to your Client using an Email/SMS Template
- Send a form automatically for a specific appointment service
- Manually Send a Form to a Client
- Changing a Form Template and Its Impact on Existing Drafts
- Automatically Send Online Forms to all Clients via Client Portal Notifications
- Show Client Online Forms on Client Portal
- Frequently Asked Questions
- Pre-populate Linked Profile Fields on Online Forms
- Using Client Forms Report
- Sending Incomplete Forms Reminders
- Related Articles
Send a Form to your Client using an Email/SMS Template
💡Pro Tip: By setting up your email/SMS template with a form ID / merge field, you can quickly send a form to your client. No need to generate the form or copy/paste the link. This will be done automatically by the merge field inside the email/SMS template each time when sent.
Each form template you create in the Form Designer is assigned a unique form ID, known as a merge field. This merge field can be added to an email or SMS template, allowing you to link a specific form when communicating with clients. Upon sending such an email/SMS generated from a template to a client, two things will happen:
- The form will be automatically created in the profile you generate the email/SMS from — even if you select a contact, such as a parent or carer, as the recipient of that message.
- The merge field in the email/SMS will be replaced with an https link to the form. Clients can click this link to complete the form and submit the information.
Note:
- If there is an existing form draft from this template in the client's profile that has not been completed, the system will not create a new form. Instead, it will resend the link to the existing draft to prevent any duplication.
- To avoid this issue, you have the option to set an expiry date for the form template by navigating to Tools > Form Designer > Form Template. This way, any incomplete form drafts will automatically expire after the designated time period. If you need to resend the form after the expiration, the system will create a new form for the client.
- If the form template has been updated since the draft was created, see 'Changing a Form Template and Its Impact on Existing Drafts' below for important details on how this merge field behaves with outdated drafts.
Here's how you can set this up:
- Go to Tools > Communication > Templates. Open the email/SMS template of your choice or create a new one.
- Click the Available Merge Fields link at the bottom-left.
- Click the Links To Online Forms button.
- Copy the merge field code for the online form you need to embed.
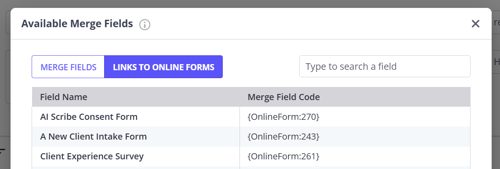
- Paste the form merge field code you copied earlier in the email/SMS template. (The form link will be displayed instead of the code when you generate an email/SMS template in a client profile.)
- Click Save.
Warning: Do not paste the Online Form merge field directly in an email/SMS in the client's profile. The link cannot be generated this way.
Instead, paste the merge field in the email/SMS template first in Tools > Communication > Templates - and then select the email/SMS template in the client's profile.
7. That's it. Now go to the client's profile and navigate to Communication → New Email/New SMS. Select the communication template that has the merge field of the form you want to send - and then send that email or SMS.
Warning
Never copy the generated client email/SMS with a form link and paste it into another client's new email/SMS. Always use a communication template with the form merge field when you send forms to clients.
Each link is unique and is directly connected with the client profile where it was generated.
When the form link is sent to the wrong client, the following issues may occur:
- when that client receives and submits a form with linked profile fields (like an Intake Form), their details will overwrite the client details of the profile where the form was generated;
- if the form has already been submitted by one of the clients who received the same link, the other clients will see an empty page when they click on the form, with a notification that the form cannot be found;
- when the form is submitted, it will be stored in the client profile where it was generated. This means that you may not be able to locate this form in the profile of a client who filled out the form, as the link was generated in a different profile.
Send a form automatically for a specific appointment service
You can send an online form before appointments for a specific service by adding the form merge field to a communication template, then using that template in a Pre-appointment Automation.
This is useful for service-specific consent forms, intake forms, preparation instructions, or other forms clients need to complete before a particular appointment type.
Before you start, make sure the online form template already exists in Tools > Form Designer.
- Go to Tools > Communication > Templates.
- Open the email or SMS template you want to use, or create a new template.
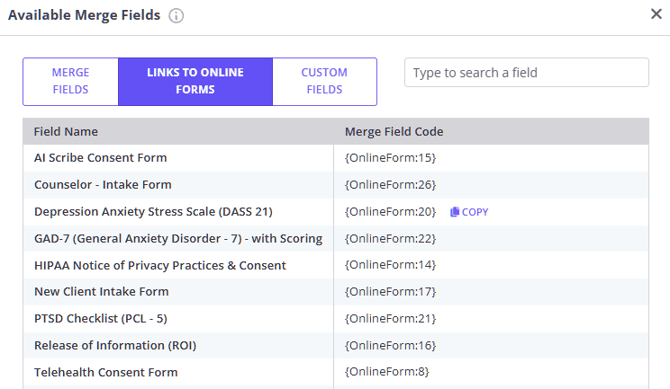
- Click Available Merge Fields.
- Select Links to Online Forms.
- Copy the merge field code for the form you want to send.
- Paste the merge field code into the message body, including the
{}brackets. - Click Save.
Next, create the automation:
- Go to User Menu > Account Settings > Communication > Automations.
- Create a new automation.
- Select Pre-appointment as the automation type.
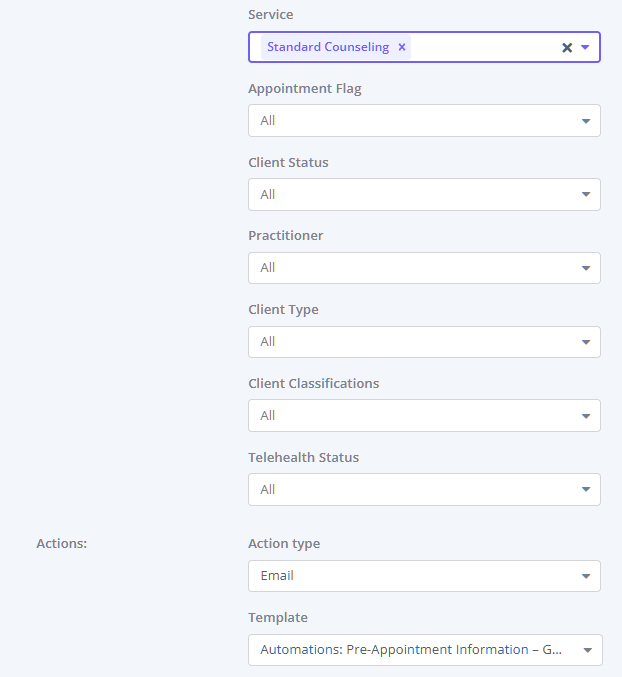
- In the conditions, set Service to the appointment service that should receive the form.
- Set Days before Appointment Date to choose when the message should send.
- Set the Action type to Email or SMS.
- Select the communication template that contains the online form merge field.
- Click Save.
💡 Timing tip: Pre-appointment automations are different from standard booking confirmation emails. They send on one trigger day, worked out as the appointment date minus the number you set in Days before Appointment Date, and the smallest value you can set is 1 day. A pre-appointment automation therefore sends the day before the appointment at the earliest, so choose a timing that gives clients enough time to complete the form before their appointment.
Manually Send a Form to a Client
Important Note:
Before creating a new form draft, please review the client records for any incomplete drafts of the same form. If you find an existing draft, you can choose to resend the link to that draft, or if necessary, delete the outdated draft and create a new one. This ensures that you are providing your client with the most up-to-date and relevant version of the form.
Before you can manually send a form link to your client, you will need to generate it in your client's profile. Here's how you can do this:
- Go to the client's profile to whom you want to send the form.
- Navigate to Records → Forms to generate a clinical form
or Admin → Admin Forms to generate an admin form. - Click + Create New
- Select a Template: Use the Template dropdown to choose the form you wish to complete.
- Select or Search by Template Name: Click to view the list or type to search by name. This is useful for quickly finding specific forms in large libraries.
- Manage Templates: Users with the
Manage Note and Form Templatespermission, can use the Manage templates link to edit form templates on the fly. -
[!WARNING] Changing Templates Deletes Content
If you have already started writing in a note or if a template was already selected, changing the template will delete your current content.
You will see a confirmation warning: "Updating the selected template will delete any content that you have written. Are you sure you wish to continue?"
- Yes: Replaces current content with the new template.
- No: Keeps your current content and template.
- You will see two new fields: Name and Expiry Date. Use the Name field to change the name of your form. And with the Expiry Date setting, select the date until which your client can access the form.
- Scroll down to the end of the form and click Save as Draft. Alternatively, the system will save a note automatically 5 seconds after it was created.
- Once done, scroll up and click X on the top-right corner of the form to exit Edit mode. That's it. You have successfully generated the form!
There are four ways you can send this generated form:

- Show this form on the Client Portal: Enable the 'Shown on Portal Forms Page' switch on the form draft and allow clients to access their online forms on their client portal home page.
- Copy/paste the form link*: This will give you a link that you can share with the client with which they can fill the form directly from their computer/mobile phone.
- Go to Portal Form: This will open the form in a new tab. Use this option if you want the client to fill out their forms on the premises using your device.

- Print the form: This will allow you to print out a physical copy of the form or download the form as a PDF.
- Email the form as a PDF attachment: This will directly email the form PDF to the client.
❓ Can I email several completed forms to a client in one email?
Not from this dialog. The Email the form as a PDF attachment option sends one form per email — it attaches only the single form you are viewing, so you cannot bundle several completed forms into the same message here. To get a client several of their completed forms, you have two options:
- Send them one at a time. Repeat the Email the form as a PDF attachment step for each completed form.
- Attach them together yourself. Open each completed form, choose Print the form to download it as a PDF, then compose a single email in your own email program and attach all the PDFs to that message.
❓ Can I send admin forms to clients?
Yes. Admin forms are online forms, so you can send them to clients in the same ways as clinical forms:
- Add the admin form merge field to an email or SMS template, then send that communication template from the client profile.
- Generate the form from the client profile by going to Admin → Admin Forms, saving it as a draft, and sharing the generated form link.
- Show the draft on the Client Portal forms page when the Client Portal forms page is enabled.
If you want admin forms to appear on the Client Portal by default, open the template in Tools → Form Designer and enable Default to Show on Portal. This setting applies to forms created after you save the template. For a form draft that already exists, open the form in Admin → Admin Forms and use Shown on Portal Forms Page to show or hide that specific draft.
Important
Do not share the same link with the other clients: each link is unique and is directly connected with the client profile where it was generated. When the form link is sent to the wrong client, the following issues may occur:
- when that client receives and submits a form with linked profile fields (like an Intake Form), their details will overwrite the client details of the profile where the form was generated;
- if the form has already been submitted by one of the clients who received the same link, the other clients will see an empty page when they click on the form, with a notification that the form cannot be found;
- when the form is submitted, it will be stored in the client profile where it was generated. This means that you may not be able to locate this form in the profile of a client who filled out the form, as the link was generated in a different profile.
Changing a Form Template and Its Impact on Existing Drafts
When you update a form template in the Form Designer, it can affect drafts differently depending on whether any data has already been entered.
How template changes apply
Newly sent forms
New forms always use the latest version of the template.
Existing drafts
Existing drafts behave differently depending on their state:
- Draft with no data entered
If a draft hasn’t been edited yet, it will automatically update to the latest template the next time it is sent. No duplicate is created. - Draft with data entered
If a draft has already been edited—either by a user or partially completed by a client—it will not update automatically. The original version is preserved to protect the data already entered.
Resending a draft that uses an outdated template
If a client has started a form using an older version of the template, you have two safe ways to resend it:
- Send the direct link
Copy the link from the client’s profile via Records > Forms or Admin > Admin Forms and send it to the client via your preferred method.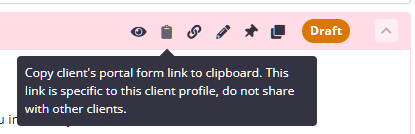
- Use the Incomplete Forms automation with an communication template with the
{IncompleteForms}merge field embedded
Adding this merge field to your communication template links client’s existing incomplete draft form(s).
Important: Using the {OnlineForm:ID#} merge field will create a new form based on the updated template. This means any data already entered in the existing draft will not carry over.
Automatically Send Online Forms to all Clients via Client Portal Notifications
You can easily distribute the Online Forms you have created to new clients or for all scheduled appointments through the Client Portal. Here's how to do it:
- Go to Tools > Communication > Templates. Open the email/SMS template for the client portal or create a new one.
- Click the Available Merge Fields link at the bottom-left.
- Click the Links To Online Forms button.
- Paste the merge field code to the communication template. Save.
- Next, go to User Menu > Account Settings > Schedule > Client Portal > Notifications and select the communication templates where you added the online forms for the client portal registrations and bookings.
Current Limitation:
Zanda online forms can't be embedded on your website as a single static form that anyone can fill out. Each online form generates a unique link tied to one client profile, so a form always belongs to a specific client rather than to the public. If you need a completely open form that any website visitor can submit before they exist in Zanda, you'd need a separate third-party form tool for that step.
Collecting details from new or prospective clients through your website
Instead of a static public form, let prospective clients reach you through your Client Portal and receive your intake form automatically:
- Add your Client Portal to your website. Put a Book Now button, link, or embedded portal on your site so visitors can find it. See Adding Your Client Portal to Your Website, Social Media and Google.
- Allow new clients to register. In User Menu > Account Settings > Schedule > Client Portal > Access and Settings, enable new client registration so first-time visitors can create their own profile. See Client Portal Registration for New Clients.
- Send your intake form automatically. Set up a New Client Automation that triggers when a client self-registers through the portal, so your New Client Intake and consent forms are sent to them as soon as they sign up.
This gives prospective clients a public way to reach you from your website and delivers your intake form to each one individually—the closest equivalent to a self-referral form for new clients.
Show Client Online Forms on Client Portal
Clients who are registered in your Zanda account have individual profiles that store all online forms created specifically for them. You have the ability to choose which forms are displayed on each client's forms page in the client portal, which allows them to view, complete, and download their signed forms.
Here’s how to do it:
- Navigate to User Menu > Account Settings > Schedule > Client Portal > Access and Settings and enable the Show Forms Page switch.
- Read the 'Action Required' pop-up message modal and save the changes.
- Go to Tools > Form Designer > Edit the form template and toggle on "Shown on Portal Forms Page" for all templates of the forms you wish to be shown on the client portal. Alternately, you can leave this off for templates and decide on a form-by-form basis which forms can be visible on the client's portal forms page.
- You may leave this setting disabled on a template level in Tools > Form Designer, but enable the 'Shown on Portal Forms Page' setting on an individual client form draft in client profile > Records > Forms or Admin > Admin Forms:
- When you have the portal forms page enabled, you will see an 'eye' icon on their top bar in the client profile.
- The eye with a slash through it indicates the form is not visible.
- You can change the form visibility status by clicking on the eye icon to either show or hide it from the client's portal page.
- You do not need to unlock a form for editing to change its visibility for the portal - just click the 'eye' icon to change it to visible or invisible.
When clients access their client portal home page where online forms are shown, here is their experience:
- A client will see the My Forms tab available to click.
- They will see a list of available forms and their status (Incomplete, Completed or Expired) and can click 'View Form' to complete them.
- A completed form can be downloaded to the client's device as a PDF file by clicking the 'Download' button.
Frequently Asked Questions
❓ Can I send different forms automatically for different services?
Yes. Create one communication template for each form, then create one Pre-appointment Automation for each service. In each automation, select the matching communication template and add the relevant Service condition, so the message only sends for appointments that match that service. If one form applies to more than one service, select all relevant services in the same automation. Use separate automations when services need different forms or wording.
❓ Can the booking confirmation email be different for each service?
No. The message a client receives when an appointment is booked comes from a single account-wide template, so it is the same for every service.
- For appointments clients book through the Client Portal, the template is set in User Menu > Account Settings > Schedule > Client Portal > Notifications, in the New Appointment Creation section. There is one template for the appointment practitioner, one for the client, and one for any extra email addresses.
- For appointments your team creates, the template is the New Appointment Template in User Menu > Account Settings > Communication > Reminders.
Neither setting has a Service condition. To vary the form by service, use a Pre-appointment Automation, which does have one. See 'Send a form automatically for a specific appointment service' above.
❓ Can an online form be sent immediately after a specific service is booked?
Not for a specific service. Service-specific sending comes from a Pre-appointment Automation, and those send the day before the appointment at the earliest, as described in the Timing tip above. Setting a larger number of days doesn't make it send sooner: if the appointment is booked after that trigger day has already passed, no message is sent for that appointment at all. See Setting Up a Pre-appointment Automation.
If a form has to reach the client straight away, you have two options:
- Add the form merge field to the account-wide booking confirmation template, accepting that every service sends the same form.
- Send the form by hand from the client's profile, through Records > Forms or Admin > Admin Forms, choosing the right form for that client.
❓ How can a practice send intake forms in more than one language?
Set up a separate service for each language, for example one Initial Consultation service per language, then create one Pre-appointment Automation per service. In each automation, set the Service condition to that language's service and select a communication template that contains that language's form merge field. Each client then receives the form in the right language automatically.
Keep in mind that this sends on the automation's trigger day, not when the appointment is booked. If clients also need something immediately when they book, either keep one account-wide booking confirmation in your main language, or send the language-specific form manually from the client's profile.
❓ Can I add an intake form link to the Client Portal home page instructions?
No. Online form links are client-specific, so use the Client Portal Forms page or a client portal notification template instead of adding one general intake form link to the home page instructions.
For forms clients should complete after logging in, enable Show Forms Page in User Menu > Account Settings > Schedule > Client Portal > Access and Settings. Then either turn on Shown on Portal Forms Page in the form template for forms created after that change, or open the client's draft form and use Shown on Portal Forms Page or the eye icon to show that form on the client's My Forms page.
For forms clients should receive after registering or booking through the portal, add the online form merge field to the relevant client portal notification template. Zanda will generate the form for that client and replace the merge field with that client's form link when the notification is sent.
❓ Is it possible to transfer forms to a different profile?
Unfortunately, forms cannot be transferred between profiles.
-
If a form has been completed under the wrong profile, you can print the form and then upload it to the correct profile by navigating to Records > Files.
-
After that, delete the form from the incorrect profile:
1. Go to the incorrect client profile > Records > Forms.
2. Open the form you want to delete.
3. Click the Trash can icon in the bottom-right corner of the open form.
4. Click Yes to confirm deletion.
❓ What should I check if a completed online form appears on the wrong client profile?
Start with the profile where the form link was generated. Submitted forms are stored on the client profile connected to the generated draft or merge-field link, even if a different person opens that link and completes the form. If the form belongs on another client profile, print or download the completed form, upload it to the correct profile via Records > Files, then delete the form from the incorrect profile.
To reduce the chance of this happening again, send online forms from a communication template that contains the form merge field, and generate the message from the intended client profile. Avoid copying a generated form link from one client's email, SMS, or form page into another client's message.
Form Authentication adds an identity check before the recipient opens the form. Depending on your settings and the client record, the recipient may authenticate with date of birth, email address, or mobile number. It helps confirm who is opening the form, but the form is still attached to the client profile where the link was generated.
❓ How do I delete a completed form from a client's profile?
-
Go to the client's profile and navigate to Records > Forms (for clinical forms) or **Admin > Admin Forms** (for admin forms).
-
Open the form you want to delete by clicking on it.
-
Click the **Trash can (rubbish bin)** icon in the **bottom-right corner** of the form.
-
Click **Yes** to confirm.
Note: The delete option is located at the bottom-right of the open form, not in the icon row at the top. The icons at the top of each form (clipboard/print, link, pencil/edit, pin/portal visibility, copy/duplicate) are for other actions. The trash can only appears when you scroll to the bottom of the open form.
Deleted forms are not permanently removed immediately — they can be restored within 30 days. To restore a deleted form, enable the Show Deleted toggle at the top-right of the Forms page, find the form, and click Restore Form.
❓ If I delete a form from a client's file, will it stop the automated email?
It depends on how that email is being sent—and deleting a form never switches an automation off.
If the email comes from an Incomplete Forms automation—the email or SMS template uses the {IncompleteForm} merge field—then yes. The automation checks for forms that are still active and incomplete each time it runs, so once you delete the draft, that form is no longer picked up on the next run. If the client has other incomplete forms that match the conditions of that automation, reminders for those will still go out.
If the email uses a Links to Online Forms merge field—an {OnlineForm:ID#} code in an email or SMS template—then no, and deleting the draft can create extra work. The next time that template is sent to the client, Zanda looks for an existing incomplete draft from that form template to reuse. Because the draft has been deleted, there is nothing to reuse, so Zanda creates a brand-new form and sends a new link.
To stop the emails, do one of the following:
- Turn the Active switch off on the automation in User Menu > Account Settings > Communication > Automations, or remove that form template from the conditions of the automation.
- Remove the online form merge field from the email/SMS template in Tools > Communication > Templates, so no new form is generated the next time the template is used.
- Set an expiry date on the form template in Tools > Form Designer if you only want the reminders to stop after a set period.
- Yes. Clinicians can pre-fill a form by generating it manually within the client profile and saving it as a draft before sharing the form link with the client using a communication template.
- Important: Before sending the form, confirm there are no duplicate templates or previous drafts in progress to avoid any confusion.
❓ Can clients print or download their signed forms?
- Yes, clients can download their signed forms if you have enabled the Show Forms Page in the Client Portal settings.
- Once enabled, clients can log in to the portal, navigate to My Forms, view their completed forms, and click the Download button to save a PDF copy. After the form is downloaded as a PDF file, it can be printed.
Pre-populate Linked Profile Fields on Online Forms
You are able to send forms to clients with some fields already filled in, using information from their details page which was filled with the linked profile fields. Clients can then easily review and update their existing details, helping to ensure their information stays accurate and up to date.
Here's how this works:
- To enable this feature, a user with access to the Setup and Configure Zanda will navigate to User Menu > Account Settings > Communication > Communication Options menu.
- On that page, turn on the
- Enable Client Form Authentication and
- Pre-Populate Linked Fields on Forms switch and save the changes.
- After this feature is enabled, linked profile fields and linked custom profile fields on forms will auto-fill with existing client data, so clients don’t need to re-enter it, but will be able to review and update the data if necessary.
Example:
A new client intake form draft has been created and the link sent to a client to initiate a new treatment plan. Details already saved in the client’s profile are automatically pre-filled into the form, allowing the client to easily review and update any information if changes are needed.
💡 Note: Clients will enjoy a consistent experience of pre-filled data when accessing their online form drafts—whether they use a link received via email or SMS, or log in through their client portal.
Using Client Forms Report
With Client Forms, you can see the statuses of all forms created or completed within a specified period of time. This is based on forms created in the client profile and allows you to keep track of outstanding client forms. See more details here.
Sending Incomplete Forms Reminders
You can use the Zanda Automations feature to set up multiple incomplete forms automations to remind clients of any incomplete forms.
- Set up communication templates, SMS or Email, to send as the reminders:
- Go to Tools > Communication > Templates and create new SMS and email templates for each type of incomplete form reminder you are going to use. Check out our collection of automation templates here.
- The important thing is to use the {IncompleteForm} merge field in your reminder templates which will add the links to the form that need to be completed.
- Go to User Menu > Account Settings > Communication > Automations.
- Click the '+ Add Automation' button at the top of the page.
- Enter a descriptive name for your automation (e.g., "Incomplete Forms Reminder").
- Select the Automation type as 'Incomplete Forms'.
- Set the Conditions
- Days before next appointment: select the number of days.
- Days before expiry: select the number of days.
- Days after form created: select the number of days.
- Select Form Template(s)
- In the 'Actions' dropdown, select what the automation will do. You can choose from SMS, Email, or Task.
- Select a pre-written communication template from the 'Template' dropdown.
- Once you have configured all your actions, click 'Save' to create the automation.
Your new Incomplete Forms automation is now active and will automatically send reminders with links to incomplete forms or create tasks for your team members linked to clients with outstanding forms based on the conditions you’ve set.
Related Articles
- Using the Form Designer - Create and manage online form templates.
- Available Merge Fields for Communication Templates - Review merge fields you can add to communication templates.
- Setting Up a Pre-Appointment Automation - Send targeted messages before appointments.