%20-%20120%20x%2044.svg)
You can customise the invoices and payment receipts you send clients with your clinic’s logo – or any other branding image of your choice. You can also edit the information about your health clinic displayed in your invoices. Last but not least, you can add custom messages and additional information to your invoices as well.
In this article:
- Adding a Documents Logo (Invoices, Notes, Forms)
- Editing Your Invoice Layout
- Editing Business Information in Your Invoice
- Adding Custom Text to Your Invoices
- Adding Information that Appears on all Invoices
- Adding Information that Appears for a Particular Practitioner
- Adding Information that Appears for a Particular Client
- Frequently Asked Questions
- Related Articles
Adding a Documents Logo (Invoices, Notes, Forms)
Your Documents Logo is managed centrally in your Business Info settings and appears across all printed PDF documents, including invoices, statements, forms, and session notes.
Here’s how to upload your logo or letterhead:
- Go to User Menu > Account Settings > Practice > Business Info.
- Under the Documents Logo section, click Upload/Update Image.
- Select the logo or letterhead image from your computer.
- Once uploaded, your new logo will automatically appear on supported PDF documents.
- Your Logo Position: After uploading your Documents Logo in the Business Info page, you can use the Your Logo Position setting to control how the logo appears on invoices. You can choose its position on the invoice or choose not to display the logo on invoices at all.
Pro-tip 💡
1. You can update or remove your Documents Logo at any time by returning to User Menu > Account Settings > Practice > Business Info.
-
Click Update Image to upload a different logo.
-
Click Remove Image to remove the logo completely.
2. Zanda uses the uploaded image as your Documents Logo and lets you choose its position on invoices. If the logo appears too large or too small, resize or crop the image before uploading it again. There are some free online tools that you can use, for example, Adobe here. At the Resize step in the Resize For field, select Custom from the dropdown, and then type the desired Width dimensions. The Height will update automatically.
Editing Your Invoice Layout
Your invoice displays various important information, such as your logo, business address, application of tax, invoice number and more. You can choose how this information is displayed.
Here’s how:
-
Navigate to User Menu > Account Settings > Billing > Invoices.
-
On the Invoice and Statement Layout page, you will find the settings to add/remove information from your invoices.
-
Edit the settings and click Save on the bottom-right corner of your screen.
What Each Field Means
- Invoice Title: Select the invoice title from the available options: 'Tax Invoice' or 'Invoice'.
- Custom Text For Top Of Invoices And Statements: Add the text you want to display in your invoice header. You can also leave it blank. Once the text is saved here, it will appear on all generated invoices, including the already created past and future dated, when invoices are printed or emailed.
- Custom Text For Invoice Footer: Add in the text you want to display at the bottom of your invoice for Business Name Position. Once the text is saved here, it will appear on all generated invoices, including the already created past and future dated, when invoices are printed or emailed.
- Business Name Position: If you don’t have a logo, or if your logo doesn’t have your business name, you can use this setting to add your business name to your invoice.
- Your Logo Position: With this setting, you can choose the position of your logo on your invoice, or you can choose not to display it at all.
- Your Business Contact Details (address, phone, email on invoices): Controls whether your business address and contact information appears on invoices. Set it to Don't Show if you want to remove the address from invoices entirely — for example, if your address is already part of your logo, or you simply don't want it displayed. Set it to to display it.
- Invoice Paper Size: Select your invoice paper size on which you’ll be printing out your invoices.
- Display Zanda Footer: Choose whether you want to display Zanda below your invoice.
- Show Diagnosis on Invoices: Allow the patient diagnosis to show and print on invoices, statements and receipts.
❗Important Note
Can I hide the "X of Y sessions used" line on invoices?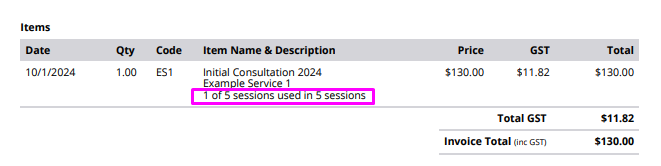
No. When a session pack is used to pay for or track a session on an invoice, the system automatically generates a line item description (e.g., "1 of 5 sessions used in [Pack Name]") to track usage.
This specific line cannot be hidden or removed from the invoice if you are using the session pack feature. It is a core system function designed to provide transparency to both the practitioner and the client regarding the pack's remaining balance.
Invoice Settings:
- Invoice Due Date: Select how many days after an invoice is created for it to be paid by. The invoice due date will be applied to all new invoices after selecting a due date. Look here for more details.
- How To Calculate Tax: If you’ll be charging additional tax to your clients, choose Price Includes Tax or Price Excludes Tax. If you won’t be charging tax, choose No Tax.
- Last Invoice Number: Enter the invoice number you would like the next invoice to follow. This is particularly useful when you are migrating from another system and need Zanda to begin from a specific invoice number in your new Zanda account, to ensure that there are no clashes when you export Invoices to Xero. Sometimes you may refer to this number as the 'invoice name'. You can update it to a different number if needed; however, you cannot use words or letters in your invoice numbers.
- Invoice Email Template: Choose an email template. Your invoices will be attached to this email template and will be sent according to the settings made in this template.
- Receipt Email Template: Choose an email template. Your receipts will be attached to this email template and will be sent according to the settings made in this template. When there is no template selected in this field, the system will use the default invoice email template when emailing receipts. A receipt is a fully paid invoice, that can be emailed to the payee from a Zanda account, or when clients pay for their invoices via the Client Portal and request to email the receipt to them.
- Medicare Email Template (AU) : Choose a dedicated email template for Medicare claim emails — separate from your invoice and receipt templates. It applies to all Medicare claim types: Patient Claims, Bulk Bill Claims (submitted and stored), DVA Allied Claims, and DVA Paperless Claims. Once a template is selected, an Edit Template link appears below the dropdown so you can open it in the editor. Whenever you click Email on a submitted claim, this template is pre-selected in the email modal, so there is no need to switch templates each time. If your account already used an Invoice Email Template, that selection has been carried over as your initial Medicare Email Template, so nothing changes until you customise it. If the field is left as Select a Message Template… , the email modal falls back to the default Invoice & Statement Email template — the same behaviour as before this setting existed.
Example Receipt Email Template💡
Here is a basic receipt email template that you can use to add to your Tools > Communication > Templates:
Message Type - Email
Name - Receipt Email
Description - This is the default email template that is used when you email receipts to your clients.
Email From Name - [your business email]
Email From Address - [your business email, where the replies will come]
Email Subject - {SystemDocumentName1}
Email Content:
Hi {ClientPreferredName},
Please find "{SystemDocumentName1}" attached. If you have any questions, please call us or reply to this email.
Regards,
{BusinessName}
{BusinessPhone}
Editing Business Information in Your Invoice
Zanda can show your business name, business registration number, address, email, phone, and fax in the invoice header. The details shown depend on both your invoice layout setting and the location attached to the invoice.
To update the business details shown on invoices:
- Go to User Menu > Account Settings > Billing > Invoices.
- In Your Business Contact Details, select Top Left if you want Zanda to show the business address and contact details on invoices.
- Select Don't Show if your logo or custom invoice text already includes those details.
- Go to User Menu > Account Settings > Practice > Business Info.
- Update your main business name, ABN, country, time zone, locale, and account-level contact details.
- Go to User Menu > Account Settings > Practice > Locations.
- Open the location used on the invoice and update the location address, postcode, email, phone, and fax.
- Click Save.
When Your Business Contact Details is set to Top Left, invoices linked to an appointment location use that location's address and contact details. If an invoice is not linked to a location, Zanda uses the account-level details from Business Info.
Changes are reflected when invoices are printed or emailed after the updated details are saved.
💡 Changing vs Hiding Your Address on Invoices
There are two separate things you might want to do with your business address on invoices:
-
To change the address shown: go to User Menu > Account Settings > Practice > Locations, click your location, and update the physical address. Changes appear immediately on new invoices.
-
To hide / remove the address entirely: go to User Menu > Account Settings > Billing > Invoices, find Your Business Contact Details, set it to Don't Show, and click Save.
- In User Menu > Account Settings > Billing > Invoices, set 'Your Business Contact Details' to 'Don't Show'. Save the changes.
- Add your business registration number and contact details in User Menu > Account Settings > Billing > Invoices > 'Custom Text for Top of Invoices and Statements', save the changes.
This will display your business registration number and contact details in the top-right section of the invoice.
Alternatively, you can- Add your business details and registration number on your logo image;
- Upload it in User Menu > Account Settings > Practice > Bisuness Info,
- In User Menu > Account Settings > Billing > Invoices, set 'Your Business Contact Details' to 'Don't Show'. Save the changes.
This will display your business registration number and contact details on the logo image.
You may need to display individual practitioners' registration numbers on their invoices. To achieve this,- In User Menu > Account Settings > Billing > Invoices, set 'Your Business Contact Details' to 'Don't Show'. Save the changes.
- In User Menu > Account Settings > Team > Practitioners > open a practitioner profile > Details, add the practitioners' registration numbers in the 'Custom Invoice Text' box, and save the changes.
This will display practitioner registration number under the provider name on their invoices.
Adding Custom Text to Your Invoices
You can add custom information to your invoices, and choose whether the information appears on invoices of specific clients, locations, calendars, or on all invoices. These fields are useful for direct deposit bank details, payment terms, registration numbers, and other billing instructions. Find more on custom invoice text fields here!
Adding Information that Appears on All Invoices
Here’s how you can add additional information that appears on all your invoices:
1. Navigate to User Menu > Account Settings > Billing > Invoices.
2. In the Invoice and Statement Layout page, you’ll see two fields called Custom Text for Top off Invoices and Statements and Custom Text for Invoice Footer.
3. Here, you can add extra information to the top and bottom of your invoice. The header text will appear on the top and the footer text will appear on the bottom of the invoices.
Hint 💡
The bottom of the invoice/receipt is a good place to add your payment terms and direct deposit banking information.
Adding Information that Appears for a Particular Practitioner
Use Custom Invoice Text when one practitioner needs invoice text that differs from the rest of the practice. This is the best place to add practitioner-specific information such as a registration number, payment note, or bank details that should appear only on invoices for that practitioner.
1. Navigate to User Menu > Account Settings > Team > Practitioners.
2. Select your practitioner.
3. Add your desired text to the Custom Invoice Text field.
4. Once done, click Save on the bottom-right corner of your screen.
The text appears under the practitioner details on invoices for that practitioner. It is separate from the Custom Text for Top of Invoices and Statements and Custom Text for Invoice Footer fields in invoice settings, which apply more broadly to your invoice layout.
Adding Information that Appears for a Location
Adding your desired text to the Location Custom Invoice Text field:
1. Navigate to User Menu > Account Settings > Practice > Locations.
2. Click on the location to whose invoices you want to add custom text.
3. Enter the desired text under Extra Invoice Text.
4. Once done, click Save on the bottom-right corner of your screen.
Adding Information that Appears for a Particular Client
Go to the client's profile whose invoice you want to add additional information. From there, follow these steps:
1. Go to Billing > Billing Setup.
2. Enter the desired text under 'Extra Invoice Info'.
3. Once done, click Save on the bottom-right corner of your screen.
Frequently Asked Questions
❓Can I show different direct deposit bank account details on invoices for different practitioners or locations?
Yes. Add the direct deposit details to the custom invoice text field that matches how you want the invoice text to change:
- For details that should appear on every invoice, go to User Menu > Account Settings > Billing > Invoices and add the details to Custom Text for Top of Invoices and Statements or Custom Text for Invoice Footer.
- For practitioner-specific bank details, go to User Menu > Account Settings > Team > Practitioners, open the practitioner profile, and add the details to Custom Invoice Text.
- For location-specific bank details, go to User Menu > Account Settings > Practice > Locations, open the location, and add the details to Extra Invoice Text.
- For client-specific invoice notes, go to the client's profile, open Billing > Billing Setup, and add the details to Extra Invoice Info.
Review your global invoice text before adding practitioner-specific or location-specific bank details so the invoice does not show conflicting payment instructions. If you want online card payments to settle into different practitioner bank accounts, use practitioner Stripe accounts instead of direct deposit invoice text.
❓How do I hide my business address from invoices?
Go to User Menu > Account Settings > Billing > Invoices. On the Invoice and Statement Layout page, find the Your Business Contact Details setting and change it to Don't Show. Select Save.
This removes the address, phone number, and email address from new invoices. Your address details are not deleted. They are only hidden from the invoice layout.
❓How do I show bank details or direct deposit details on invoices and receipts?
Zanda does not use a separate bank details visibility switch for invoices. Add your bank details, direct deposit details, or payment instructions as custom invoice text instead.
For details that should appear on every invoice and receipt PDF, go to User Menu > Account Settings > Billing > Invoices and add the text to Custom Text for Invoice Footer. You can also use Custom Text for Top of Invoices & Statements if you want the details near the invoice header. Saved custom text appears when the invoice is printed or emailed because emailed invoices and receipts are sent as PDF documents.
For details that should only appear for one location, go to User Menu > Account Settings > Practice > Locations, open the location, and add the text to Extra Invoice Text. For details that should only appear for one client, open the client's profile and go to Billing > Billing Setup > Extra Invoice Info.
The Your Business Contact Details setting only controls whether the business address, phone number, and email address appear on invoices. It does not hide custom bank details that you have added to the invoice footer, invoice header, location extra text, or client extra invoice info.
❓How do I remove my contact details from invoices?
Go to User Menu > Account Settings > Billing > Invoices. On the Invoice and Statement Layout page, change Your Business Contact Details to Don't Show, then select Save.
❓I updated my address in Locations, but the invoice still shows the old address. Why?
Address changes apply to new invoices only. Existing invoices keep the address that was current when they were created.
Check that you saved the updated address in Practice > Locations, then create a new test invoice to confirm the new address appears correctly.
❓I can't find the "Your Business Contact Details" setting. Where is it?
Go to User Menu > Account Settings > Billing > Invoices. The setting is on the Invoice and Statement Layout page.
It appears as item 6 in the layout fields and includes a dropdown with Show and Don't Show options. You may need to scroll down to find it. It appears below the Invoice Title and Custom Text fields.
❓Can each practitioner have their own invoice template or bank details?
Zanda uses one invoice layout for the practice, with custom text fields for details that need to change by practitioner. To add practitioner-specific bank details, registration details, or other invoice notes, go to User Menu > Account Settings > Team > Practitioners, open the practitioner, and enter the details in Custom Invoice Text.
Use User Menu > Account Settings > Billing > Invoices for text that should appear on all invoices, such as practice-wide payment terms or general bank details.
❓ Can I add a QR code to invoices for bank transfers?
Zanda invoice settings support text-based payment instructions through the custom text fields. For an online card-payment option, connect Stripe so clients can pay eligible invoices from My Invoices in the Client Portal.
If you want clients to pay by bank transfer, add the bank transfer details as text on the invoice rather than relying on a QR code field.
❓ How do I update the address clients see on invoices?
Update your main business address in User Menu > Account Settings > Practice > Business Info, under Contact and Postal Details. If your invoices show location-specific contact details, update the relevant location under User Menu > Account Settings > Practice > Locations as well.
After you save the address, create or open an invoice and use Print or Email to preview the PDF. New invoice PDFs will use the current business or location details based on your invoice layout settings.
Related Articles
- Insurers and Provider Numbers - Add and manage provider numbers for practitioners.
- Quick Reference Guide to Invoice Fields - Review where invoice fields appear and what they control.
- Sending Links to Pay Invoices Online - Set up Stripe invoice payment links and learn how clients pay invoices online.
- Setting Up Your Business Information - Update the business details, contact details, address, and document logo used across Zanda.
- Adding Business Registration Number to Invoices - Add tax IDs, registration numbers, and other business details to invoice layouts.