%20-%20120%20x%2044.svg)
You can schedule an appointment that includes multiple clients, referred to as a group appointment. Within this setup, you have the ability to specify the maximum number of participants, send email or SMS reminders, start a telehealth session, update the status of each participant, issue invoices, and much more.
In this article:
- Running classes, courses, workshops, and group sessions
- Create a Group Appointment
- Add Clients to the Group Appointment
- Update Participant Status
- Invoice Group Participants Manually
- Add and Find Notes for an Individual Participant
- Duplicate a Group Appointment
- Send Email/SMS Messages and Appointment Reminders to Group Participants
- Sending a Unique Telehealth Link to Each Group Participant
- Reviewing Changes Made to a Group Appointment with its Activity Log
- Frequently Asked Questions
Running classes, courses, workshops, and group sessions
Classes, courses, workshops, and group sessions — for example a Pilates or yoga group — are all run as group appointments in Zanda. A group appointment is the booking record for the session: its title, practitioner, location, date, time, participants, and maximum participant count control how the session runs and how many clients can join.
You can also let clients book these sessions themselves through the Client Portal:
- In Account Settings > Schedule > Client Portal > Access and Settings, turn on Allow Group Bookings so your group appointments appear to clients, and set the Group/Class Bookings payment option if you charge for them.
- The Client Portal booking button is labelled to match what your practice calls these sessions — you can set it to Class, Course, Group, or Workshop (it defaults to Class) using the Group Booking Label setting; see Setting Up Online Bookings on Client Portal. Clients then use that option (for example, Book a Class) to book into any group appointment that still has available spaces.
💡 Tip: If every booking for a session should invoice the same way, set a default service or product on the group appointment before clients book.
Creating a Group Appointment
You can create a group appointment with multiple clients on the Calendar page. Here’s how:
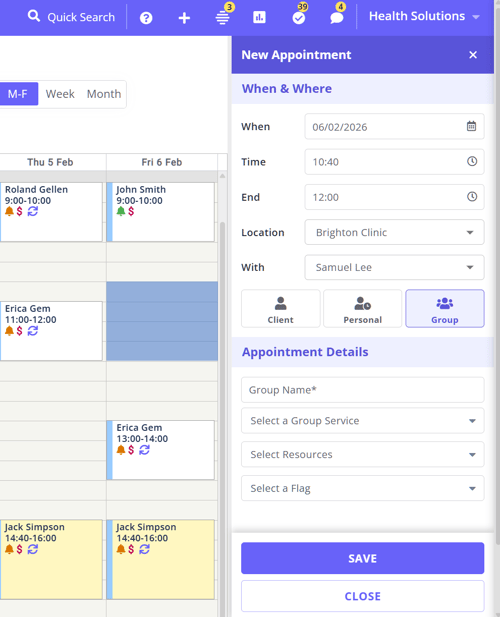
1. Using your mouse cursor, highlight the time-slot(s) in which you’d like to create the appointment. The New Appointment Panel will open up.
2. The When & Where section with be pre-filled by the calendar settings, but you can edit them if needed. Below it, click on the Group icon to set the appointment type.
3. Type in the name of your group or class. You can also select a default group service to invoice participants automatically, book resources and add an appointment flag.
4. Once done, click Save. Now, it’s time to add clients to your group appointment (you can do this later, if you want).
💡 Important notes:
- All the participants will be sent their unique TH link via the merge field to join the group appointment.
- You can also manually send their unique TH link from each group appointment panel. Click the speech bubble icon on the Participants panel to open the communication modal. Select the clients. Click the Notify Now button and select how you'll send the TH link - via SMS or email.
- If you’re using a service template specifically designed as your default group service, and you offer this service for online class bookings, ensure it is set to unavailable for individual online appointment bookings:
- Navigate to User Menu > Account Settings > Client Portal > Available Services
- Find the service you use as a default group service
- Turn off the switch next to this service
- This will ensure that this service is only available with class bookings.
Adding Clients to the Group Appointment
These are the steps to add clients to a group appointment:
1. On the appointment panel, scroll down to the Appointment Details section.
2. In the Participants field, select the desired number of participants for your group from the dropdown menu.
3. Select the "Unlimited Participants" option if you expect the number of attendees to exceed 30.
4. In the Participants section, user the 'Search for a client' field to add existing clients to the group appointment.
5. You can create new client and add them to a group appointment, if needed.
6. Continue this process until all intended clients have been successfully added to the group.
7. Click Save.
Updating Participant Status
Updating a participant’s status is important for keeping accurate records. For instance, if a participant reschedules their appointment, you should update their status to ‘Rescheduled’.
Here’s how to do this:
1. Select the group appointment on your Zanda calendar to access the Appointment Settings Panel.
2. In the Participants section, you will find a list of all the clients you have included in the group appointment.
3. Next to each client's name, there will be a small indicator showing their appointment status. Click it to select the relevant status.
Note: If an Appointment Cancellation Template is configured under Account Settings > Communication > Reminders, changing a participant's status to Cancelled or Late Cancellation on a future-dated appointment sends an automatic cancellation notification to that participant. See Configuring Appointment Reminders.
5. If you want to remove a client from the appointment list, click the x icon on the far-right side of their name.
6. Click Save to apply the changes.
Printing Group Participant List
You can also print out or download a PDF of the list of clients in your group appointment. Here’s how:
1. Select the group appointment on your Zanda calendar to access the Appointment Settings Panel.
2. At the bottom, you’ll see the Participants section.
3. To print the participant list, click the Printer icon.
Invoicing Group Participants Manually
Pro-tip💡
You have the option to assign a default service to your group appointment, facilitating automatic invoicing for all group participants.
Read this article for more details.
To individually invoice a client within a group appointment, follow these simple steps:
1. Select the group appointment on your Zanda calendar to access the Appointment Settings Panel.
2. In the Participants section, you will find a comprehensive list of all clients included in the group appointment.
3. Click on the name of the client you wish to invoice. This action will open an Invoice section tailored specifically for that client.
4. Add the services, products and session packs you’d like to charge the client for. If they have made any payments, add those as well.
5. Click Save. Once you’re done invoicing, click Back to the group.
6. To invoice another member of the group, click on another client from the Participants list and repeat this process.
Adding and Finding Appointment Comments for an Individual Participant
Each participant in a group appointment can have their own note, saved to that participant's own appointment comments and kept separate from everyone else in the group.
1. Select the group appointment on your Zanda calendar to access the Appointment Settings Panel.
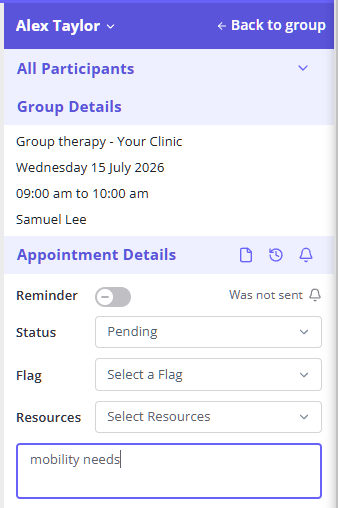
2. In the Participants section, click the name of the participant you want to add a note or a comment for. Their Appointment Details open.
3. Scroll to the Appointment Comments field at the bottom and type your note.
4. Click Save.
The note belongs to that participant alone—each participant has their own Appointment Comments, and a note you add for one participant is not shared with the others in the group.
Where to find these notes afterwards
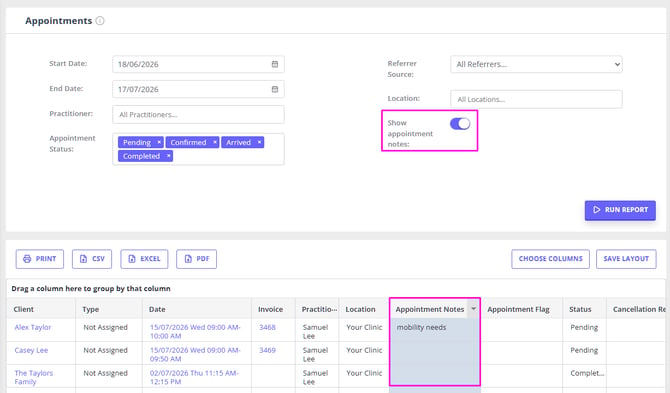
To review each participant's own note, go to Reports > Client Appointments and look at the Appointment Notes column. Each row shows the note entered for that individual participant.
Note: On a client's profile, under Appointments, the Info column shows the group appointment's shared note rather than the participant's individual note—so this column can appear blank even when you have entered a per-participant note. Use the Client Appointments report above to view each participant's own note.
You can duplicate a group appointment to easily book the same session for a future date. This copies all details including participants and services. Learn how to duplicate appointments.
Communicating With Group Participants
Important: A dedicated Toll-Free Number (TFN) is required to send/receive SMS messages in the USA, Canada, Puerto Rico, Bahamas, Jamaica, Costa Rica, and Barbados. For more details, please click here.
Now that you've set up a group appointment, you have the ability to communicate with all participants by manually sending them
-
a custom email or SMS,
-
a manual appointment reminder,
- an SMS or email with their unique telehealth link
💡 Please note when you're sending an SMS or an email message to multiple participants of a group appointments using any of the methods mentioned here, the system will still be sending each message as an individual message to each participant, maintaining confidentiality of shared information.
Here’s how:
Sending a custom Email or SMS
-
Select the group appointment on your Zanda calendar to access the Appointment Settings Panel.
-
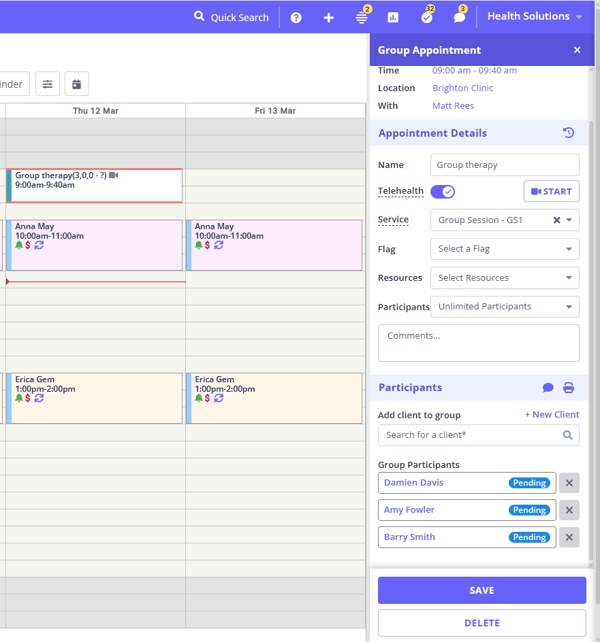
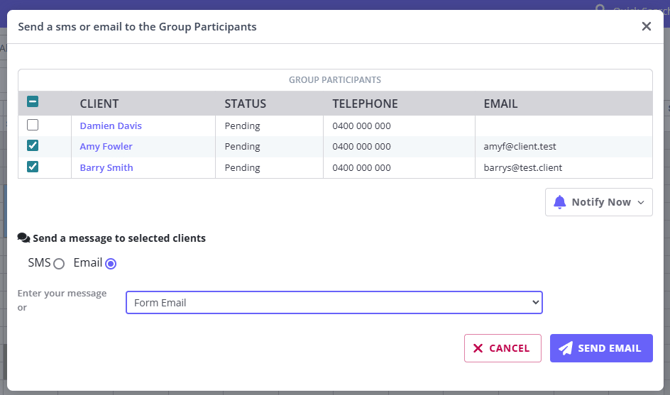
At the bottom, you’ll see the Participants section. Click the speech bubble icon on the top-right corner of that section.
-
Select the checkbox next to each client you wish to message, or check the box at the top to select all clients in the list.
-
Select your message type i.e. Email or SMS.
-
Type in your message or choose a template by clicking Use a template. When done, click Send to Selected Clients.
Sending an Email or SMS Appointment Reminder Manually
Option 1: From the appointment context menu (right click)
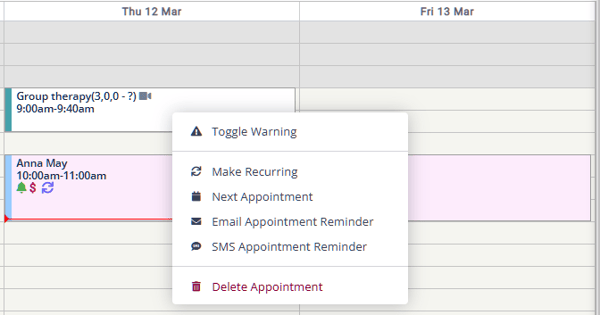
1. Locate the group appointment on your Zanda calendar and right-click it.
2. From the context menu, click Email Appointment Reminder or SMS Appointment Reminder. The appointment reminders will go out to each group appointment participant according to your account reminder settings.
Option 2: Using the Notify Now button on the group communication modal:
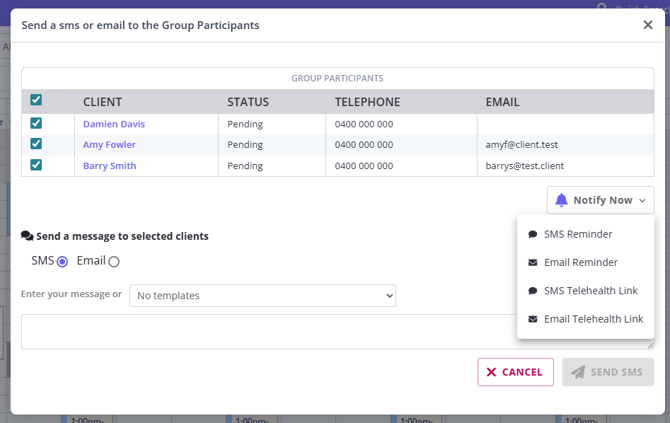
- Click the appointment block on the calendar to open its panel.
- Scroll to the Participants section and click the speech bubble.
- Select the clients by checking the boxes next to their names or select all.
- Click the Notify Now button.
- Select the communication option you'd like to action: you can send an SMS or email reminder or a unique telehealth link to the selected clients.
Sending a Unique Telehealth Link to Each Group Participant
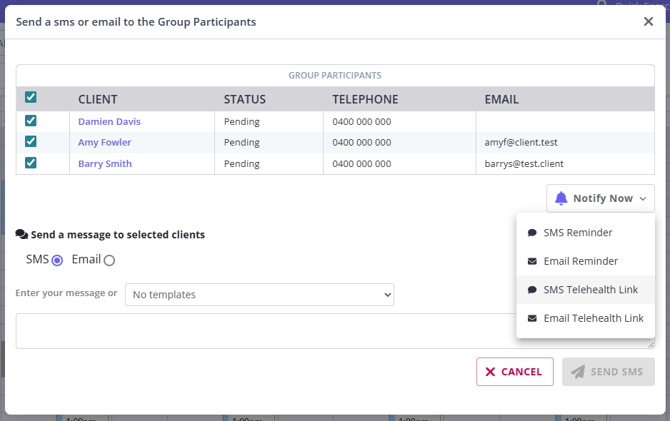
- Click the appointment block on the calendar to open its panel.
- Scroll to the Participants section and click the speech bubble.
- Select the clients by checking the boxes next to their names or select all.
- Click the Notify Now button.
- Select SMS Telehealth Link or Email Telehealth Link
Each client will receive an SMS or an email with their own unique telehealth link to join this group appointment telehealth session.
Reviewing Changes Made to a Group Appointment with its Activity Log
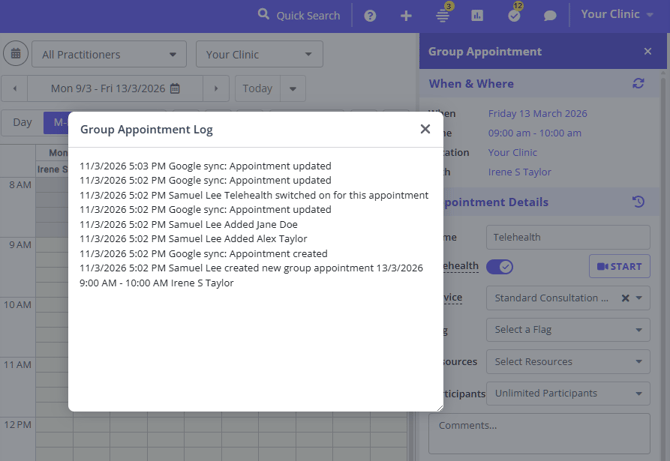
The Appointment Activity Log provides a chronological record of all changes and actions related to an appointment. It automatically tracks events such as appointment creation, updates, participant changes, telehealth settings, and integrations like calendar syncs. This log helps practices quickly see what happened, when it happened, and who made the change. It can be useful for reviewing appointment history, resolving scheduling questions, and understanding how an appointment has been managed over time.
-
To access the appointment activity log, click the arrow icon
 (a circular arrow with clock arms inside) on the Appointment Details header.
 -
The Group Appointment Log modal will open, where you'll be able to review a chronological record of all changes and actions related to an appointment.
Frequently Asked Questions
❓ How do I set up a class — a Pilates or yoga group, a workshop, or a course?
Set it up as a group appointment. Whatever you call it — a class, course, workshop, or group session — it uses the same group-appointment booking record in Zanda (see Running classes, courses, workshops, and group sessions above). Create the group appointment on the calendar, set its maximum number of participants, and add clients — or let clients book themselves through the Client Portal. You can label the Client Portal booking option Class, Course, Group, or Workshop to match how your practice describes the session.
❓ Why is my group session showing the wrong time?
Group appointments use your account's business timezone for the scheduled appointment time. If you have enabled Additional Time Zone, the calendar can show your user timezone beside the business timezone so you can compare them, but it does not change how the booking is stored. To check whether the group appointment itself was changed, open the Group Appointment Log and review the created or saved entries for the appointment start and end time.