%20-%20120%20x%2044.svg)
Session Note templates allow you to create predefined note templates that include anything from text inputs and drop-down checkboxes through to body charts or drawings, designed for use during of after your appointments.
Already have a note template, but not sure how to use it? This article covers how to make a session note from a template. You can create and manage note templates by going to Tools > Note Templates
In this article:
Creating a New Note Template
- Navigate to Tools > Note Templates
- Click + New Note Template.
- Begin designing your note template. Enter the template name, and the first section name.
- A note template is comprised of sections and fields. You can add more sections to the note using the '+ Add Section' button.
- Add fields to the note using the + Add Field button. You have the ability to add varying field types to the note. Each of these fields is explained below.
-
Use the 'Copy' and 'Remove' buttons to copy and remove the field and sections you already created.
- Sections and fields you copied will be available for pasting via the buttons below on the left. You will then be able to make changes to a copied field. This feature improves your efficiency when you need to create a note with similar fields.
-
You are able to reorder fields and move each of them to any place in the note template. Simply grab the three dots in front of the field type and drag it to the desired position.
- Use the 'Reorder Sections' button to move the sections around to the desired location.
- Once happy with the template click ✓ Save Template.
💡Pro Tip:
1. When you're creating or editing a session note template you can preview how the template will look when either:
-
using the template to create a note for a client (Data Entry Mode);
-
or how the template will look once it has been saved to a client's record (Data View Mode).
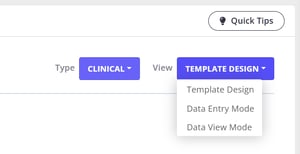
2. When printing session notes, your logo will be displayed on the printed documents if you have uploaded it during the invoice setup process. You can do this by navigating to User Menu > Account Settings > Billing > Invoices.
We recommend you always click Save Changes before navigating to something else. If you don't, however, you'll be prompted if you want to bring back any unsaved changes to your note templates.
Frequently Asked Questions
❓ Can I copy fields or sections from one note template to another?
You can use Copy, Paste Field, and Paste Section while editing the same note template. These controls are designed for quickly duplicating fields or sections inside the template you currently have open.
To reuse an entire template in another Zanda account, export the template from Tools > Note Templates and import the downloaded .txt file in the other account. To reuse only part of an existing template, open the template you want to edit, use Copy on the field or section, then use Paste Field or Paste Section in that same template and adjust the copy as needed.
❓ Can I make a section or field optional, or remove it, on an individual note?
You decide this in the template, not while you are writing the note.
Each field in a note template has a Require an answer for this field toggle, shown under the field while you edit the template in Tools > Note Templates. Leave the toggle off for anything that will not apply to every note. A field with the toggle off can be left blank on any individual note, and the note still saves and completes normally.
Adding, removing, and deleting fields and sections happen in the template editor only. Remove and Copy, along with + Add Field and + Add Section, appear only when you are editing the template, so a note always shows every section and field the template contains. You can skip past a field you do not need, but its heading stays on the note and on the printed or emailed PDF.
A few things worth knowing:
- A required field is marked with an asterisk while you write. Hover over the asterisk to see which field it refers to.
- Required fields only block Save and Complete. You can still use Save as draft with them empty and finish the note later.
- The Require an answer for this field toggle is not offered on every field type. A Switch field (the one under the Yes/No heading) and an Information field have no required option, so they are always optional.
- If a whole group of fields only applies to some appointments, a second note template for that appointment type is usually tidier than one template that covers everything. You choose the template from the Template dropdown when you create the note.
❓ Do I need to add client name, date, or time fields to my note template?
Zanda links each note to the client profile where the note is created, and the printed note header includes system-generated details such as the client name, client date of birth, created by, created on, activity date, and completed on fields. This means you usually do not need to add separate client name or date fields just to identify the note.
Add a client name, date, or time field as a single line text field only when you want that information to appear inside the body of the note in a specific place, or when your practice's documentation standards require an extra field in the template itself.
❓ How do I sign a note when I add a Signature field?
Add a Signature field to the template where the signature should appear. When completing the note, the signer types their full name into the signature field, and Zanda displays the typed name in a signature style on the completed note and printed PDF.
❓ Can I print or export a blank note template as a formatted PDF?
To get a formatted, printable copy of a template, create a note from it and print that (steps below). The Export option under Tools > Note Templates is for a different purpose—it produces a plain-text .txt definition file used to move a template between accounts, not a visual copy of the form.
Two ways to see or share a template's layout—for example, to review it with your team or note changes you'd like to make:
- Preview it on-screen while editing. Open the template under Tools > Note Templates and use Data Entry Mode to see how it looks when a note is being written, or Data View Mode to see how it looks once saved to a client's record. This is a preview only—there's no print or export button on these views.
- Print a note created from the template. Create a session note from the template on any client record, then open that note and use the Print or Email button at the bottom to generate a formatted PDF. The PDF mirrors the template's sections and fields, so it's a practical way to circulate the layout for review or mark-up. You can leave the note blank or use a test client if you only need the structure.
Understanding the Fields
There are several fields to choose from to add to your note template. In the sections below we will describe how each of these fields function and can be used in your notes.
Text
Single Line: A simple, one-line text line designed to ask questions during the appointment, and space to input the client's response.
Multiple Lines: Similar to the text input, but used in situations where you will be writing more text into the field (i.e. multiple paragraphs). It includes text formatting tools (bold, italics, underline, ordered/unordered lists, increase and decrease indent and undo and redo buttons).
Select
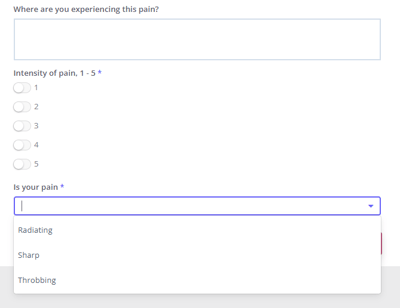
Choose Multiple Values: Used to create fields with responses already populated, presented as either a series of switches, a drop-down list or checkboxes depending on your preference. When using this option you would be able to select as many options as you like when completing a note (i.e. 'choose all that apply').
Choose one Value: Similar to the Multiple Options field, except only one of the options can be selected at a time (i.e. 'Yes', 'No', 'N/A').
Switches, Dropdown List or Checkboxes:
You may choose to display the answer values as switches, a dropdown list or checkboxes:
- This is what you will see when you are writing a note:
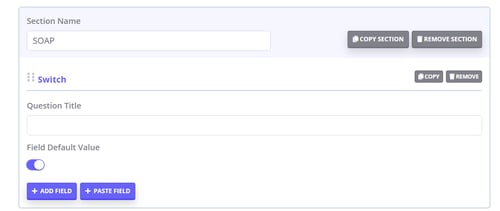
Yes/No Switch: A toggle option (that is either active or inactive). Generally used for questions that can either be answered with a Yes or No or True or False response. Enabling the Field Default Value means it will stay Yes or True unless toggled.
Draw: Annotate a Chart: This field allows you to upload your own image to be used for drawing and annotation. This is best used for reusable, common tasks such as body charting.
Note: if you are uploading your own images, make sure that they do not exceed the recommended dimensions: maximum Width: 800px; maximum Height: 1000px.
Information: Use this field to add text that will be visible on the note but cannot be edited. Use the available text editing tools to format the information text.
Signature: Add this field so that you can type your signature on a note. This is useful for meeting compliance requirements, such as co-signing a student practitioners notes.
Managing Note Templates
- Real-time filtering: The list updates immediately as you type.
- Usage: Enter any part of the template name. The search is case-insensitive (e.g., "physio" matches "Physio" and "PHYSIO").
- Inactive templates: If the Show Inactive toggle is ON, the search results will include both active and inactive templates.
2. You can manage your note templates by clicking on their name which will take you to the edit view, allowing you to make changes to your existing note templates. If you'd like to change the 'type' of a note template (i.e. from Clinical > Admin) you can do so by editing the template and using the toggle in the top right-hand corner of the page. The only difference this applies is where they can be generated from, and where they are filed inside a client's profile.
- Clinical-type Notes are created and filed inside Records > Notes and - being of a more sensitive nature - can be restricted to only certain users based on given permissions.
- Admin-type Notes are created and filed inside Admin > Notes and are designed to be used by front-office staff and receptionists/administrators to log telephone calls, emails etc.
Frequently Asked Questions
❓ I saved a note template but can't find it when creating a clinical note—why does it only appear under Admin Notes?
Every note template has a type, Clinical or Admin, set with the toggle in the top right-hand corner when you edit the template. The type controls where the template is available when you create a note:
- A Clinical-type template appears when you create a note under Records > Notes.
- An Admin-type template appears when you create a note under Admin > Notes (Admin Notes).
If your template only shows under Admin Notes, its type is set to Admin. To use it when writing a clinical note, edit the template and switch the type to Clinical with the same toggle, then save. From that point the template appears when you create a note under Records > Notes.
Note templates are used to create notes on a client's profile—unlike online forms, they are not sent to the client.