%20-%20120%20x%2044.svg)
In Zanda, every individual person in your health clinic can have their own calendar. In it, you can make appointments, create invoices and do much more.
In this article, we’ll show you how to customize your calendar in Zanda.
In this article:
- Set the calendar start time and end time
- Customize the calendar block
- Minute increments on time picker dropdown
- Customize the functionality of your calendar
- Frequently Asked Questions
- Related Articles
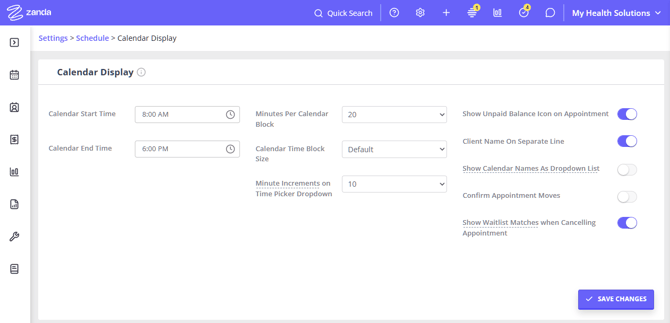
First things first. To customize your Zanda calendar, go to User Menu > Account Settings > Schedule > Calendar Display. Here, you’ll find all the settings for customizing your Zanda calendar.
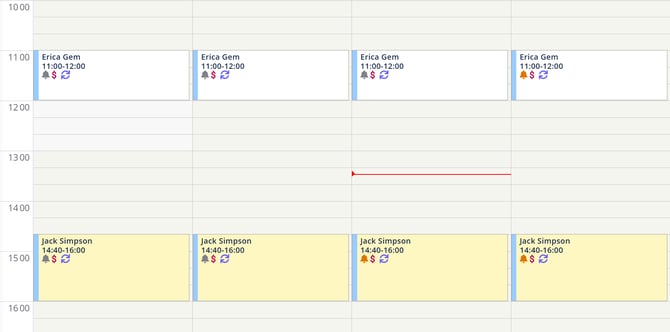
Note on Fixed Elements: Some calendar elements, such as the Current Time Indicator (red line) and the Appointment Reminder (bell) icon, are fixed system features and cannot be toggled off or modified in the Calendar Display settings.
The Calendar Display page is divided into three parts.
Here are the settings:
Set The Calendar Start Time And End Time
The very first settings you can change is the Calendar Start Time - and below that, the Calendar End Time. With these two settings, you can change the time period that shows up on your Zanda calendar.
Both are dropdown time pickers set in whole hours—you choose an hour from the list rather than typing a time in, so half-hour and minute values aren't available here.
The earliest Calendar Start Time is 12:00 AM and the latest Calendar End Time is 11:00 PM. The End Time must also be later than the Start Time, so it isn't possible to set the calendar to end at 12:00 AM (midnight). If you work late into the evening, set your Calendar End Time to 11:00 PM—the latest hour the calendar can display.
💡 Availability outside these hours won't be visible. The calendar is only drawn between the Calendar Start Time and the Calendar End Time, so availability that runs past the End Time isn't shown at all — with a Calendar End Time of 5:00 PM, availability through to 7:00 PM stops appearing after 5:00 PM, and the last block your team can select is the one before it. If you set availability outside these hours, Zanda tells you when you save that some times are outside your Calendar display times and may not be visible. Extend the Calendar End Time to bring those hours back into view; the availability itself doesn't need changing. These settings don't affect what clients can book through the Client Portal — those times come from the practitioner's availability and your Client Portal settings.
Customize The Calendar Block
Each block on the Zanda calendar represents a time period. By default, a block represents 30 minutes. Meaning if you want to add a one-hour appointment to your calendar, you will select two blocks.
To change the block settings, you have two options:
- Minutes Per Calendar Block: This option lets you change the time period a block represents. Choose from the available options: 5, 6, 10, 12, 15, 20, 30, 45 or 60 minutes. Other values (for example 50 minutes) aren't available—if you run 50-minute sessions, pick a block size that divides evenly into them, such as 5 or 10 minutes, so the appointment start and end times line up on the calendar.
- Calendar Time Block Size: This option simply lets you change the size of the block. You can make the blocks on your calendar look smaller or larger depending on your preferences.
💡 User Pro Tips:
1. Adjusting the Minutes Per Calendar Block setting can significantly impact how start and end times for availability are displayed on the calendar. This is especially relevant when availability times do not align with even hour marks. For example, if your availability ends at 5:05 pm or 6:15 pm, these times may not be fully visible or distinguishable when the calendar is set to display 20 or even 10-minute blocks.
The reason is that the system requires a full block of time to display availability. It cannot partially fill a block, so gaps such as the ones ending at 5:05 or 6:15 may not appear. To address this, you have two options:
- Adjust the Minutes Per Calendar Block to a smaller increment, such as 5 minutes. This allows the calendar to display finer-grained time intervals, making these gaps visible.
- Align your availability times with the current calendar block setting. For instance, if using 10-minute blocks, adjust start and end times to match 10-minute increments, such as 9:10 am–05:10 pm or 10:20 am–06:20 pm.
By making one of these adjustments, you ensure the calendar display accurately reflects your availability and eliminates potential confusion caused by mismatched time intervals.
2.Adjust the Calendar Time Block Size to optimize your calendar's appearance for your device screen by selecting either Large or XLarge block sizes to fit larger screens.
Minute Increments on Time Picker Dropdown 💡
This setting defines which times appear in the time dropdowns throughout your account, including the Appointment Panel, Availability, and Update Availability pop-up. You can choose 5 , 10 , 15 or 30 minutes; new accounts start at 10 minutes.
Only times that match the increment are offered, and the increment governs both the start-time and end-time pickers, as well as the availability pickers, so the same set of minute values is available whichever end of an appointment you are setting. On the default 10-minute setting you can pick 3:40 PM or 3:50 PM, but not 3:45 PM; you'd need the 15-minute (or 5-minute) setting for that. Because these dropdowns don't accept free typing, a time that isn't on the list can't be entered manually.
Different increments expose different minute values, and a coarser increment can leave you unable to pick both times you need. The 10-minute setting offers :50 but not :15, while the 15-minute setting offers :15 but not :50. Sometimes the start and end times you need don't line up to a single interval. A 50-minute session followed by a 25-minute break, for example, needs :15 (quarter-past) start times together with :50 end times. In that case, set the increment to 5 minutes. Five minutes is the finest option, and it makes every minute value in fives selectable (:00, :05, :10, :15 ... :50, :55), so it supports any combination of start and end times.
This is a single account-wide setting, so it applies to every practitioner and every user in the account.
Not to be confused with Minutes Per Calendar Block, above: that setting controls how the calendar is drawn , while this one controls which times you can choose.
Customize The Functionality of Your Calendar
Zanda lets you change certain aspects of how your calendar looks and behaves.
- Show Unpaid Balance Icon on Appointment : After enabling this option, Zanda will show a red currency sign on those client appointments who have an overdue invoice.
- Client Name on A Separate Line: When you create an appointment on the Zanda calendar, it shows the client name, the date and time of the appointment and other information. Enabling this option will separate the client's name on another line from the rest of the info.
- Show Calendar Names As Dropdown List: If selected, practitioners will be shown in a drop-down list rather than as individual options as shown below:
- If switched off, practitioners will be shown side by side, as long as there's enough room in your browser and your account has no practitioner groups set up. On smaller screens, or if you have any practitioner groups in use, the dropdown list is shown.
- Confirm Appointment Moves: If you accidentally drag appointments and reschedule them, this option can come in handy. If you turn it on, you’ll get a confirmation popup anytime you reschedule an appointment.
-
Show Waitlist Matches when Cancelling Appointment: if enabled, whenever an appointment is cancelled or rescheduled, an automatic popup window will appear, where the system will show a list of waitlisted clients with availability that matches the released time slot. You will be able to select matching clients and send them an SMS to offer the available spot.
💡 Once you’ve made the desired changes to your calendar, click on the Save Changes button.
💡 Tip: Returning your calendar to Today
Zanda remembers both the calendar date or week and the location you last had selected in your browser. This is helpful if you are working ahead in your schedule and need to return to the same view later.
To quickly return to the current date, select Today at the top of the calendar.
If you prefer the calendar to forget the last date and location you viewed, you can clear your browser cookies after logging out or use a private/incognito browsing window when accessing Zanda. At this stage, there is no setting in Zanda to make the calendar default to Today each time you log in.
Frequently Asked Questions
❓Can I show phone numbers or appointment notes directly on appointment blocks?
For client appointments, the calendar shows the client mobile number and address directly on the appointment block when you are in Day view with a single practitioner calendar selected. The same view also shows the booked service, once a service has been saved on the appointment. See Can I show the service (appointment type) on appointment blocks? in the questions below for what is possible in the other calendar views.
Appointment comments and notes are best viewed from the appointment pop-up. Hover over an appointment on the main calendar to see the pop-up summary, which includes client contact details, appointment comments, invoice information, appointment statistics, and status icons.
To open more client details without going to the full client profile, select the appointment to open the Appointment Panel, then select the client's name at the top of the panel. The Client Mega Menu shows the client's mobile number and quick links to key areas of the client profile.
❓ Can I show the service (appointment type) on appointment blocks?
The calendar shows the booked service on the appointment block when both of these are true:
- your calendar is set to Day view, and
- you have a single practitioner calendar selected, rather than All Practitioners.
The service appears once a service has been saved on the appointment. There is no setting to switch this on or off, and no setting that adds the service to any other view.
In M-F , Week , and Month view, and whenever All Practitioners is selected, the appointment block shows the client name but not the service. If you need to see what kind of appointment each booking is in those views, you have two options:
- Use Coloured Appointment Flags. Set up a flag for each kind of appointment under User Menu > Account Settings > Schedule > Appointment Flags , then apply the flag when you book. The flag colors the whole appointment block in every calendar view, and the Calendar Legend (the three vertical dots at the top of the calendar) lists what each color means.
- Print your schedule. Select the three vertical dots at the top of the calendar and choose the print option. The printed appointment list includes a Service column for every appointment, whichever view you printed from.
💡 Appointment Types in the Calendar Legend means something different: it tells you whether a booking is a client, personal or group appointment. It does not refer to the service that was booked.
❓ Can I hide, resize, or turn off the appointment reminder (bell) icon on the calendar?
The reminder (bell) icon's size and visibility aren't configurable. It appears on any appointment that reminders apply to, at a fixed size, and there's no Calendar Display setting, or any other setting, that hides or shrinks it on individual appointments.
Turning off the reminder for a single appointment (see Configuring Appointment Reminders) stops that reminder from being sent, but the bell icon itself stays on the appointment—its color changes to show the reminder won't be sent, rather than disappearing. Private Mode and Hide Unattended Appointments (see Using Monthly Calendar View) don't affect it either: Private Mode hides client-identifying details, and Hide Unattended Appointments hides whole appointments with a rescheduled, cancelled, or no-show status—neither changes how the reminder icon looks on an appointment that's still showing.
❓Why does clicking the appointment date on an invoice open the calendar on the wrong location?
When you select the appointment date link on an invoice, Zanda opens the calendar on that appointment's date and shows the booked practitioner. The location, however, stays on the location you last had selected — Zanda remembers your last-used location in your browser, the same way it remembers the last date you viewed. If the appointment was booked at a different location, its column won't appear until you switch the location selector at the top of the calendar to the appointment's location. Select that location and the appointment will be shown.
❓Can I set my calendar week to start on Sunday instead of Monday?
There's no dedicated setting for this. Calendar Display doesn't have a "week start day" option.
The day the week starts on is tied to your account's Locale (User Menu > Account Settings > Practice > Business Info).
❓Can I change the font size of the text on calendar appointment blocks?
Font size on the calendar isn't configurable. There's no Calendar Display setting, or any other setting, that makes appointment text larger or smaller.
If appointment blocks are hard to read, the closest option is to increase the Calendar Time Block Size (Large or XLarge) under Calendar Display. A taller block gives the same appointment text more room to sit in, which can make it easier to read at a glance.
Related Articles
- How to Read Appointment Pop-Up on Main Calendar Screen? - Learn what appears when you hover over client, personal, and group appointments.
- Client Mega Menu - Use the quick menu to view client contact information and profile shortcuts.
- Navigating the Calendar Display - Review the main calendar toolbar, filters, view options, and navigation controls.
- Using Coloured Appointment Flags - Color appointment blocks by type so you can identify them in any calendar view.
- Printing Your Schedule - Print an appointment list that includes the service for each appointment.