The client portal is a comprehensive feature included with your Zanda account, designed to enhance your clients’ experience while streamlining your practice operations. Through the portal, both new and existing clients can securely view, book, and manage their appointments online—significantly reducing your administrative workload. You can also activate online credit card payments, allowing clients to pay for appointments at the time of booking. Additional options let you enable client access to invoices, online forms, upcoming appointment details, telehealth session links, and waitlist sign-ups, ensuring a seamless and efficient interaction for every client.
To get started with your client portal, simply activate it from within your Zanda account and configure the settings to fit your clinic’s specific needs. Once set up, you can share your custom portal link on your website and include it in your email communications. This allows you to welcome new clients, accept bookings, and process payments online at any time, providing a seamless experience for both your team and your clients.
In this article:
Enabling the Client Portal
- Go to User Menu > Account Settings > Schedule > Client Portal.
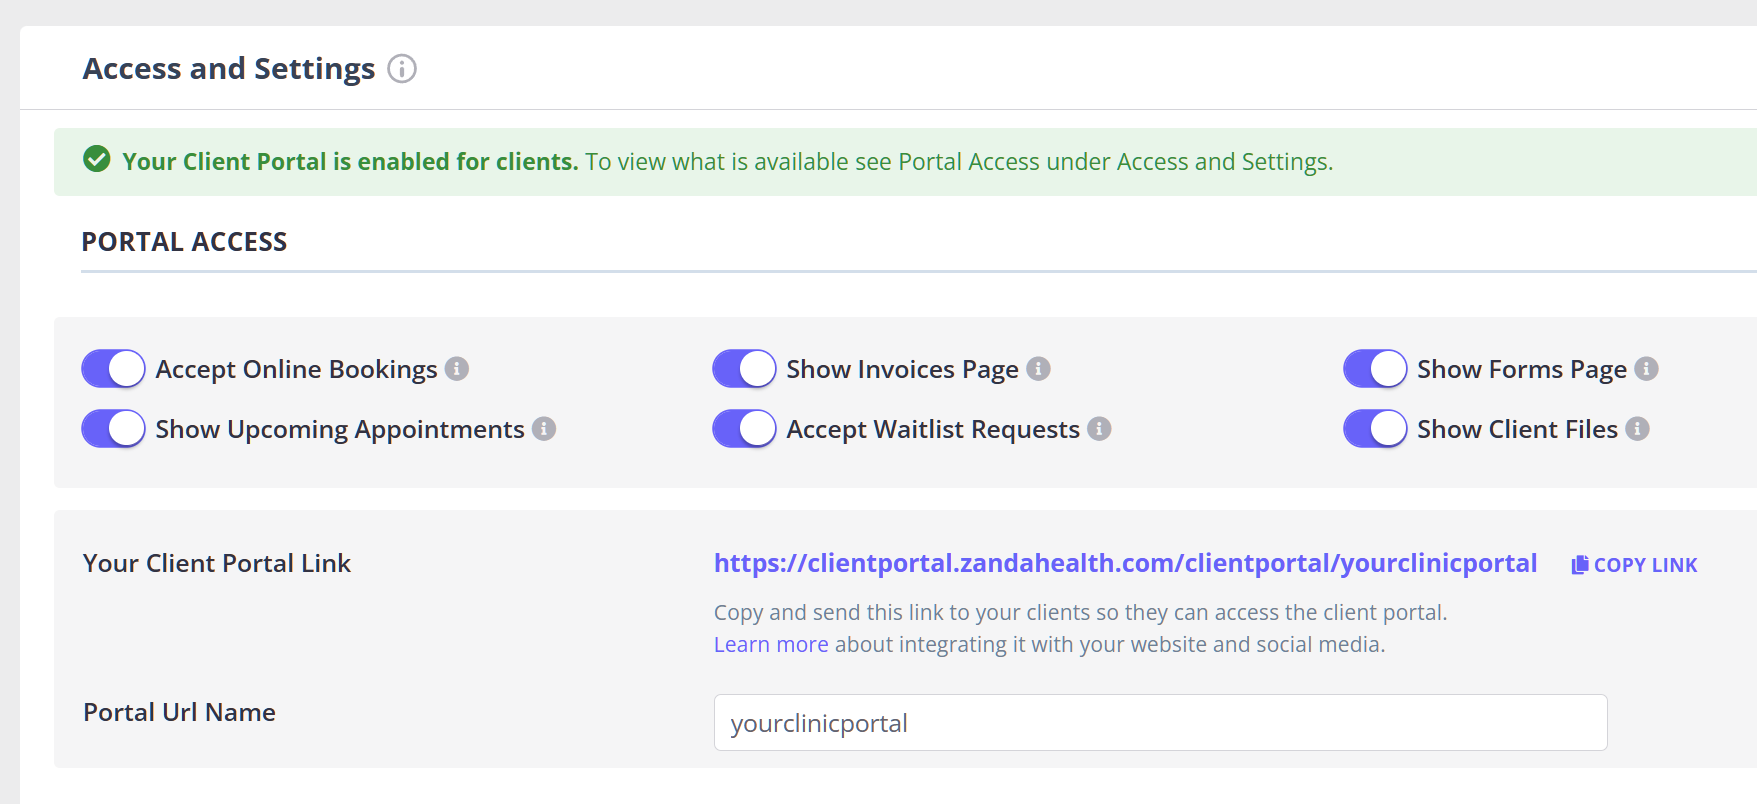
- In the Portal Access section, you can enable four different areas for client access:
- Accept Online Bookings: if enabled, clients can book appointments on the portal. They will also see a list of their upcoming appointments.
Learn how this feature works here.
- Accept Online Bookings: if enabled, clients can book appointments on the portal. They will also see a list of their upcoming appointments.
-
- Show Invoices Page: if enabled, clients can log in to view invoices payable by them, to either pay online (if online payments via portal are enabled) or download a PDF copy.
Learn how this feature works here. - Show Forms Page: if enabled, clients can view the forms page, where they can submit and download their assigned forms. If not enabled, forms will only be accessible individually via the links sent to clients. Learn how this feature works here.
- Show Upcoming Appointments: if enabled, clients can view the details of their upcoming appointments. If you are using Zoom clients will see the option to join the Zoom call for their appointments. If not enabled, clients will not see their upcoming appointments on the portal.
- Accept Waitlist Requests: if enabled, clients can add themselves to your waitlist from the client portal. Learn how this feature works here.
- Show Client Files: When enabled, clients can view files shared with them and upload documents that will appear in their profile.
- Show Invoices Page: if enabled, clients can log in to view invoices payable by them, to either pay online (if online payments via portal are enabled) or download a PDF copy.
-
- You can enable or disable any of these settings to customize the level of client access provided through the portal.
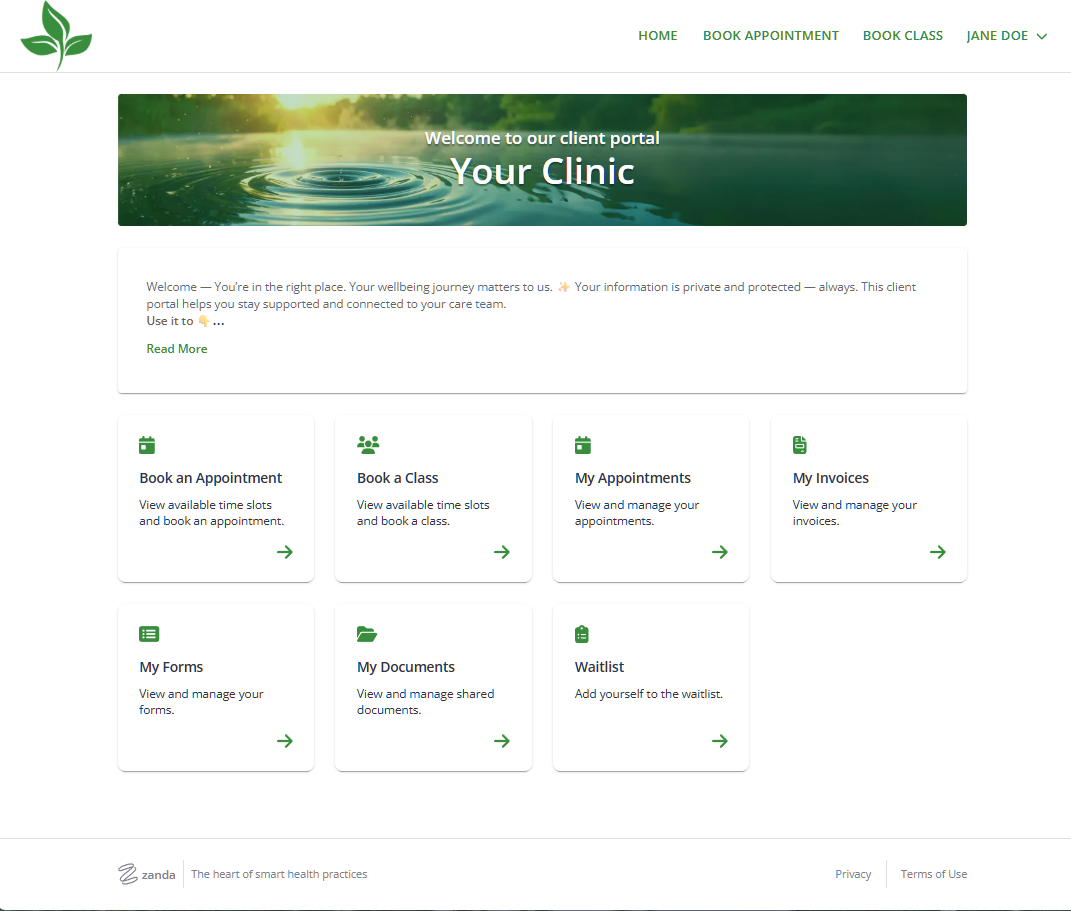
- ⭐ This is what clients will see when they access the portal when full access is enabled:
General Settings
In this section, you can manage new client registration process and client experience when they access the portal home page.
- Allow New Clients to Register: if this switch is enabled, new clients can register a new profile via the portal. If not enabled, only existing clients that have a profile in your account can log in or set a password to access the portal.
- Client Verification Method: Choose whether clients are verified via SMS or email when registering or when updating their login details. A code will be sent to their registered mobile or email.*
- Choose email if you have clients located in other countries, as we only support sending SMS messages to mobile numbers registered in the same country as in your account business information settings.
- Google Analytics ID: connect your Zanda client portal to your Google Analytics account to help you understand how people interact with your client portal.
- Home Page Instructions For Clients: These instructions will show on the home page of the client portal for all clients to see.
For more formatting options, you can use these HTML codes:
- Bold font: <b> Test Paragraph </b>
- Italics: <i> Italics </i>
- Active/clickable hyperlink: <a href="https://www.google.com">Click here to access Google.</a>
- Expand Home Page Instructions For Clients: When enabled, client instructions on the home page will display in full as fixed text - your clients won't need to expand to see them. On mobile devices, the text will be shortened with a 'Read More' button.

✴️ Important Notes on Verifying New Clients
When a new client you don't know signs up through the Client Portal for the first time to book an appointment with you, it's a good idea to verify their identity. Zanda makes it easy for you to do this by offering Email and SMS verification. By enabling this feature, you also ensure that every new client that signs up through your Client Portal is providing valid contact details.
Important
A dedicated Toll-Free Number (TFN) is required to send/receive SMS messages in the USA, Canada, Puerto Rico, Bahamas, Jamaica, Costa Rica, and Barbados. For more details, please click here.
☑️ Email and SMS Verification: How it Works
- When a new client signs up through your Client Portal, they can enter their email address or phone number to verify their identity.
- Once done, the client will receive an email in their inbox containing the short verification code or an SMS with a short verification code depending on the verification method you selected in the settings.
- All the client has to do is enter and submit the verification code and they will be redirected to your Client Portal where they can book an appointment with you.
Note
With SMS verification, Zanda sends an SMS from your account. This is charged as one SMS and will show up in your SMS Usage Report as 'Activation Code Fee'.
Of the two verification methods, we recommend you choose SMS verification for two main reasons:
- It is easy to use for your clients: With SMS verification, clients have to pick up their phone, look at the code and enter it on your Client Portal, which is fast and easy. With email verification, your emails might arrive late in your client's inbox or worse - become flagged as spam. This means your clients might run into trouble finding your verification email.
- It ensures only real customers sign up: When you confirm identities via SMS, you ensure that only real people sign up - since the phone companies have already done the hard work of verifying the user. With email, this isn't the case as anyone who creates an account can fake their name, age, location and more.
Frequently Asked Questions
FAQ: Can I stop Zanda from automatically creating invoices when appointments are booked by clients on the Client Portal?
Answer:
At the moment, Zanda does not have a setting to stop invoices from being automatically created when an appointment is booked through the Client Portal. By default, every appointment booked on the portal generates an invoice that is linked to that appointment.
As a workaround, you can simply delete the automatically generated invoice after the portal booking is made, if there is no payment associated with this appointment and invoice.