%20-%20120%20x%2044.svg)
Not all of your clients are the same. Some will require special attention, or you may want to alert your admin team when a specific client books an appointment. For such noteworthy appointments, Zanda offers you the ability to mark them with an Appointment Warning icon and add internal Alert Notes. This icon is a yellow triangle with an exclamation mark in it.
In this article:
- How to Toggle a Warning for a Specific Appointment
- Automatically add an Alert Note for all Appointments
- Frequently Asked Questions
- Related Articles
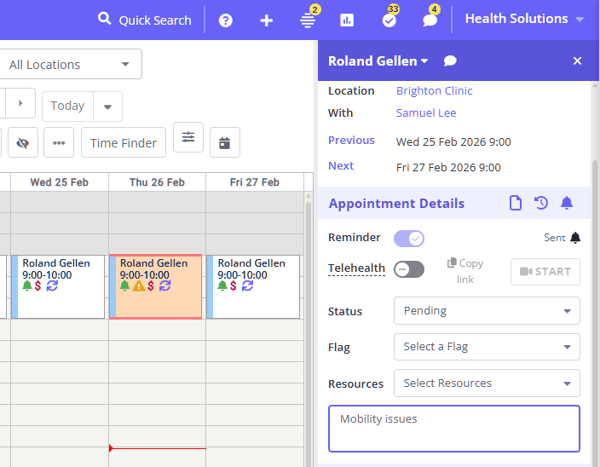
An appointment that’s marked with an Appointment Warning has a peach color appointment flag applied and an orange triangle symbol with an exclamation mark added to the appointment block.
How to Toggle a Warning for a Specific Appointment
- After you create an appointment, simply right-click it and from the pop-up menu, select Toggle Warning.
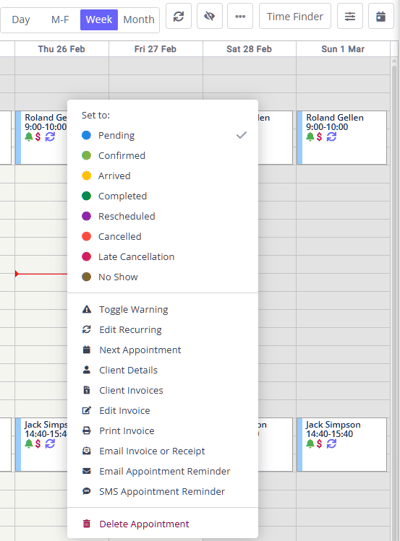
- But adding an Appointment Warning may not be enough. Sometimes you might want to make a note explaining why you’ve marked that appointment. To do that, click on the appointment to open the Appointments Panel. Under Appointment Details > Notes, type in the information regarding this unique client.
- To unmark an appointment with the Appointment Warning icon, right-click it again. From the popup menu select Toggle Warning again.
Important
- Appointment context menu (right-click) is not available on a mobile device.
- If you access your Zanda account via a mobile device, you need to navigate to Client Profile > Admin > Manage to turn on the appointment warning.
Automatically add an Alert Note for all Appointments
💡 Note: The alert notes you'll add to your clients won't be visible to them - only you and the authorized team members will be able to see them in client profiles and on appointment details on the calendar.
1. On top of your Zanda dashboard, you’ll find a Search bar. Click on it.
2. In the search window that appears, type in the name of the client whose future appointments you want to be marked with an Appointment Warning (and an accompanying note) by default.
3. When the client’s profile page opens up, select Admin > Manage from the left-hand side menu inside the page (not the Zanda dashboard).
4. Here, you can see the option to add Alert Notes as well to toggle Appointment Warnings by default. Once you add the notes and turn on the Appointment Warnings switch, click the Save Changes button on the lower right corner of your screen to apply the settings.
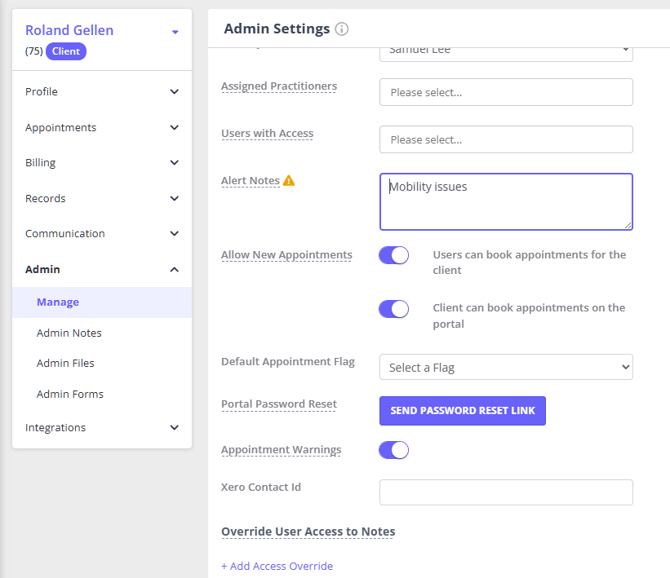
Repeat this process for as many clients as you want.On ce done, anytime a new appointment regarding that client gets created, it will automatically be marked with an Appointment Warning - and the alert note will be posted in the Appointments panel. Whenever you update an alert, it will copy it to all future appts. It doesn’t update/delete the existing alert, it will just add the new / updated alert.
💡 Note: Alert Notes hold up to 500 characters, so keep the entry to the short warning your team needs to see, not the full clinical detail.
💡 Reporting note: To review reporting options for Alert Notes and appointment notes, see Client Reports.
Frequently Asked Questions
❓ Can Alert Notes be filled in automatically from an online form?
No. Alert Notes are entered by your team on the client profile, under Admin > Manage. Zanda has no form question type that writes into Alert Notes, so a care plan, intake form, or any other form a client completes will not populate them.
The closest workflow is a Custom Profile Field:
- Create a Custom Profile Field for the information you want to collect, under User Menu > Account Settings > Clients > Custom Profile Fields. Choose Multiple Line Text if you need room for a longer answer.
- In the form template, add a question, set its type to Linked Profile Field and then Custom Profile Field, and pick the field you created.
- When the client submits the form, the answer writes back to the Custom Profile Fields section of their profile automatically. Leaving the question blank does not overwrite what is already there.
A Custom Profile Field value stays in that section of the profile. It is not copied onto new appointments and it does not turn on the Appointment Warning, which is what Alert Notes do. If the answer is something your team needs to see when an appointment is booked, someone still needs to summarize it into Alert Notes by hand.
For the full setup, see Add and Manage Custom Profile Fields.
❓ Can I show the Appointment Warning icon without changing the appointment color?
No. When Appointment Warnings are turned on for an appointment, Zanda shows the warning icon and applies the peach warning color to the appointment block. If you need to add internal context without changing the appointment color, use Alert Notes on the client profile. If you need a different visual color for appointment categories, use Appointment Flags instead.
Related Articles
- Using Coloured Appointment Flags - Set up and manage appointment flag colors for appointment categories.
- Client Reports - Review reporting options for Alert Notes and appointment notes.
- Add and Manage Custom Profile Fields - Collect information through a form and write it back to the client profile.