Managing Linked Zanda Accounts
Practitioners, virtual assistants, bookkeepers and other professionals running multiple businesses that use Zanda accounts for client management, can conveniently access those Zanda accounts with a single login via one Zanda account with access.
This feature eliminates the need for repetitive logins and logouts, allowing users to seamlessly switch between accounts with ease and efficiency.
Watch this video tutorial:
In this article:
- Creating an Account With Access
- Linking Zanda Accounts
- Navigating Between Linked Accounts
- Managing Accounts With Access
- FAQ and Troubleshooting Linked Zanda Accounts
How to Create an Account With Access
❇️ Any Zanda account can be used to access other linked Zanda accounts securely, provided that consent is granted by the owners of the linked accounts.
❇️ An account with access to multiple linked Zanda accounts can be a free account, if you are not intending to use it for booking appointments and storing client data. Such an account will allow you and your team members to log in securely using your personal logins and 2FAs, and then to switch between linked Zanda accounts to provide your services.
Here is how a free account with access can be set up:
- Create a free trial Zanda account.*
-
When a free trial account is created, email to support@zandahealth.com and request the customer success team to set this account as a free account with access.
-
Since a free account with access does not involve any clinical work, we will make sure that you can keep using it for login and navigation between linked accounts purposes, without the need to upgrade to a paid plan.
- Create user profiles for each team member who will be logging in your account with access with the purpose of switching between different Zanda accounts, using their own login details.
* Hint 💡
If you get a notification that ‘ Email Address is Already in Use', please follow the instructions provided here.
How to Link Zanda Accounts
⚠️ Important
Only the designated Master Users of the Account with Access and the Linked Accounts have the authority to initiate and manage the linking process.
☑️ Step 1: The Master User of the Account With Access
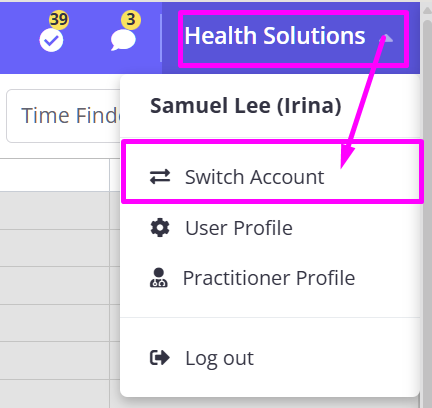
1. Log in to the account with access and open the master user profile menu at the top-right.
2. Select 'Switch Account':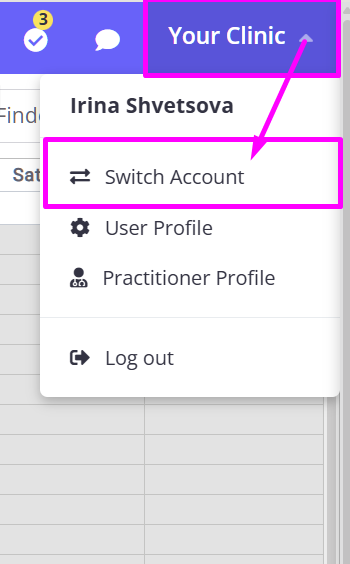
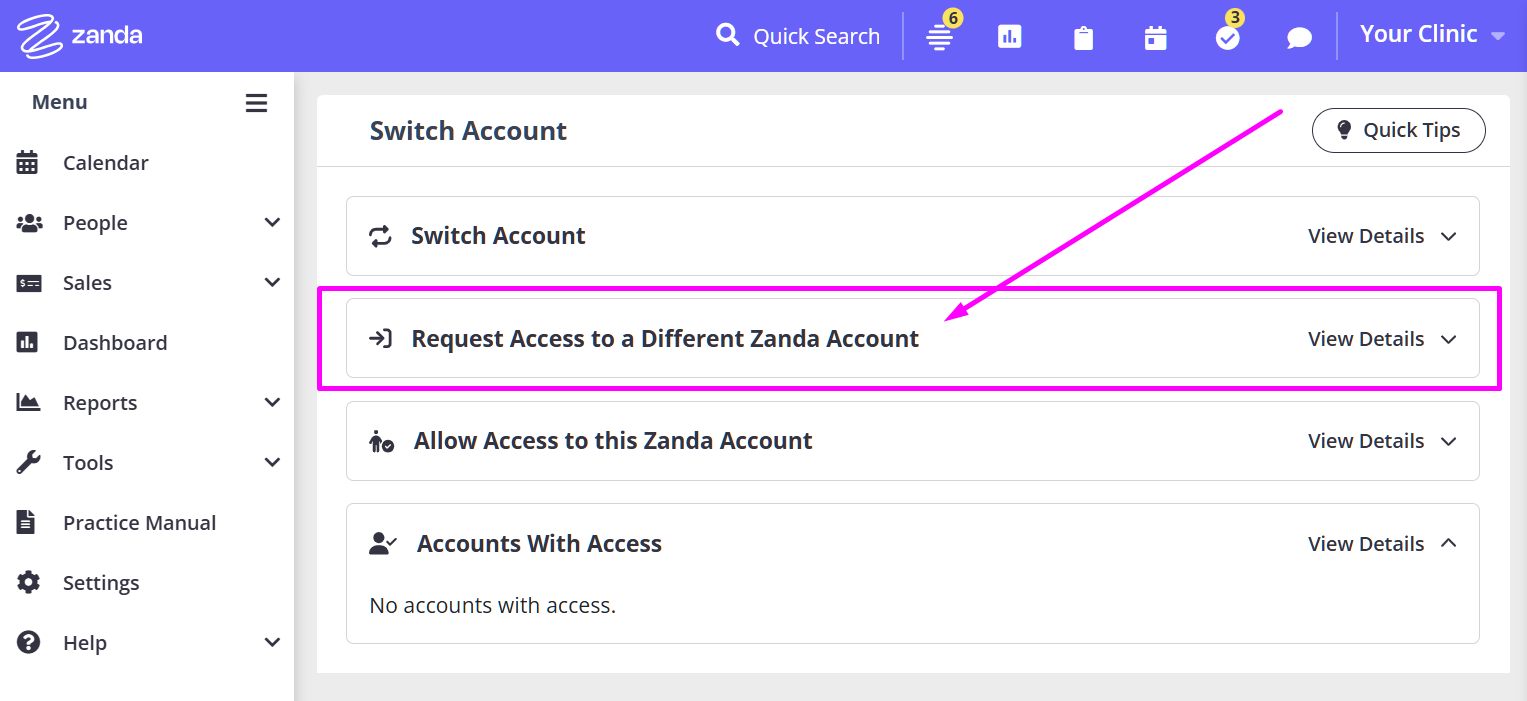
3. The 'Linked Zanda Accounts' settings page will open.
4. Click the 'Request Access to a Different Zanda Account' section. Use it to request access to a different Zanda account:
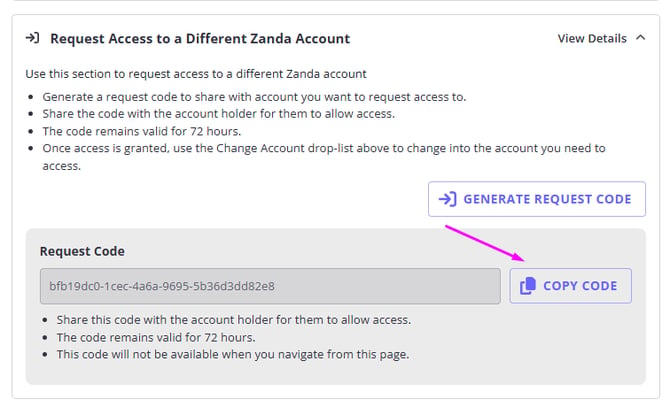
5. Click the 'Generate Request Code' button to generate a one-time unique code to share with account holder you want to request access to.
6. Copy the generated code and securely share it with the master user of the linked account via your preferred communication method (SMS or email)
6. Please note:
- The code remains valid for 72 hours.
- This code will not be available when you navigate from this page.
- If needed, you can generate a new request code at any time.
- Once access is granted, use the Change Account drop-list above to change into the account you need to access.
☑️ Step 2: Master User of the Linked Account
The master user of the account with access will send you the access code to validate their access. This code is valid for 72 hours after generation. After you received the code you'll be able to grant the account with access the ability to access your account via a selected user profile in your account.
If you already had a user profile in your account that you'd like to nominate for the account with access, please skip to Linking the Account With Access to an Existing User below. Otherwise please follow the full instructions to set up a new user profile to be used:
Creating A New User Profile:
- Log in to the account to be linked as the master user and navigate to Settings > Team > Users
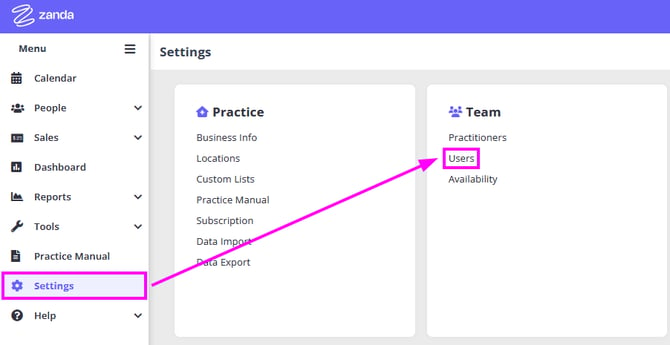
- Select '+ Add New User' on the top right of the page
-1.png?width=461&height=202&name=image%20(1)-1.png)
- Complete the details for the new user profile that the account with access will use
- For the Name, simply enter the name of the account you're granting access to. For example: Forest Virtual Admin
- For the Email, use a placeholder email address by combining your practice name and the name of the account with access. For example, if your account was called "Health Solutions", you might use the address: healthsolutions@forestvirtualadmin.com.
❇️ This email address will not be used and does not need to be a valid email address - Set the user permissions that you would like applied to the account with access when they log in to your account
- Click Send Invitation Email on the bottom right hand side of the page to create the new user profile
-2.png?width=670&height=540&name=image%20(2)-2.png)
- After clicking Send Invitation Email, the page will refresh showing a new User Status section at the top of the page.
- Click on Show The Invitation Link here, then open the displayed link in a new tab
.png?width=670&height=283&name=image%20(5).png)
- Finally, copy the user profile's name on to this page and set a password for this user, then click Register. ❇️ This password will not be used and does not need to be saved
.png?width=501&height=633&name=image%20(4).png)
Linking the Account With Access to an Existing User
- Log in to the account with access and open the master user profile menu at the top-right.
- Select 'Change Account'
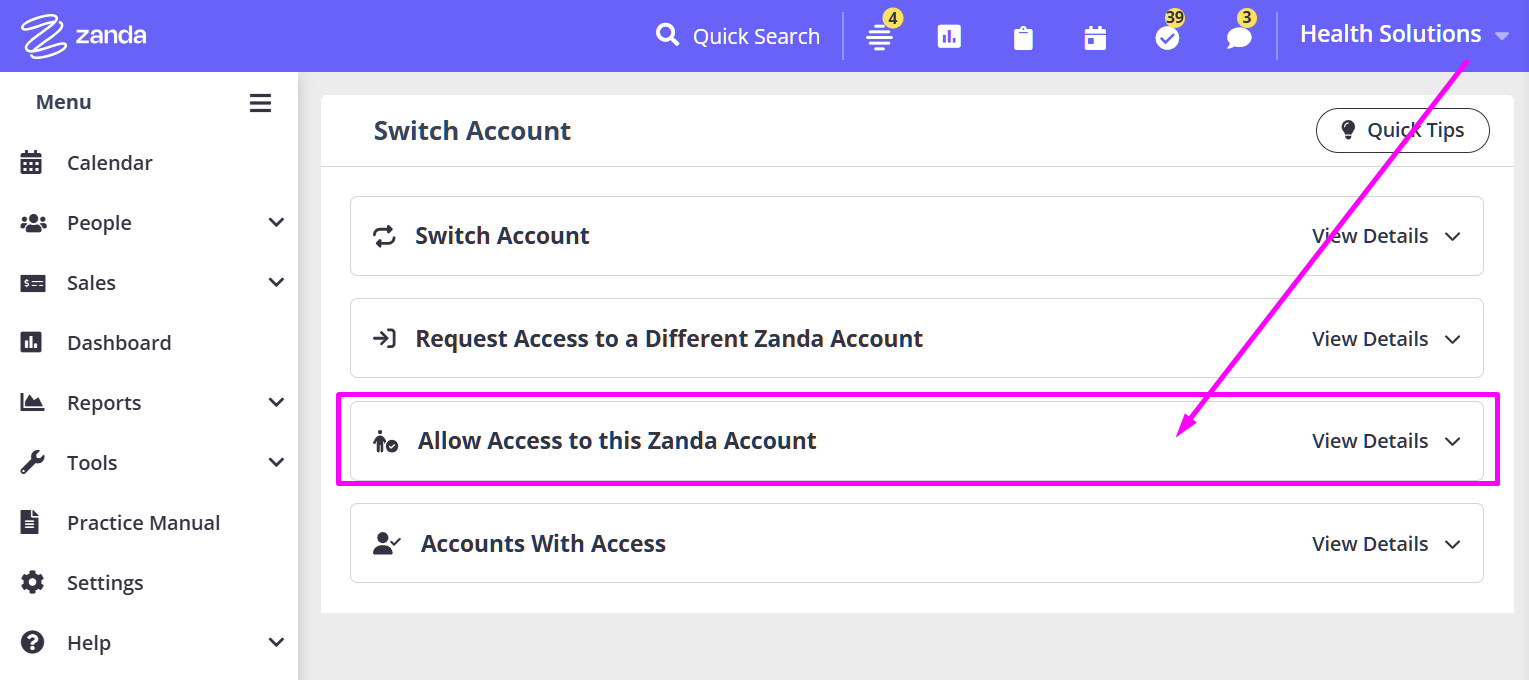
- Select 'Allow Access to this Zanda Account'
- Enter the received code in the 'Access Code' field and click the 'Validate Code' button
- If the code is incorrect, or has expired you will received an error to notify you. In this case, you will need a new request code from the account that is requesting access.
- For a valid code, the account name of the requesting account will be displayed so that you can verify it is the correct account you wish to grant access to.
- Select the user profile the account with access will use when viewing your account:
- Select the user that the linked account with access will use when accessing your account. You do not need to share login details for this user with the linked account, they will automatically emulate this user when switching into your account from their own.
- Please follow the steps under Creating A New User Profile above if you do not have a user profile you'd like the account with access linked to.
- The permissions set for the selected user in your account will apply for any users accessing your account from the linked account.
- Granted access can be viewed and revoked in the "Accounts with Access" section below
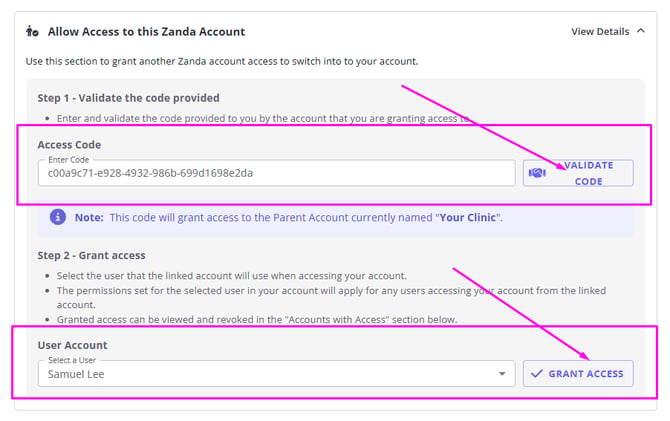
❇️ Once the access is granted, the users from the account with access will be able to access the linked accounts via the selected user with the defined level or access and assigned permissions.
❇️ These permissions can be edited, and the access can be revoked at any time by the master user of the linked account.
How To Navigate Between Linked Accounts
Once the accounts are linked, all users in the account with access can switch between the linked accounts when needed. Here is how:
1. Log in to the account with access and open your user profile menu at the top-right.
2. Select 'Change Account':
3. Click 'Change Account'
4. Click the 'Select Another Account to Access' dropdown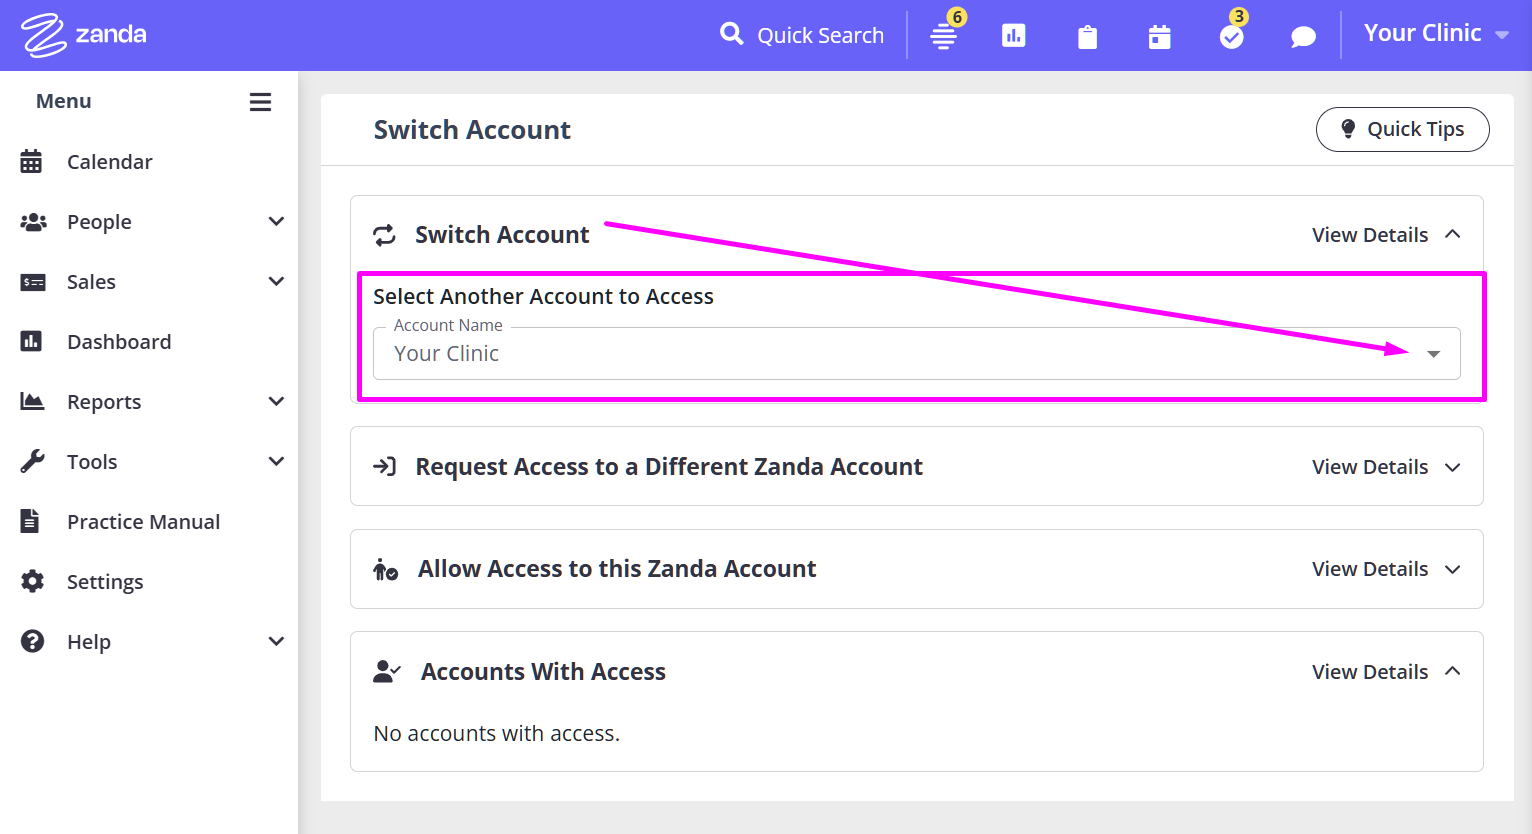
5. Select the account to switch to:
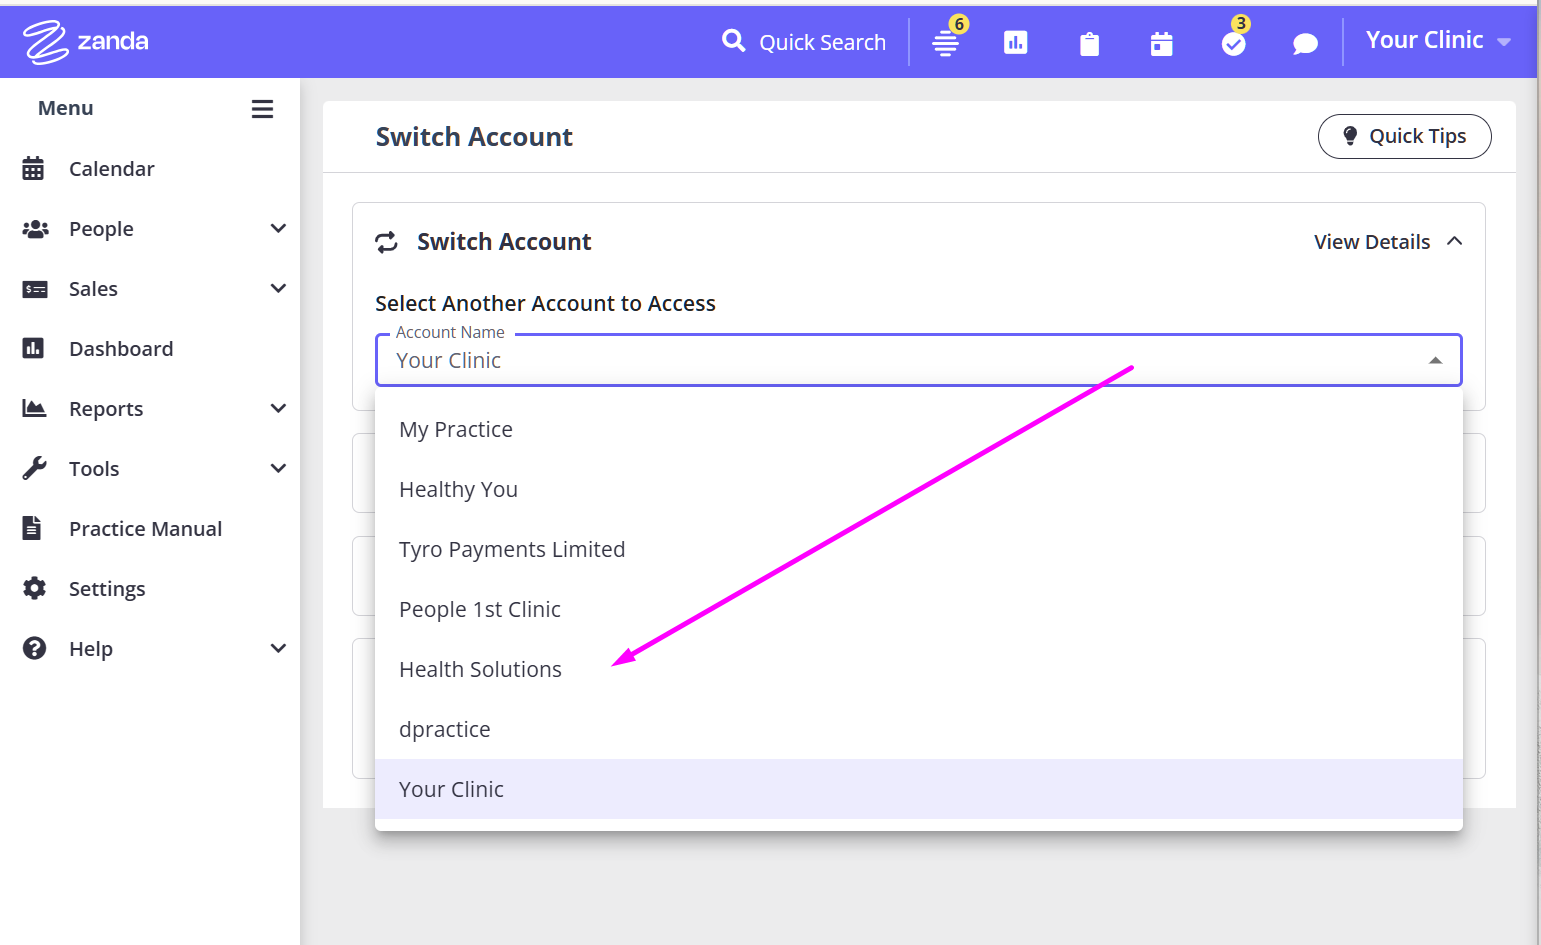
6. You will be switched into the selected Zanda account, where you will be able to perform user actions as defined by the user access level and user permissions for the user you are emulating as set by the master user in that account.
How To Manage Accounts With Access
Master users of Zanda accounts can see and manage accounts with access via the Change Account page:
- Log in to your account and open the top right menu.
- Select 'Change Account'.
- The Linked Zanda Accounts menu will open.
- Scroll to the 'Accounts With Access' section. It list accounts that have access to switch into your account. You can revoke access any time.

- To revoke access, click the 'Revoke Access' button in the Actions column:

- Read the confirmation message and click 'Confirm':
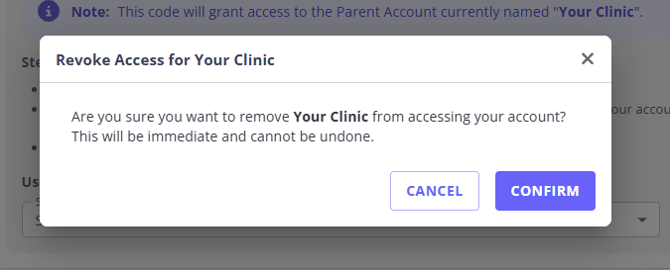
- This with terminate the connection and revoke the access.
FAQ and Troubleshooting Linked Zanda Accounts
The provided code does not work. How do I get a new code?- Answer: The code remains valid for 72 hours. If the code is incorrect or has expired, you will need a new request code from the account that is requesting access.
- Answer: The linked account has not granted you the necessary permissions. These permissions need to be edited by the master user of the linked account.
- Answer: The same user permissions and user activity trail will apply for any users accessing your account from the linked account. It is not possible to specify which user of the account with access performed an action in your account.
Can accounts be linked if they’re on different infrastructures?
Currently, Zanda accounts are located on one of the following infrastructures, based on their geographical position.
You can easily identify your account's infrastructure by looking at the link your are using to access your Zanda account. It will be one of the three available:
- my.zandahealth.com
- us.zandahealth.com
- uk.zandahealth.com
⚠️ The accounts must be on the same infrastructure to be linked.
If a service provider (like a virtual assistant or external practitioner) is on a different infrastructure than the practice or client they work with, the accounts cannot be linked.
To enable linking:
-
The service provider will need to create a new Zanda account on the same infrastructure as the client or practice.
-
If the service provider works with clients on multiple infrastructures (e.g., both my.zandahealth.com and us.zandahealth.com or uk.zandahealth.com), they’ll need to maintain separate accounts, one per infrastructure.