In this article:
- Key Features of Zoom Telehealth Basic
- Enabling Zoom Telehealth Calls on Appointments Automatically
- Inviting Participants to a Telehealth Basic Session
- Managing Zoom Telehealth Basic Sessions - Practitioner Experience
- Joining a Telehealth Zoom session - Client Experience
- How to Load a Meeting without Using the Zoom App
- Related Articles
Key Features of Zoom Telehealth Basic
COMING SOON:
- Zoom Telehealth Basic feature is currently available to the UK and US customers. We are planning to release it to all customers soon.
- Telehealth BYO (Bring Your Own Zoom License) feature, allowing users to port their own personal Zoom licences to their Zanda accounts.
With Zoom Telehealth Basic, you will have access to the following advanced features integrated into your Zanda system:
- 4 Free Zoom Telehealth Pro sessions per practitioner/per month.
- Unlimited Number of Telehealth Sessions each month: each session is limited to 40 min duration.
- Group Sessions: Host telehealth group sessions with up to 20 participants, plus the host.
- Computer Audio Sharing: Share audio from media files (e.g., YouTube videos) directly within Zoom.
- Screen Sharing: Easily share your screen during sessions.
- Virtual Backgrounds: Zoom enables you to upload your customly created virtual backgrounds for a more professional environment.
- Whiteboards: Collaborate with clients using virtual whiteboards.
- Closed Captions: both practitioners and clients can enable in app and in browser.
- File Sharing: Send and receive files during the session.
- In-App Chat: Engage with clients during the session for smooth communication.
- Session Recordings: you will be able to record sessions and save them on your computer. Recordings to a cloud storage will not be allowed.
- Zoom Flexibility: Use either the Zoom Desktop App or your browser to run Zoom sessions. On most devices, users are not required to download Zoom for this service to function properly. If clients wish to join their sessions on their iPhone, they will be required to use the Zoom App, this is enforced by Zoom.
Enabling Zoom Telehealth Calls on Appointments Automatically
You can streamline your administrative tasks by automatically enabling Telehealth Pro and Basic calls link for appointments designated for telehealth sessions.
This section of the article will guide you through the setup process.
- First, you will set a special location type for your telehealth appointments:
- Navigate to Settings > Practice > Locations and create a new location for telehealth appointments, or open your existing one to edit.
- In the Location Type field, select 'Telehealth Video Call' type.
- Enter other location details if necessary and save the changes.
- Next, ensure that each practitioner who provides telehealth appointments has separate availability set up for their telehealth location.
- Navigate to Settings > Team > Availability and click the practitioner name to open their list of availabilities.
- Create a new availability for their telehealth location, or open the existing one to edit.
- In the Location dropdown, select the Telehealth location.
- Set the available days and hours, including the client portal online availability, if needed, and save the changes.
- Once the Telehealth Video Call location and the availability of practitioners for this location are properly configured, all new appointments created by users within the app and by clients through the client portal will automatically include the Telehealth link. This link will be applicable for both types of Zoom Telehealth services offered in Zanda: Basic and Pro.
- If an appointment was initially set up in a different location type and later moved to a telehealth location, the telehealth link will not be activated automatically. Users can manually enable the link via the appointment panel.
How to Enable Zoom Telehealth Basic in Your Zanda Account
Zoom Telehealth Basic and Pro are currently available in Beta version. During this period,
- We recommend that you download the Zoom app to your device for a better overall experience.
- If you already had Telehealth Plus+ enabled before, you do not need to change any settings - the Zoom Telehealth Pro will be automatically switched to to be used for your Telehealth sessions.
- You will be able to switch back to using Telehealth Plus+ for your sessions during the Beta testing period. This can be done in Settings > Communication > Communication Options, or in Settings > Practice > Subscription > Optional Add-Ons.
- If you used Telehealth Lite option, you will continue using it in the Beta period, however you will be able to test the Zoom Telehealth Pro and Basic without extra charges, during Beta. You will only need to have the Telehealth Pro add-on enabled in your account. This can be done in Settings > Communication > Communication Options, or in Settings > Practice > Subscription > Optional Add-Ons.
How to Invite Participants to a Telehealth Basic Session
Each appointment on your calendar will have a unique link for its Telehealth session that will need to be shared with participants. The system will use the same link for Pro and Basic sessions for the same appointment.
You can set up your communication templates to include the {ClientTelehealthUrl} merge field. This merge field will automatically add the appointment Telehealth Zoom link if Telehealth is toggled on for the appointment. This way you can automatically send Telehealth Zoom links to your client with their appointment reminders, or use the communication templates to manually message or email a client to send them the link. ⚠️Ensure that you enabled the Telehealth switch on the appointment panel to generate the Telehealth Zoom link!
❗The following instructions are applicable during the Beta phase.
- If you wish to manually send the link to a client without the use of a Zanda communication template, or via your own SMS or email, you can copy the link directly from the appointment panel:
- Find the appointment on the Calendar display and click on it once to bring up the appointment panel on the right.
- Click on the Copy Link button on the appointment panel, to copy the link to clipboard. This allows you to paste the link into an SMS or email message to share with your participants.
When using communication templates that include appointment-specific merge fields (e.g., templates for sharing telehealth links), ensure you send the messages:
- As a manual reminder through the appointment panel or
- From the Client Profile > Communication > New Email or New SMS while selecting the related appointment.
⚠️ Sending these messages via the Text Messaging Panel on the Calendar will not populate appointment-specific details, including telehealth links.
❇️ To save time and ensure accuracy, consider setting up Pre-Appointment Automations for these communications.
Managing Zoom Telehealth Basic Sessions - Practitioner Experience
Each client appointment and group appointment will have the option to enable and start a Zoom Telehealth Basic session.
Enabling a Telehealth Basic session
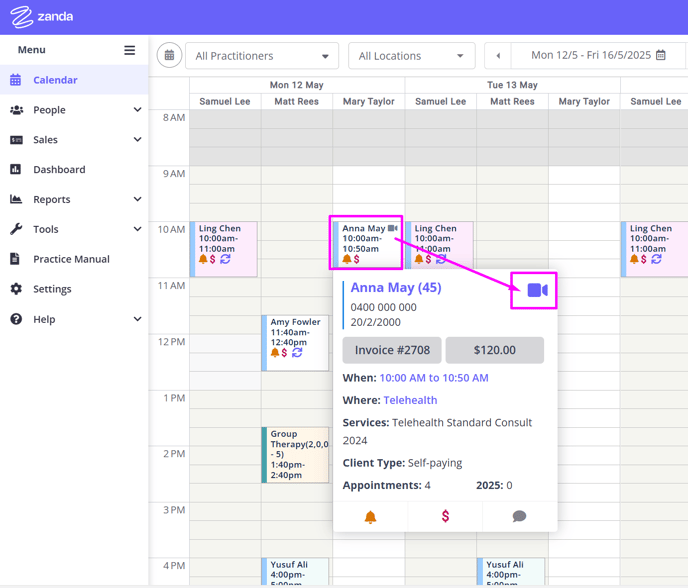
- Click the appointment block on the calendar.
- The appointment panel will open on the right side.
- The Appointment Details section includes the controls to manage Zoom Telehealth sessions:
- If a new appointment was created in the Telehealth Video Call location, the telehealth switch will be enabled by default. Otherwise, you will be able to manually turn it on at any time later;
- Copy link to send it to the client when necessary;
- Click 'Start' to start the session.
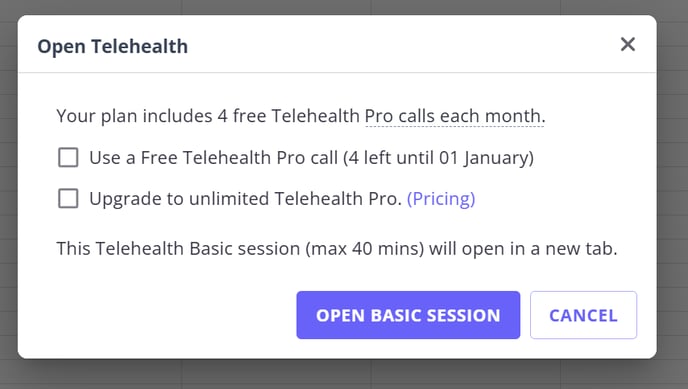
- When you clicked the 'Start' button, a notification will pop-up. Read the notification for additional information and click 'Open Basic Session'
5. The Telehealth Basic launch page will open. Here you will be able to start a test meeting or start a live session.
- If you start a session on a desktop or laptop computer, you will be able to start it via a browser, or via Zoom Desktop App:
- ❗If you wish to start a practitioner session on your mobile device, you will only have an option to use the Zoom Mobile App. This is a limitation enforced by Zoom.
Running a test meeting
- Click 'Start A Test Meeting' button in your Zanda Telehealth Pro launch page.
- The Zoom launch page will open. Click the 'Join' button:
- Click 'Open Zoom Meetings' to open the meeting in the Zoom App. Alternatively, click the 'Launch Meeting' to open the meeting in your browser.
- The system will prompt you to test your camera, microphone and speakers to ensure they will work in a session.
- Once you confirmed that the camera, microphone and speakers are working, click 'End Test'
Setting Up Your Zoom Preferences
If you would like your Zoom preferences to be remembered for each call, we recommend that you create an account with Zoom (you can create a free account with Zoom) and log into this. You can customize your camera, background, and other preferences in your Zoom account. Then, when starting a telehealth call choose to launch your calls in the Zoom app by selecting 'Start with Zoom App'. This way your call will use the Zoom preferences as set in your Zoom account.
Running a Client Session
To start a Telehealth session
1. Click the 'Join With App' or 'Join in browser' button on a desktop/laptop computer, ot 'Join With App' on a mobile device:
2. You can test your speaker and microphone before joining the session:
3. When a client joins the session, they will be placed in the waiting room. You will hear the bell sound notification when any client wants to join the call.
Please keep the participants list open to see who is in the waiting room while waiting for clients to join.
5. When in a session, use the controls at the bottom of the screen to manage the session*:
*Note:
- You will be able to record a session, saving the recording on your computer. Saving to a cloud will not be permitted.
- The use of Zoom AI Companion will not be available.
5. To end the session, click 'End' at the top-right and select 'End Meeting For All'
Using the Zoom Whiteboard
Practitioners have the capability to create and manage whiteboards during their Zoom sessions, which can enhance the interactive experience. Here are some essential features and guidelines to consider:
- The whiteboards created during a session are tied to the practitioner's account, not the client's.
- Practitioners can set up or adjust whiteboards before a scheduled appointment by joining the Zoom meeting individually. This enables thorough preparation and customization.
- For ease of use, whiteboards can be named for quick identification.
- These whiteboards are stored in Zoom’s cloud and can be accessed* only when the practitioner is the host of an active Zoom meeting associated with their appointment.
* It is important to understand that whiteboards are linked to the practitioner's account. Any Zoom call initiated under the practitioner's name provides access to all related whiteboards. As a best practice, avoid storing any confidential information on whiteboards, as they may be visible to anyone with access to the practitioner's appointment panel.
Enabling Closed Captions In Session
Using captions in a session is beneficial for hearing impaired participants or participants who need this type of visual support for a more efficient participation.
- In Zanda Zoom Telehealth sessions, captions can be accessed from the "More" menu in both the Zoom app and the browser.
- Both practitioners and clients have the options to turn it on.
Joining a Telehealth Zoom session - Client Experience
Clients will need to click the Telehealth session link they received from you, to open a session.
1. The link will open in their preferred browser on the Telehealth home page.
2. To join the session, they will need to click the 'Join With App' or 'Join With Browser' button. The button will be greyed out / inactive until the session start time. A client will be able to see the information about the date, time and session provider of this appointment.
Note:
Clients will be able to open their session in a browser or in a Zoom App on any type of device (desktop computer, laptop or mobile).
3. A client will be able to start a test meeting to test their camera, microphone and speakers before joining the session.
4. Clients will be advised if the practitioner has not started the session yet. Once it is the time of the session and the practitioner started it from their end, a client will be able to join the session.
5. After they clicked the 'Join With App' or 'Join With Browser' button, they will be taken to Zoom platform.
6. Once connected, they will be able to test their speaker and microphone before joining the session:
How to load a meeting without using the Zoom App
1. Click the 'Join With Browser' button:
2. Enter 'Your Name' in the Enter Meeting Info box and proceed as usual within your browser.
Related Articles:
- Embracing the Future of Telehealth with Zanda and Zoom
- Telehealth Upgrade: Transitioning from Telehealth Lite to Zoom Telehealth Basic and Zoom Telehealth Pro
- Upcoming Changes to Telehealth Services In-Detail