%20-%20120%20x%2044.svg)
Use Zanda communication templates to send bulk SMS and email messages to your clients. This feature is perfect for marketing campaigns, newsletters, or sending a message to a specific select group of clients (e.g. all clients with a specific classification). You can also add file attachments, images and links to the email template as you would in individual emails.
Important
A dedicated Toll-Free Number (TFN) is required to send/receive SMS messages in the USA, Canada, Puerto Rico, Bahamas, Jamaica, Costa Rica, and Barbados. For more details, please click here.
In this article:
- Creating A Communication Template
- Sending The Campaign
- Running A Marketing Logs Report
- Taking A Client Off Mailing List
- Frequently Asked Questions
- Related Articles
A user will need to have the 'Communication Menu' permission enabled to have access to the Bulk Send feature and send bulk messages.
This permission can be enabled for specific users in User Menu > Account Settings > Team > Users
Creating A Communication Template
The first step is to create a template to be sent to your clients. This can either be an SMS or an Email template. Here's how:
- Go to User Menu > Account Settings > Communication > Email, SMS & Letter Templates.
- Click + New Template.
- Set Message Type as SMS or Email.
- Add your template name and a description for your reference (this information is not published).
- Add your message content. You can insert merge fields from the dropdown list to personalize your message.
- Click Save at the bottom of the page.
Sending the Campaign:
Please Note:
When you send a bulk email, each message is queued and delivered to your clients individually. Recipients will not see who else received the email, and no CC or BCC fields are used in this process.
Once you've built your template and you're ready to send it just follow the steps below.
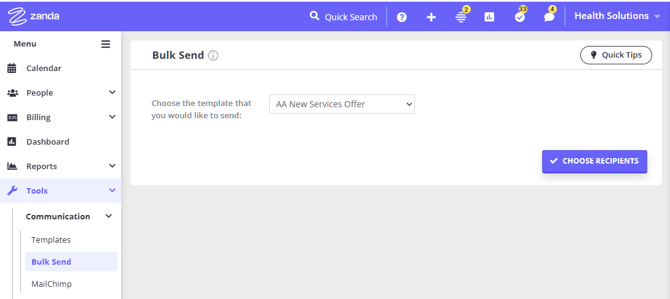
- Go to Tools > Communication > Bulk Send.
- First, select the template you'd like to distribute from the drop-down list. Please beware that SMS sending fees will apply for each sent SMS message.
- and click Choose Recipients.
Important: Reusing a Template? (Missing Filters?)
If you have used a template before, the system remembers your previous recipient list. You will not see the recipients filtering options immediately.
To get access to the Advanced Search filter screen:
- Optional: Untick the currently selected clients (use the checkbox in the header row to clear all).
- Click Save.
- Сlick Add Recipients.
You will now be taken to the Advanced Search filter screen.
To add clients to the recipient list click Add Recipients.
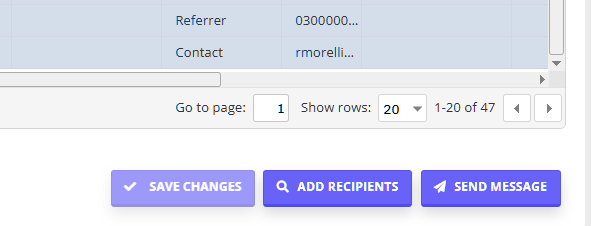
- Clients can be added to the mailing list by using the advanced search filter and then clicking Get Clients to generate the clients based on the selected filters. You can leave the filters blank to include active, visible, non-archived client profiles by default. 💡 Filtering Logic Tip: Classification toggles use OR logic (not AND). Selecting multiple classifications finds clients with any of them. Also, if you select no toggles, the search defaults to all clients (not just those with no classifications).
- Currently, it is not possible to send bulk communications to contacts using the reminder contacts list. When initiating a bulk send, messages are delivered individually to each selected profile type. You can select Third Party profiles as recipients if your user access allows you to search referrer and Third Party profiles. The message uses the selected profile as the recipient, so it does not carry that profile's relationship with a specific client, third party, or referrer. If you use client-based or referrer-based merge fields when emailing a contact, referrer, or third party, those fields will appear blank in the sent communication.
- When sending a bulk communication message to Shared profiles, only the primary member of each shared profile will be included in the recipient list and will receive the bulk message.
- To select all clients in the list, use the checkbox toward the top left-hand corner of the table (to the left of the 'Name' column heading). Or, select only some clients to be the recipients, by manually checking a box next to their name.
- Once you have selected all clients to be included in the list and you are ready to send, click Send Message.
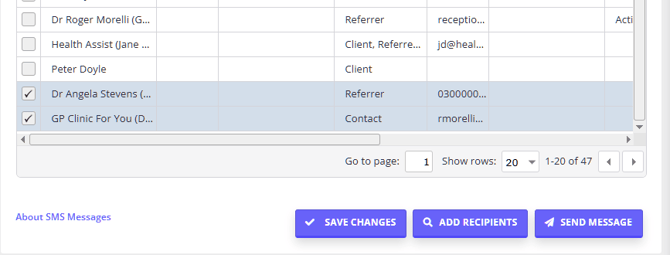
- Cause: You are reusing a template that already has a recipient list saved and this list is shown to you immediately after you selected your template.
- Fix:
- Optionally, untick all currently selected clients (use the checkbox in the header row) if you don't want to send this bulk message to them as well.
- Click Save.
- Click the Add Recipients button.
Problem: I click "GET CLIENTS" and the client list does not load.
- Expected result : The GET CLIENTS button should generate a list of clients that match the filters selected on the Bulk Send Advanced Search screen. Leave the filters blank if you want to include all clients your user account can access.
- Fix :
- Refresh the Bulk Send page and select the template again.
- If you are reusing a template, click Add Recipients to return to the Advanced Search filter screen.
- Try GET CLIENTS with no filters selected, then try again with the filters you need for your message.
- If the list still does not load, contact Zanda support with the template name and the filters you selected so the team can investigate the recipient list for your account.
- Alternative Cause : One or more Advanced Search filters may be narrowing the recipient list. Bulk Send searches active client profiles by default, so inactive or archived profiles will not appear in the standard results.
- Fix :
- Clear any filters you do not need, including Marketing Communication, Profile Type, Status, classifications, practitioner, and appointment filters.
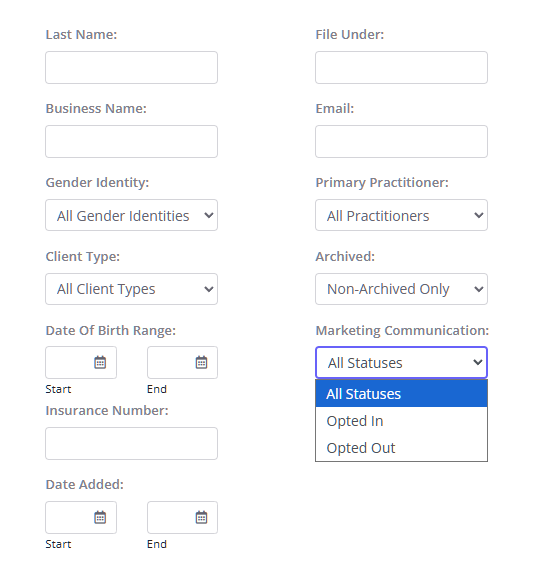
- If you are using Marketing Communication, check whether the dropdown is set to Opted In or Opted Out. The recipient list will only include clients whose profile matches the selected communication status.
- Click Get Clients again.
- If the list is still empty, check whether your user access limits which client profiles you can view, then contact Zanda support for account-specific help.
Important notes on sending bulk SMS:
- While much more effective than email, and significantly cheaper than snail-mail (traditional post) please be mindful that SMS fees apply. If you're keen to minimize costs keep your content under 160 characters (or 70 characters if you're using non-standard characters such as emojis) so that you only use a single message per recipient. Longer messages require more than one SMS credit to send.
- If there are non-existent mobile numbers on client files and when a bulk SMS is sent, the SMS to these numbers would fail and you would not be charged for these unsuccessful SMSs. You can cross-reference this in the Reports > System > SMS Usage report, where those that failed would be absent from the generated recipient list.
Running Marketing Logs Report
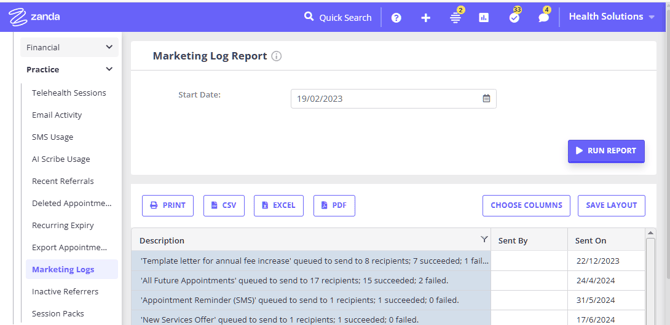
The report is located at Reports > Practice > Marketing Logs. This report displays a log file for all bulk communication/marketing campaign activity.
- Use this to see what bulk sends have been performed in the selected time period
- Includes description (including how many recipients), which user sent the campaign, and the date sent.
❓ Can I see who received a previous Bulk Send?
Use Reports > Practice > Marketing Logs to confirm a bulk campaign was sent and to review the campaign summary. The Marketing Logs report shows the campaign description, sender, and sent date, but it is not a recipient-by-recipient delivery report.
For message-level history, use the activity report that matches the message type:
- For bulk emails, go to Reports > Practice > Email Activity and look for messages with the Automation/Bulk Send type. This report can show the related client, subject, sent date, and send status.
- For bulk SMS messages, go to Reports > Practice > SMS Usage. This report can show the related client or phone number, message, sent date, message type, and send status.
If you are preparing to resend a template, the saved recipient list appears after you select the template in Tools > Communication > Bulk Send. To choose a different group, clear or adjust the saved list, click Save, and then click Add Recipients to return to the Advanced Search filters.
❓ Why is the client list empty after I click Get Clients?
The Bulk Send recipient list only shows client profiles that match the filters on the Advanced Search screen. If the list is empty, broaden the filters first: set Client Status to All Statuses, leave optional filters blank, and check whether the Archived filter is set to Non-Archived Only. If your user permissions limit you to your own clients, the list will only include profiles you can see.
Taking A Client Off Mailing List
When a client wishes to opt out from receiving marketing or other type of bulk communication, here is how you can exclude them from your Bulk Send recipients list:
1. Go to the Client Profile of the person you wish to remove.
2. Click on the Admin tab > Manage within the client's profile.
3. Locate the Receives Marketing Communication option (on the right hand side).
4. Toggle this setting to unsubscribe (or off).
5. Click Save.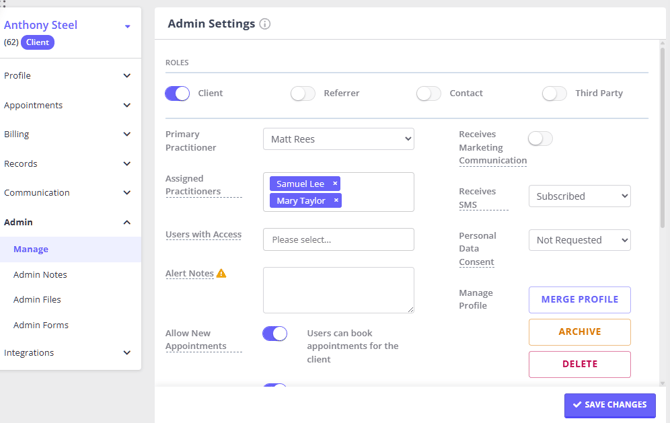
6. When sending a bulk communication message (email or SMS) via the Tools > Communication > Bulk Send, use the Advanced Search filter "Marketing Communication:" set to 'Opted In'.
This way, client profiles who are unsubscribed from marketing communication, will not be included in the recipients list.
Note: 💡
- Your clients can subscribe or unsubscribe from marketing communication via a Zanda online form with the 'Subscribe To Marketing Communication' linked profile field.
-
The ‘Receives Marketing Communication’ setting in a client’s profile > Admin > Manage is for internal reference only. It does not prevent general communication (like appointment reminders or invoices) from being sent.
This setting is designed to help you filter clients using the Communication Methods filter when sending bulk marketing messages—so you can easily include or exclude clients based on their opt-in status.
Frequently Asked Questions
❓ Can I bulk email active clients with appointments during annual leave?
Yes. Use Tools > Communication > Bulk Send when you need to email a group of clients about a calendar closure, practitioner leave, or another schedule change. Choose an email communication template, click Add Recipients, then use the client search criteria to find clients who match the appointment date range and client status you need. Select the matching clients, click Add Recipients, review the recipient list, and click Send Message.
Bulk Send uses the clients you select from the search results. If your closure affects only some appointments, review the recipient list before sending so the message goes only to the clients who need the update.
❓ Can I send a bulk email to insurers or other Third Party payees?
Yes, if the insurer or payer has a Third Party profile in Zanda and your user access allows you to search referrer and Third Party profiles. Go to Tools > Communication > Bulk Send, choose your email template, click Choose Recipients or Add Recipients, then use the Third Party role in the recipient search to find and select those profiles.
Bulk Send emails are sent to the selected profile records, so use merge fields that belong to the Third Party profile itself. Client-based and referrer-based merge fields do not pull through a Third Party profile's relationship with a specific client, and those fields may appear blank in the sent email.
❓ Can I see bulk email delivery, open, or click stats?
Use Reports > Practice > Email Activity to review bulk email send status, including whether each email is sent, pending, failed, or reported as spam where that status is available for your account. Hover over the status to see delivery details such as delayed delivery, permanent delivery failure, temporary delivery failure, or a system issue.
Zanda does not show open rates or link-click tracking for bulk emails. To find bulk emails in the report, choose your date range, run the report, and look for emails with the Automation/Bulk Send type.
❓ Can I resend one failed email from a Bulk Send?
There is no resend button in Bulk Send for one failed email. To send the message again to one client, open the client profile, go to Communication, create a New Message or New Email, select the same email template or recreate the email content, then click Save and Send. The new email is saved in the client's communication history, and you can review the original campaign in Reports > Practice > Marketing Logs.
❓Can I bulk email clients who have appointments in a future date range?
Yes. In Tools > Communication > Bulk Send, choose the email template you want to send, select Add Recipients, and use the advanced search filters to find clients with appointments in the date range you need. In the Appointments section, set Had an Appointment Between to the future dates you need before reviewing and sending the message.
If your email needs to include appointment information, use merge fields that work in email templates, such as List All Future Appointments (Email/Letter Only). Avoid appointment-only merge fields such as {AppointmentDate} in Bulk Send; those fields are designed for appointment reminders and may not work without a specific appointment context.
❓Can I resend one failed email from a Bulk Send?
There is no resend button in Bulk Send for one failed email. To send the message again to one client, open the client profile, go to Communication, create a New Message or New Email, select the same email template or recreate the email content, then click Save and Send. The new email is saved in the client's communication history, and you can review the original campaign in Reports > Practice > Marketing Logs.
❓Can I use Bulk Send to send invoice links or invoice PDF attachments?
Use Bulk Send for general email and SMS campaigns that use client communication templates. When each recipient needs an invoice-specific payment link, invoice PDF link, or invoice PDF attachment, use an invoice workflow instead. The related articles below cover the supported invoice-sending options.
Related Articles
- Sending Invoices and Receipts to Your Payees - Learn the supported methods for emailing invoice and receipt PDFs to payees.
- Setting Up an Invoicing Automation - Automatically send invoice reminders, invoice PDF links, and receipt messages based on invoice conditions.
- Sending Links to Pay Invoices Online - Send invoice payment links by email, SMS, or automation.
- Available Merge Fields for Communication Templates - See which merge fields are available for email, SMS, and letter templates.
- Sending Invoices and Receipts to Your Payees - Learn the supported methods for emailing invoice and receipt PDFs to payees.
- Setting Up an Invoicing Automation - Automatically send invoice reminders, invoice PDF links, and receipt messages based on invoice conditions.
- Sending Links to Pay Invoices Online - Send invoice payment links by email, SMS, or automation.