Whether a new client registers, someone books or cancels an appointment, or a waitlist request is submitted, Zanda can automatically notify the right people—keeping your team organised and your clients well-informed.
In this article
What Are Client Portal Notifications?
Client Portal notifications are automatic messages sent by Zanda when key actions occur on your client portal. These messages can be delivered via email or SMS (depending on your setup) to clients, practitioners, and additional staff. Once configured, you don’t need to manually monitor the portal—Zanda sends updates for you.
When Notifications Are Sent
Notifications are triggered by four types of portal activity:
1. New Client Registration - Sent when someone registers a new profile through your client portal.
2. New Appointment Booking - Sent when a client books an appointment online.
3. Appointment Cancellation - Sent when a client cancels an appointment through the portal.
4. Waitlist Request - Sent when a client adds themselves or another client to your waitlist (only available if you’ve enabled the Waitlist feature).
5. Rescheduled Appointment - sent when a client reschedules an appointment online.
Who Receives Notifications?
For each event, you can enable notifications for three groups:
Practitioner
-
New Client Registration: The client’s primary practitioner
-
New Appointment: The practitioner assigned to the appointment
-
Appointment Cancellation: The practitioner assigned to the appointment
-
Waitlist Request: The client’s primary practitioner
The Client - The client receives a confirmation message for the actions they performed.
Additional Email Addresses - Add other team members—such as reception or admin—by entering one or more email addresses.
How to Set Up Client Portal Notifications
Before you begin, make sure:
-
Your client portal is enabled (at least one portal feature must be active)
-
You’ve created message templates for the notifications you want to send in Tools > Communication > Templates
Step 1: Go to Notification Settings
-
Navigate to User Menu > Account Settings > Schedule > Client Portal
-
Select Notifications from the left-hand sidebar
Step 2: Check Client Portal Status
At the top of the page, you’ll see a status banner:
-
Green: Client Portal is enabled and ready
-
Yellow: Client Portal is disabled — enable it in Access and Settings
Step 3: Configure Each Notification Type
Each event (Client Registration, Appointment Booking, Appointment Cancellation, Waitlist Request Submitted, Resscheduled Appointment) includes three rows you can customize:
Row 1: Practitioner Notification
-
Toggle ON to notify the practitioner
-
Select a template from the dropdown
-
Click Edit Template if you need to adjust the message
Row 2: Client Notification
-
Toggle ON to send a confirmation to the client
-
Select a template from the dropdown
-
Click Edit Template to update the content
Row 3: Additional Email Addresses
-
Toggle ON to notify other staff
-
Add email addresses (comma-separated, no spaces)
-
Select an email template
-
Use Edit Template if you need to customize the message
Step 4: Save Your Changes
Click SAVE CHANGES at the bottom of the page to apply your settings.
Managing Message Templates
Go to Tools > Communication > Templates to create, edit, clone, print, or deactivate templates.
Creating a New Template
-
Click + New Template
-
Fill in:
-
Template Name
-
Type (Email, SMS, or Letter)
-
Description (optional)
-
Content with appropriate merge fields (Use AI Write tool to help you draft a professional template in seconds)
-
-
For Email templates, also complete:
-
Email From Name
-
Email From Address
-
Email Subject
-
-
Click Save
Editing Templates
You can edit a template:
-
Via Tools > Communication > Templates, or
-
Directly from the Notifications page using Edit Template next to the dropdown

Using Merge Fields
Merge fields personalize your messages with client or appointment details. Some of the available merge fields you can use for client portal notifications:
Client Information
-
{ClientFirstName} , {ClientLastName} , {ClientNumber}
-
{ClientMobilePhone} , {ClientEmailAddress}
If you would rather your team saw a client's number than their name in these notifications, use {ClientNumber}—it displays the client's Client Profile Number (Client ID#). This works in any Client Portal notification template, including the appointment cancellation email your team receives. The supplied cancellation template reads "{ClientFullName} ({ClientMobilePhone}) has just cancelled their appointment...", so edit that template from User Menu > Account Settings > Schedule > Client Portal > Notifications using Edit Template next to the Appointment Cancellation dropdown, and replace or supplement {ClientFullName} with {ClientNumber}.
Appointment Information
-
{AppointmentDate} , {AppointmentStartTime} , {AppointmentServiceName}
-
{AppointmentLocationName} , {AppointmentLocationAddress}
- {AppointmentAddToCalendar}
Practitioner Information
-
{AppointmentPractitionerFullName} , {AppointmentPractitionerShortName} , {ClientPreferredPractitionerFullName} , {ClientPreferredPractitionerShortName}
Template Requirements
New Client Registration & Waitlist:
- Use templates that contain only client-specific merge fields to ensure messages are relevant and personal.
- Notifications can be sent via email or SMS, depending on your preferred delivery method.
Appointment Bookings & Cancellations:
- Templates for these notifications must include appointment-related merge fields—such as {AppointmentDate}, {AppointmentServiceName}, or {AppointmentLocationName}—to provide clear details to recipients about the booking or cancellation.
- Both email and SMS are supported for delivery.
Additional Email Addresses:
- When sending notifications to extra team members (for example, reception or admin staff), use email templates exclusively. SMS notifications are not available for additional recipients.
Testing Your Setup
After you configure notifications:
- Create a test client profile and access the client portal as this user to simulate client experience.
- Trigger each type of notification event through the portal—register as a new client, book or cancel an appointment, and submit a waitlist request (if enabled).
- Verify that all intended recipients—including clients, practitioners, and any additional staff—receive the correct messages according to your configuration.
- Review each notification to ensure merge fields populate accurately with client, practitioner, and appointment details.
- Test delivery for both email and SMS channels if you have enabled both, confirming messages appear as expected and are received promptly.
- Review the content layout and formatting for clarity and professionalism across all notifications.
- Make any necessary adjustments to templates or notification settings before going live.
By thoroughly testing, you ensure a smooth, reliable experience for your team and your clients—reducing missed communications and increasing confidence in your client portal setup.
SMS Tips
-
SMS has character limits (160 characters) per one message and incur additional fees - see full details here.
-
A dedicated Toll-Free Number (TFN) is required to send/receive SMS messages in the USA, Canada, Puerto Rico, Bahamas, Jamaica, Costa Rica, and Barbados. For more details, please click here.
Frequently Asked Questions
How do I find and edit the email that gets sent automatically when a client books an appointment?
The booking confirmation email is controlled by the New Appointment Booking notification in your Client Portal settings.
To find and edit the template:
- Go to User Menu > Account Settings > Schedule > Client Portal > Notifications.
- Find the New Appointment Booking section.
- In the Client row, check which template is selected in the dropdown. This is the email clients receive when they book an appointment.
- Select Edit Template next to the dropdown to open the template in Tools > Communication > Templates.
- Make your changes.
- Select Save.
If no template is selected, no confirmation email is sent to the client when they book. To activate a confirmation email, select a template, then select Save Changes at the bottom of the Notifications page.
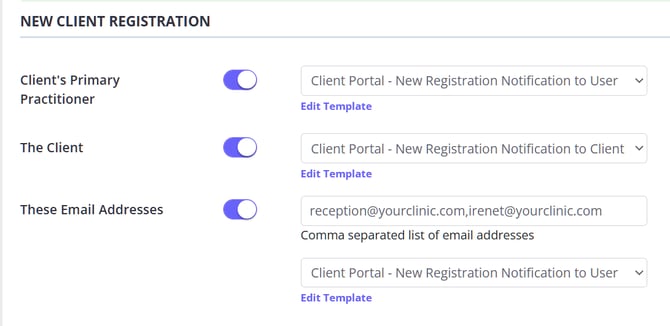
Will my team be notified when a new client registers through the Client Portal?
Yes. Go to User Menu > Account Settings > Schedule > Client Portal > Notifications, then open the New Client Registration section. You can turn on notifications for the Client's Primary Practitioner, The Client, and These Email Addresses, then choose the message template each recipient group should receive. Additional staff recipients use email, so add a shared reception or admin inbox in These Email Addresses when more than one team member needs the registration message.
Zanda can also show a New Client Registered notification in Practice Hive for users associated with the default practitioner. Each user can control these in-app alerts from Practice Hive settings with Enable Client Portal Notifications.
Why is a practitioner receiving an appointment cancellation email when a client books a new appointment?
If the appointment stays active in the calendar, check which template is selected in the New Appointment Creation section. The notification row controls when the message is sent, while the selected template controls the wording of the email or SMS. If a cancellation template is selected in this section, Zanda can send cancellation wording when the client is actually creating a new booking.
To correct the template:
- Go to User Menu > Account Settings > Schedule > Client Portal > Notifications.
- Find the New Appointment Creation section.
- Check each enabled row: Appointment Practitioner, The Client, and These Email Addresses.
- For each enabled row, select a template that matches a new appointment booking, not an appointment cancellation.
- Select Save Changes at the bottom of the page.
- Test the Client Portal booking flow again to confirm the intended recipients receive the correct message.
If the appointment is actually being cancelled or rescheduled, review the Appointment Cancellation or Rescheduled Appointment sections instead.
Troubleshooting:
Notifications Aren’t Sending
If notifications aren’t being delivered as expected, review the following points to quickly identify and resolve common issues:
- Ensure the client portal is enabled. Notifications require at least one active portal feature.
- Confirm the toggle switch is ON for each recipient type you intend to notify (practitioner, client, additional email addresses). Each row needs to be explicitly enabled.
- Double-check that you have selected a message template for every active notification type and recipient group.
- Verify all email addresses are entered correctly, using proper formatting (comma-separated, no spaces), and that they are valid to avoid delivery issues.
- If you’re sending SMS notifications, make sure your SMS service is active and properly configured in your Zanda account settings.
- Also, check that clients have consented to receive SMS and that your sending configuration (such as a Toll-Free Number, where required) meets local requirements.
Working through these steps helps ensure notifications reach your clients, practitioners, and team members as intended, contributing to a seamless communication workflow.
Message Content Is Incorrect
If messages are sending but the content is incorrect, follow these steps to identify and resolve the issue:
- Navigate to User Menu > Account Settings > Schedule > Client Portal > Notifications
- Locate the type of notifications where the message content is incorrect
- Click Edit Template.
- Update the content or adjust the merge fields as needed, ensuring that the template includes all required fields for the specific notification type.
- Save your changes.
- Test again by triggering the event in the client portal using your test client profile.
This process helps ensure that your notification templates meet Zanda requirements and display the intended information correctly to recipients.
Additional Emails Aren’t Receiving Messages
Verify that:
-
Email addresses are comma-separated (no spaces)
-
The toggle for Additional Emails is ON
-
An email template is selected
-
Email addresses are valid and not bouncing
Template Not Showing in Dropdown
- The template is inactive. To appear in the dropdown, message templates must be active. Check the status of your template by navigating to Tools > Communication > Templates, and ensure it is enabled for use. If a template is inactive, click to activate it, then return to your notification settings and try again.
Related Features
-
Appointment Reminders (separate from portal notifications)
- Allow Clients to Reschedule Appointments via the Client Portal
Quick Reference
Navigation
-
Notifications: User Menu > Account Settings > Schedule > Client Portal > Notifications
-
Templates: Tools > Communication > Templates
Key Things to Remember
- The Client Portal must be enabled in your Zanda account for notifications to function. Always confirm that at least one portal feature is active before configuring notification settings.
- For each client portal event (New Client Registration, Appointment Booking, Appointment Cancellation, Waitlist Request, Rescheduled Appointment), there are three types of recipients you can configure: the practitioner, the client, and additional email addresses. This ensures the right people are always informed.
- Additional recipients—such as administration or reception—can only be notified by email. SMS delivery is available for clients and practitioners where enabled, but not for additional email addresses.
- After adjusting your notification or template settings, thoroughly test your configuration. Create test events in the portal and verify each recipient receives accurate and timely messages according to your setup.
- Always click SAVE CHANGES at the bottom of the notifications settings page to ensure that all updates are applied. Unsaved changes will not take effect and may result in missed communications.
✋ Need Help?
If you need further assistance:
-
Review this guide, especially the troubleshooting section
-
Test using a simple configuration
-
Contact Zanda Support at support@zandahealth.com Live Chat or via Help menu in your Zanda account—we’re always here to help