%20-%20120%20x%2044.svg)
You can create a new invoice and edit an existing one. In addition, you can also print out an invoice or email it to a client.
In this article:
- Create a New Invoice
- Find an Existing Invoice
- Edit an Existing Invoice
- Link a Stand-Alone Invoice to an Appointment
- What Appears In An Invoice
- Ways to De-identify Client Invoices
- Print or Email an Invoice
- View Invoice Activity Log
- Stop Invoices Being Created Automatically for a Client
- Frequently Asked Questions
- Related Articles
Create a New Invoice
There are two ways you can create a new invoice on the calendar page:
- By creating a new appointment.
- By directly recording a sale.
Method 1: Create a New Appointment
When you create a new appointment, an invoice for it will be automatically generated. Here’s how:
1. Using your mouse cursor, highlight the time-slot in which you’d like to create a new appointment. The Appointment Panel will open.
2. Fill in the information under When & Where – and choose a client whom you want to invoice.
3. Under Appointment Details, choose one or more services, products, or session pack templates you want to add to the client’s invoice.
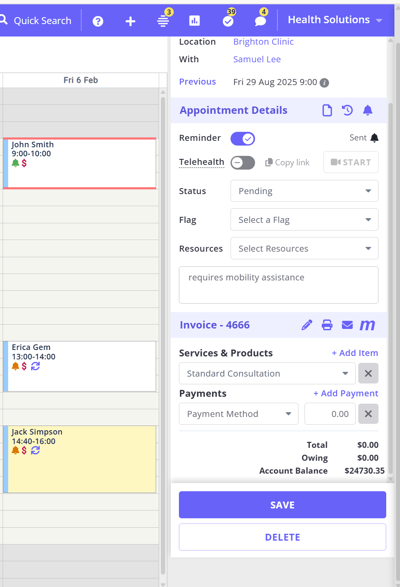
4. Click Save. Now you will see a new section called Invoice when you click the client appointment. This will include a list of items in the invoice, the total amount due and payment status.
Method 2: Create a new invoice
You can directly create an invoice without booking an appointment first. Here's how:
1. On the sidebar menu, click Billing > New Invoice.
2. A form called Create a New Invoice will appear. Fill in the required information.
3. Click Create Invoice.
4. The invoice will open up. Here, you can link the invoice to an appointment, add items to your invoice and the payments you’ve received for it. You can also edit the invoice details.
5. After you’ve made the changes, click Save Invoice.
Find an Existing Invoice
There are four ways you can use to search for an existing invoice:
- Using the search bar
- Inside the calendar.
- Using the search filters on the Invoices page.
- By visiting the client’s profile page.
Method 1: Using the search bar
The easiest way to find an invoice is by using the search bar on top.
Here’s how:
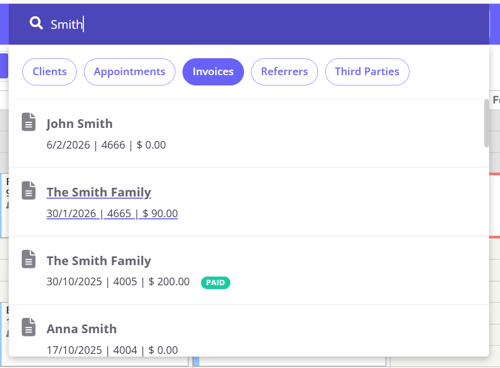
1. Start by typing the name of the client whose invoice you want to find.
2. Click on the Invoices option to make sure only invoices appear.
3. From the drop-down menu, click the invoice. You can see each invoices’ number, amount due and date.
Method 2: Check inside the Calendar
If you specifically remember which client appointment invoice you’d like to edit, you can search for it in the calendar. Here’s how:
1. Use the back and next buttons above the calendar to scroll through the weeks to find the appointment whose invoice you want to edit.
2. Once you see the appointment you’re looking for, click on it.
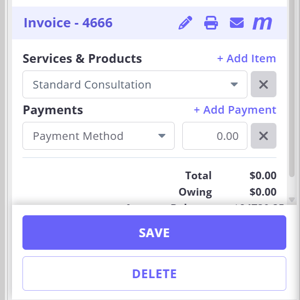
3. In the Appointment Settings Panel, scroll down to the Invoice section and click the pencil icon.
Method 3: Use search filters
If you don’t remember specific details regarding the invoice you want to edit, you can use filters to narrow down and find the invoice. Here’s how:
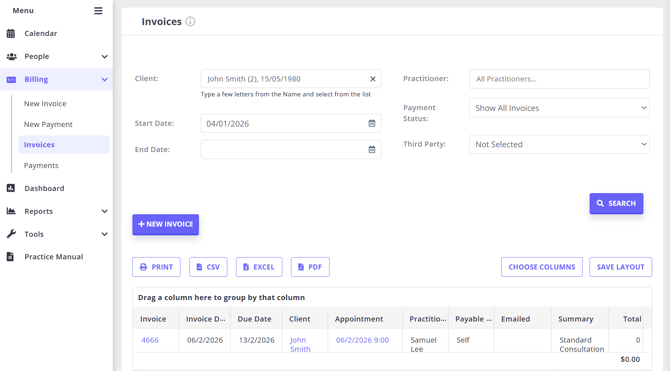
1. On the sidebar menu, navigate to Billing > Invoices.
2. Type the client name for whom you’ve created the invoice. If you are unable to remember, use any of the other filters to find your invoice. For example, you can filter invoices by start and end date, payment status, or calendar.
3. After applying your filters, click Search. The list at the bottom of the page will be updated with invoices matching your applied filters. Scan through it and click the appropriate invoice you want to edit.
Method 4: Visit the Client’s Profile page
If you know which client’s invoice you want to edit, you can find it in their profile page. Here’s how:
1. In the search bar above the dashboard, type in your client’s name and click on it.
2. Navigate to Billing > Invoices.
3. From the list of invoices, click on the one you’d like to edit.
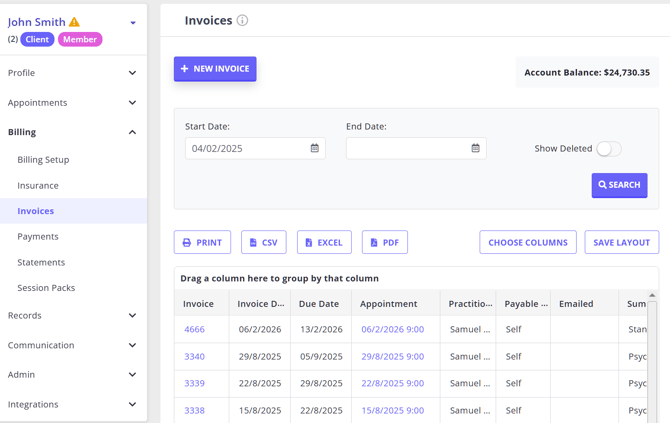
These four methods will bring you to the Edit Invoice page.
Edit an Existing Invoice
You can make changes to an existing invoice. On the Invoice Edit page, you can
-
Edit information such as Payable By, Insurance, and Referrer Information.
-
In addition, you can also add/remove invoice items and payments.
💡 When an invoice item has a practitioner set in its Provided by field, the service list for that item groups services under Provided Services and Other Services , listing the ones that practitioner provides first. Every service stays selectable. The headings appear only when the practitioner has services in both groups. See Marking Which Services Each Practitioner Provides.
-
You are able to add custom notes specific to this invoice in the Invoice Items Description field. These notes will be visible on the actual invoice.
-
The notes added in the Invoice Payments Notes field are for internal use and will not be shown on the actual invoice.
-
The Invoice Notes field is for internal use only, will not be shown on the actual invoice.
💡Pro Tips:
-
The Invoice Notes are included in the invoices and payments report in Reports > Financial > Invoices and Payments, and in Billing > Invoices. If you do not see the Notes column in these reports, please scroll down to the bottom of the report page and click on Choose Columns button, then tick the Notes to include them in the generated report. You may wish to save this new layout for future use.
-
If you need notes shown on the invoice print, you have two options:
- Write it in the invoice item 'Description field' when adding line items to the invoice
- Add it as custom invoice information that shows on all invoices for this client via: Client Profile > Billing > Billing Setup > "Extra Invoice Info"
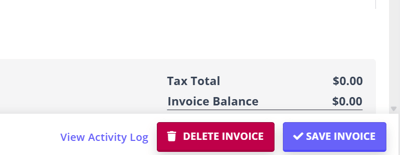
After making the desired changes, click Save Invoice. There’s also a Delete Invoice button on the bottom right-side if you’d like to permanently discard the invoice.
Add Multiple Line Items to an Invoice
You can add multiple line items to a single invoice to bill for more than one hour of service, or for multiple units of a product within the same appointment or session.
- Open the invoice edit page from the calendar appointment panel or via Billing > Invoices.
- In the Invoice Items section, click + Add Item.
- Select the same service again (or choose a different service if needed).
- Repeat this step for each additional hour or unit.
- Use the Description field on each line item to add details, such as:
- Time ranges (e.g. Hour 1: 10:00–11:00)
- Notes or reference information required by the payer
- Click Save Invoice.
The invoice total updates automatically to reflect all added line items.
Tip 💡:
This method is commonly used when billing government health programs (such as NIHB in Canada or NDIS in Australia), where multiple hours of service need to be itemised separately.
For more details, see:
Link a Stand-Alone Invoice to an Appointment
In Zanda, you can create invoices which aren't linked to client appointments. This can be done via the Billing menu > New Invoice or via a Profile > Billing > Invoices > + Create New Invoice.
However, these stand-alone invoices can be linked to existing appointments, provided that appointment does not already have an invoice attached.
Once an invoice has been linked to an appointment, the link cannot be removed from the invoice editor.
The Link to an appointment option is available only for invoices that are not already linked, and the appointment you select must not already have an invoice attached.
If you need an invoice that is not tied to the appointment, create a new standalone invoice via Billing > New Invoice, then delete the original linked invoice only if it has no payments and no active Medicare claim that prevents deletion.
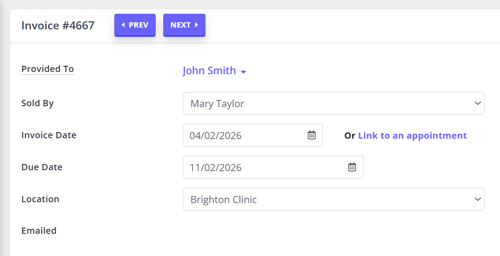
⚠️ Note: Once an invoice is linked to an appointment, this cannot be reversed.
Option 1: Linking an invoice to an appointment via the Billing menu
Use this method when you are creating an invoice as a new sale via the Billing menu and then link it to an existing appointment. This is a convenient method of attaching an invoice to an existing appointment without searching for the appointment on your calendar.
- To create a new sale and generate an invoice via the Billing menu, navigate to Billing > New Invoice;
- Complete the pop-up details as required;
- Once the invoice is created, link it to the existing appointment which is available in the dropdown;
- Add the product or service in the Item line;
- Add the payment method in the Payment line to record the payment;
- Save the invoice and print or email it to the payee.
Option 2: Linking an invoice from the Profile's Invoice page
You can also create invoices that aren’t linked to appointments from the Invoices page within a client or shared profile. If circumstances change, these standalone invoices can be connected to existing appointments for the same client or shared profile later, provided those appointments do not already have an invoice attached.
- Go to a client or shared profile > Billing > Invoices and create a new invoice.
- Add a service or a product to an item line.
- If applicable, add a payment to the payment line to make a record of it.
- Save the changes. This will create an invoice not linked to an appointment.
- When necessary, open this invoice to edit and click the 'Link to an appointment' link.
- Select the relevant appointment from the dropdown and save the changes.
Option 3: Linking an an invoice from Invoice Edit Page
- Find an existing invoice using one of the methods provided above and open its edit page.
- Click the 'Link to an appointment' link.
- Select the relevant appointment from the dropdown and save the changes.
What Appears on an Invoice
Every service you set up in Billing > Services has a number of fields, but only some of them print onto the invoice a client sees. Knowing which is which helps you predict what an invoice will look like, and where to go if you want to change what's included.
Appears on every invoice line item and cannot be deactivated.
- Date
- Qty
- Code
- Item Name & Description
- Price
- Tax
- Total
- Discount (only if a discount was applied)
- Dx/Diagnosis (only if the setting below is on, and the client has a linked diagnosis)
- Client Due / Insurer Due (US accounts with an active insurance claim, shown instead of Total)
Turning the Diagnosis (Dx) Column On or Off
The one invoice field you can switch on or off is the Dx column. Go to User Menu > Account Settings > Billing > Invoices > Invoice and Statement Layout and use the Show Diagnosis on Invoices toggle.
- When it's on, a "Dx" column appears on invoices for any client who has a diagnosis linked to their invoice items.
- When it's off, the column never prints, even if diagnoses are recorded.
💡 Tip: The same Invoice and Statement Layout settings page also lets you set the invoice title, choose whether tax is included in the price or added on top, add custom text to the top/footer of invoices and statements, position your business name/logo, and set the paper size.
Client & Practice Info (De-identifying Invoices)
Zanda allows you to control which client details appear on invoices. Below is a summary of the settings available and the specific client information each setting manages:
1. Client Date Of Birth: navigate to the client's primary practitioner profile via User Menu > Practitioner Profile (if you are the practitioner) or User Menu > Account Settings > Team > Practitioners > Practitioner's profile > Settings (if you are managing this for another practitioner) and use the 'Show Client's DOB On Invoice' switch to show or hide clients' DOB on their invoices.
Note: if you are a practitioner and you are permitted to access your own practitioner profile, you can access it via the top-right menu: Click your practice name at the top-right and select 'Practitioner Profile' option
2. Client's Name, Details & Appointment Time on all invoices: Use a setting in each client's profile or contact profile > Billing > Billing Setup. When enabled, this will remove the client's name, address, DOB and insurance details, and appointment time information from this client's invoices created from that point on .
3. Client's Name, Details & Appointment Time on a specific invoice: You can remove client's information (client's name, address, DOB and insurance details, and appointment) from a single specific invoice when needed. Open the invoice's Edit page and turn on the 'De-identify' switch. Save the invoice.
How to Print or Email an Invoice
You can print or email an invoice you’ve created.
Important: When you view invoices on screen, you will see the running balance for a client. However, once you print or email the invoice to the payee, only the outstanding amount for the service(s) listed on the invoice will be shown.
First, you’ll want to find the relevant invoice. To do so, follow the search methods listed in the above section.
- If you’ve located the invoice via the calendar using method 1, here’s how you can print or email the invoice:
1. Click the appointment block whose invoice you want to print.
2. Scroll down the Appointment Settings Panel to the Invoice section.
3. Click on the Printer icon to print the invoice or click on the Email icon to email the invoice.
- Alternatively, right-click on the appointment block on the calendar to open its context menu, and select 'Print Invoice' or 'Email Invoice or Receipt':
- If you’ve located the invoice through the Invoices page or a client’s profile using method 2 or 3, here’s how you can print or email the invoice.
On the top-right corner of the Edit Invoice page, click on Print to print the invoice or Email to email the invoice.
Printing the Invoice
After clicking the Print button, you’ll see a pop-up window displaying your invoice. Now, follow these steps:
1. Click on the Print icon. It is usually located on the top of the invoice.
2. Select your printer and click Print.
OR
1. Click Download to save your invoice as a PDF.
2. Open the PDF file and print it from within your PDF reader.
❓ What should I do if the left margin is cut off when I print an invoice PDF?
If the left edge of an invoice PDF is cut off, download the PDF first, then open it in your PDF reader and print from there. In the print window, check that the selected paper size matches your invoice paper size, and use the reader's scaling option, such as Fit to page or Shrink oversized pages, so the full invoice sits inside the printable area.
For invoice PDFs, you can check the Zanda paper size in User Menu > Account Settings > Billing > Invoices > Invoice Paper Size. Zanda applies the PDF margins automatically, so the paper size and the print settings in your PDF reader or browser are the best places to adjust how the invoice fits on the printed page.
Sending an Invoice Email
After clicking the Email button, you’ll see a pop-up window displaying your email along with an attachment of your invoice. Now, follow these steps:
1. In the To field , choose the recipient from the drop-down menu. The drop-down lists the client and any profiles linked to them in your account—such as contacts, referrers, and third-party payees.
In the CC field , you can copy in additional recipients:
- Choose from the drop-down menu, which lists the same linked profiles—the client's contacts, referrers, and third-party payees.
- Or type one email address directly into the CC field: type the full address, then click Send copy to: "..." to add it. For security and anti-spam reasons, only one address can be typed in manually per email—to copy in more people, add them as a contact on the client's profile first so they appear in the drop-down.
💡 Tip: If you regularly send invoices to the same insurer or organization, add them as a contact or third-party payee on the client's profile. Their email address will then be available in the To and CC drop-downs every time you email an invoice.
2. In the Template field, choose an email template from the drop-down menu. The Invoice and Statement Email template will be chosen as default.
It is possible to create your own default 'Invoice and Statement Email' template that will apply automatically:
1. In Tools > Communication > Templates modify the existing Invoice and Statement Email template or create your own2. In User Menu > Account Settings > Billing > Invoices > select the required template in the Invoice Email Template field > Save changes.
3 For this template, the Subject line will automatically include the associated Invoice number.
Finally, review the email text in the editor – and make whatever changes you want. Once done, click Send Email.
Hint 💡
Want clients to pay online using a credit card? You can! Learn how to include a payment link to emailed invoices here.
How to check if the invoice was emailed to the client:
- Open their client profile > Communication > Activity
- Find the email which was sent with this invoice as attachment
- The invoice file name will be listed in the "System Attachments" column.
How to View Invoice Activity Log
- The Invoice Activity Log records changes made to an invoice—for example, when the invoice was created, items were added or removed, payments were added, the Date Paid was updated, the Payable By client was changed, or a referral was changed. Each log entry shows the username of the person who made the change, the date and time, and the nature of the change. This log can be found on the Invoice Edit page in the bottom-right corner.
💡 Note: The Invoice Activity Log does not record changes to the invoice's practitioner or location.
Stop Invoices Being Created Automatically for a Client
Zanda does not have a setting that switches invoicing off for a client. What controls whether an invoice is created is the Service or Pack on the appointment: when an appointment is saved with a service or pack selected, Zanda creates the appointment and its invoice together. Save the appointment with no service or pack, and no invoice is created.
So to stop invoices being generated for one client, you stop a service being attached to their appointments.
Step 1: Clear the client's Preferred Service or Pack
If a Preferred Service or Pack is saved on the client, that service is applied automatically to every new appointment you book for them—which is why an invoice appears every time.
- Open the client's profile and go to Billing > Billing Setup.
- In the Preferred Service Or Pack dropdown, choose the first option, Select a Service or Pack , to clear it.
- Save your changes.
New appointments for this client will now open with the service field empty.
Step 2: Book appointments without a service
When you create an appointment for this client, leave the Service or Pack field in the Appointment Details section empty and save. The appointment is created and no invoice is generated.
If the appointment repeats, book the series from an appointment that has no service on it—the later occurrences copy their invoice items from that first appointment, so an invoice-free appointment produces an invoice-free series.
Removing invoices that already exist
Clearing the Preferred Service or Pack only affects appointments you create from that point on. It does not change invoices that have already been created, including invoices on future-dated appointments. Deal with those separately:
- Open the appointment's invoice and remove the service line items. If no payment has been recorded against the invoice, removing the last item deletes the invoice.
- If a payment has been recorded, the invoice is kept. See Deleting and Restoring Invoices and How Can I Write Off an Invoice? for the options.
Things to be aware of
- De-identifying invoices does not stop them. The De-Identify Invoices setting in the client's Billing Setup hides the client's name and appointment time on the invoice. The invoice is still created.
- Client Portal bookings always create an invoice. A booking made by the client through the Client Portal always has a service attached, so it will always generate an invoice. If you need this client to have no invoices at all, book their appointments yourself rather than letting them book online.
- To stop bookings altogether , rather than just the invoices, use the client's profile > Admin > Manage > Allow New Appointments and turn off Users can book appointments for the client. See Client Profile in Detail.
Frequently Asked Questions
Can an invoice show that the service has not happened yet?
You can add a visible note to the invoice, but Zanda does not automatically add a client-facing invoice status that says a service has not yet been provided. Invoice payment status is separate from appointment status, so use one of the visible invoice text fields when the payee needs this context.
For a message on one invoice, add the wording to the invoice item's Description field. For a message that should appear on every invoice for a specific client, go to Client Profile > Billing > Billing Setup > Extra Invoice Info. Use User Menu > Account Settings > Billing > Invoices > Custom Text for Top of Invoices and Statements or Custom Text for Invoice Footer only when the same message should appear on all invoices.
Keep Invoice Notes and payment Notes for internal comments, as they do not appear on the printed or emailed invoice.
How should I invoice freelance or one-off work?
Use a client appointment when the work needs to appear on the calendar. Add the client, date, time, location, and service in the appointment panel. When you save the appointment, Zanda creates the appointment invoice from the service, pack, or product items you add.
Use a stand-alone invoice when the work does not need a calendar booking. This can suit a product sale, a one-off charge, or work you want to bill without reserving appointment time. Go to Billing > New Invoice, select the client or payee, create the invoice, add the relevant service or product line items, and save the invoice.
To request online payment, include the {InvoicePayLink} merge field in an invoice email or SMS template.
Why are client details still showing after I turned on De-identify Invoices?
The De-identify Invoices setting in a client or contact profile applies to invoices created after the setting is turned on. It does not automatically update invoices that already exist, including future-dated invoices that were created before the setting changed.
To de-identify an existing invoice, open the invoice edit page, turn on the De-identify switch, and click Save Invoice. If details are still showing after that, check which details are visible:
- Client details, such as the client name or appointment information, are controlled by the invoice De-identify switch.
- Your practice details, such as business address, phone number, email address, or tax ID, are controlled separately in User Menu > Account Settings > Billing > Invoices > Your Business Contact Details.
Can a fee automatically adjust based on appointment duration?
Zanda does not automatically change an invoice item fee when you change the appointment duration. To bill by duration, open the invoice edit page and update the invoice item's Qty or Price, or add separate line items for each hour or unit. The invoice total recalculates from the item price and quantity.
Can I change the invoice quantity to two decimal places instead of three?
There is no setting that changes the number of decimal places shown for the invoice line Qty. On the invoice edit page, Qty always displays three decimals (for example, 1.000), but this is a display format only, not a change to the amount charged.
The invoice your client actually sees—the printed copy, the emailed copy, and the PDF—shows the quantity to two decimal places whenever the third decimal is zero. It only shows a third decimal when the quantity genuinely carries a non-zero third decimal, such as 1.125.
The three-decimal display does not, on its own, change any total. Each line total is the quantity multiplied by the price and then rounded to two decimals, so 1.00 and 1.000 produce exactly the same total. A total only shifts when the quantity itself carries a real third decimal, such as 1.001. If a total looks off, check the actual value typed in the Qty field rather than the number of decimals shown, and set the quantity to two decimals if you do not want a third decimal to affect it.
Can I allocate a paid invoice to an appointment for a Medicare patient claim?
Yes. In Zanda, this is called linking the invoice to an appointment. Open the paid standalone invoice, click Link to an appointment, select the relevant appointment, and save the invoice. The appointment must not already have an invoice attached, so if the appointment is linked to the wrong unpaid invoice, remove or delete that invoice first when it is safe to do so.
For Australian customers, check whether the incorrect invoice is linked to any Medicare claims before deleting it. Invoices linked to Medicare claims cannot be deleted; write the invoice off instead and keep it in your account as a null invoice.
Can I download PDF copies of all invoices at once?
Use the invoice print window when you need a PDF copy of an individual invoice. For bulk invoice records across the account, use Tools > Data Export and select Invoices. This creates CSV files, including Invoices.csv and Invoice Items.csv, with invoice numbers, dates, due dates, payee details, invoice summaries, totals, and line-item details that you can open in Excel or a similar spreadsheet program.
Use Tools > Xero Export only when you want to send invoice records to Xero. Xero export is separate from downloading invoice PDF copies.
For more details, see Exporting Your Data and Managing Integration With Xero.
How can I see when the practitioner was changed on an invoice?
The Invoice Activity Log does not record changes to the invoice's practitioner or location, so this change will not appear there.
- If the invoice is linked to an appointment, the practitioner, location, and invoice date come from the appointment and cannot be changed directly on the invoice. To see when the practitioner was changed, open the appointment on the calendar and view the Appointment Log (click the Show Appointment Log icon in the Appointment Details section). The log will show an entry such as 'Moved from [previous practitioner] to [new practitioner]', along with the user who made the change and the date and time. See Viewing the Appointment Log for details.
- If the invoice is not linked to an appointment, Zanda does not keep a record of when its practitioner was changed.
Related Articles
- Completing Appointments and Generating Invoices/Receipts — How invoices are generated directly from an appointment, so the invoice and appointment are linked from the start.
- Adding and Managing Payments — Record, allocate, and un-allocate payments on invoices, including moving a payment to another invoice for the same client.
- Submitting a Patient Claim (AUS Only) — Lodge a Medicare patient claim from the invoice that's linked to the appointment.
- Deleting and Restoring Invoices — Remove an incorrect invoice from an appointment (and restore it if needed) before linking the correct one.
- How Can I Write Off an Invoice? — Zero out an invoice you can't delete, e.g. when clearing an incorrect charge.
- Quick Reference Guide to Invoice Fields — A field-by-field reference for everything shown on an invoice.
- Client Profile in Detail — Where the client's Billing Setup lives, including Preferred Service or Pack, De-Identify Invoices, and Extra Invoice Info.