%20-%20120%20x%2044.svg)
Managing Online Bookings in 3 Steps
1. Go to User Menu > Account Settings > Schedule > Client Portal > Access and Settings, and enable the 'Accept Online Bookings' option.
2. While still on this page, locate the Online Bookings section and activate the 'Allow Group Bookings' option to support class bookings.
3. To manage individual client booking access , open the client’s profile, select Admin > Manage, and use the**'Allow New Appointments' > 'Client can book appointments on the portal' **setting to control whether the client can book new appointments online.
💡 Portal cancellation access is controlled separately. The client-level Client can book appointments on the portal switch controls new online bookings only. To control whether clients can view and cancel existing appointments in the portal, use Show Upcoming Appointments and the Cancellation Policy setting in User Menu > Account Settings > Schedule > Client Portal > Access and Settings.
💡 Default access for new clients. By default, every new client has online booking access turned on, including a client who registers on the portal, not just a client you add manually. There is no account-wide setting that changes this default.
If you want to hold booking access back until you have reviewed a new client, turn off Client can book appointments on the portal for that client individually (Client Profile > Admin > Manage > Allow New Appointments), or use Tools > Bulk Update to turn it off for several clients at once. If you would rather stop new visitors from creating a Client Portal account at all until you are ready to vet them, use Allow New Clients to Register instead; that blocks registration itself rather than just booking access.
- To access the online booking settings page, navigate to User Menu > Account Settings > Schedule > Client Portal > Access and Settings.
- On this page, scroll to the Online Bookings section and go through each setting. You can work on those before you enabled your client portal for clients accessing online bookings.
- For more instructions on enabling your client portal and accepting online bookings, refer to this detailed article: Getting Started With Your Client Portal
In this article:
- Clients Can Book With Any Practitioner
- Require Clients to Register/Login First
- Allow Archived Clients to Book Appointments
- Allow Group Bookings
- Show Service Price
- Request Payment When Booking
- Earliest Time Clients Can Book
- Limit How Far Clients Can Book
- Minimum Gap Between Bookings
- Cancelation policy
- Default Flag Applied to Bookings
- Display Start Times Every
- Booking Terms and Conditions
- FAQs
Clients Can Book With Any Practitioner
If enabled, clients can book with all practitioners with availability. If not enabled, clients can only book and see availability with their primary or assigned practitioners.
-
Note: In accounts where clients can only book with their assigned practitioners, contacts will see both their own and the client’s assigned practitioners - making it easier to ensure the right person is booked with the right practitioner.
Require Clients to Register/Log In First
If enabled, clients must log in or register to access the portal. If new client registrations are not allowed, this setting will be enabled by default to only allow existing clients to access the portal.
Allow Archived Clients to Book Appointments
This setting controls whether clients you have archived can still book appointments through the Client Portal. It is enabled by default, so archived clients can book unless you turn it off.
To stop archived clients from booking online, disable Allow Archived Clients to Book Appointments in the Online Bookings section of User Menu > Account Settings > Schedule > Client Portal > Access and Settings.
When it is disabled:
- Archived clients can still log in to the Client Portal and use its other services — viewing invoices and receipts, past appointments, and forms.
- When an archived client tries to book, the booking is stopped with the message "Unable to book. Your profile is not set up for online bookings. Please contact the clinic directly to make your booking."
💡 This is useful when you want to keep a former client's portal access for their records but no longer want them booking new appointments themselves.
Allow Group Bookings
If enabled, clients will see the option to book into groups that have not yet met their maximum number of participants.
Group Booking Label
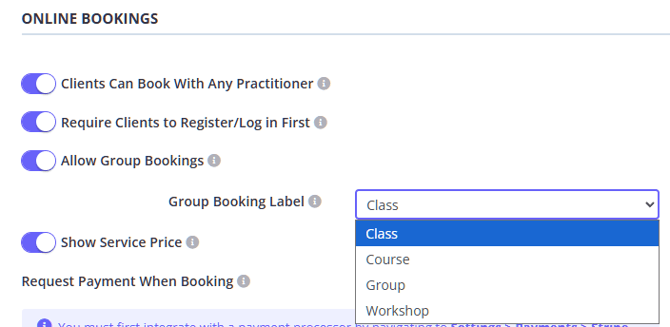
Not every practice calls group sessions "classes". You can change the wording clients see for group bookings to match what you offer. In your group-appointment settings on this page, use the Group Booking Label dropdown to choose one of:
- Class (default)
- Course
- Group
- Workshop
Select the label that best describes your services and click Save — your Client Portal updates immediately. Hover over the tooltip icon next to the setting to see how the label is used.
Your chosen label appears across the whole client booking experience:
- Portal home page: the card title becomes "Book a {your label}", with a matching description (for example, "View available time slots and book a workshop.").
- Booking flow: the page header reflects your chosen label at each step.
- Booking confirmation: the group title shows your selected label.
- Booked appointment details: your label appears on the appointment summary.
Show Service Price
If enabled, clients will see service prices when viewing the list of services to book. This setting is enforced when payments are optional or required.
Request Payment When Booking
It is possible to set up credit card payments via the Client Portal when clients book individual sessions or book a class:
You have the option to have the payment of the associated individual or group service
- Disabled which means there will be no option to pay for a service online via the Client Portal.
- Required which means clients cannot book without paying upfront.
- Optional which means the credit card details are prompted but it is not compulsory to book an appointment.
Payments will only be taken if the practitioner for the appointment is linked to Stripe, or if the account has a business Stripe account connected.
✔️ Practices are also able to pass the Stripe processing fees to clients when they pay for their invoices online. See the detailed guide here.
Earliest Time Clients Can Book
Select the earliest interval in which a client can book an appointment from the current time.
This setting determines how soon clients can access your available appointment times. For example, if you select 'three days ahead,' clients will be unable to view or book appointments within the next three days. If today is Monday, your availability will become visible to clients starting from Thursday of the same week.
Limit How Far Clients Can Book
This setting allows you to control how far in advance clients can view and book your available appointment times. For example, setting this limit to ‘3 months ahead’ means clients can only see and book appointments within the next three months. If today is January 1, availability will be visible to clients through to March 31 of the same year—dates beyond that will not appear as bookable options.
The dropdown includes Anytime, One week ahead, Two weeks ahead, Three weeks ahead, Four weeks ahead, 2 months ahead, 3 months ahead, 6 months ahead, 8 months ahead, and 12 months ahead. The dropdown does not include a six-week option, so choose Four weeks ahead for a shorter booking window or 2 months ahead for a longer booking window.
💡 This setting applies account-wide, covering every service, appointment type, and practitioner, including group appointments and classes (see the FAQ below for the per-practitioner workaround). For different advance-booking windows across offerings, for example a shorter window for group sessions and a longer window for individual services, set up a separate Zanda account: each account keeps its own independent Client Portal settings.
Minimum Gap Between Bookings
Sets the buffer that is enforced around existing client appointments booked through the portal. This setting does not create a fixed cycle for all visible start times on an empty calendar.
To understand how this setting works, first check how your available start times are created:
- The Client Portal starts with the practitioner's availability, service duration, and any value selected in Display Start Times Every.
- If Display Start Times Every is left as Select, the portal uses the selected service duration as the start-time interval. For example, a 50-minute service can show available starts every 50 minutes when the calendar is otherwise empty.
- If an appointment already exists, Zanda removes the appointment time plus the configured minimum gap before and after that appointment from the available times shown to clients.
For example, if a 50-minute client appointment is booked at 9 AM and Minimum Gap Between Bookings is set to 20 minutes, the Client Portal will protect the time from 8:40 AM to 10:10 AM around that appointment. The next available time depends on the remaining practitioner availability and the Display Start Times Every setting.
🚨 Important Note
The gap between appointments does not apply to Personal Appointments. If you have a time slot blocked by a Personal Appointment, the Client Appointment will be booked straight after it without the configured time gap buffer.
Cancellation Policy
- You can choose to allow clients to cancel their appointments through the Client Portal, or you can restrict this option using the cancellation policy settings. You also have the flexibility to define how many days in advance a cancellation is permitted—clients will only be able to cancel within this window. Outside of the allowed time frame, clients will receive a notification instructing them to contact your practice directly to request a cancellation.
- If the 'Cancellation Policy' is set to 'No Cancellations Via Portal', clients will not see the 'Cancel Appointment' button next to their appointment.
- The Cancellation Policy applies to clients who can view upcoming appointments in the portal. If Show Upcoming Appointments is enabled, clients can access the appointments page and the cancellation policy determines whether Cancel Appointment is hidden, enabled, or disabled with a policy message. Turning off Client can book appointments on the portal for one client prevents that client from booking new appointments online, but it does not create a separate cancellation rule for that client.
🚨 Important Note
- If cancellations are allowed via the portal and there are no payments associated with the cancelled appointment, the generated invoice will be deleted.
- If a payment is associated with the appointment, the invoice and payment will remain active. In this case, you will need to unallocate the payment and delete the invoice manually if required.
Reschedule Policy
Select the policy for allowing clients to reschedule their appointments online via the Client Portal. You can choose a cut-off time (e.g., 6 hours before the appointment) up to which clients can change their booking times. See Allow Clients to Reschedule Appointments via the Client Portal for detailed instructions.
Default Flag Applied to Bookings
Select a flag to be applied by default to every booking made via the portal. Useful for viewing and reporting on the source of bookings in the calendar.
Display Start Times Every
Define the minute interval in which appointment times are offered to clients. Determined by the availability and existing appointments.
With this setting, you can define the start times of available appointments from the first available time slot.
If you leave this setting as Select, the Client Portal uses the selected service duration as the start-time interval. If you want clients to choose from fixed start times, choose an interval such as 60 minutes.
This setting offers fixed intervals only—you choose an interval from the dropdown (for example, every 30, 45, or 60 minutes). It is not possible to enter a custom, hand-picked list of start times (such as 9:15 AM, 11:00 AM, and 2:45 PM). To offer irregular start times, see the FAQ below.
For example, your availability starts at 9 AM, your appointments last for 50 minutes, and you select the 60-minute interval in Display Start Times Every setting.
- When no appointments are booked yet, the available times will display as 9 AM, 10 AM, 11 AM and so on.
- When the first 50-minute appointment is booked, the client portal will display availability for this day as 9:50 AM, 10:50 AM, 11:50 AM and so on. If you still wish every appointment to start on the hour, add a 10-min gap between client appointments.
Booking Terms and Conditions
Any sensitive policies or conditions regarding booking/payments can be displayed here. Clients need to click the text " terms and conditions of use" in order for this to show and be read before clicking Book Now. The character limit for this field is 1900 characters, if your text exceeds this limit you are able to enter a hyperlink to link to a separate page.
FAQs
❓ Can I rename the Book Class button on the Client Portal?
Yes, you can use one of the available label names from the dropdown on the Account Settings > Schedule > Cient Portal > Access and Settings page. The options to select are: class, course, group and workshop.
❓ Can I set a different booking gap for each practitioner?
No. The Minimum Gap Between Bookings setting is managed in your Client Portal online booking settings and applies to the online booking slots offered through the portal. To adjust when a specific practitioner can be booked online, go to that practitioner's availability and turn Online Bookings on or off for the relevant timeslots.
❓ Can I show a "please call us" message for one practitioner instead of their online booking schedule?
Two existing settings each get you part of the way there, though neither swaps a practitioner's bookable schedule for a text message while still listing them—it helps to know exactly what each one does:
- Remove the practitioner from online booking entirely. Untick Clients can book online on every one of that practitioner's availability blocks (see Setting Up and Editing Availability). Once none of their time is online-bookable, the practitioner stops appearing as an option in the Client Portal altogether—clients won't see a message in their place, they simply won't see that practitioner listed. Your other practitioners' online booking is unaffected, and your team can still book appointments for that practitioner manually within Zanda.
- Add a note to a practitioner who stays bookable. The Additional Client Portal Information field on a practitioner's profile (User Menu > Account Settings > Teams > Practitioners > select the practitioner) displays a short note under their name in the Client Portal's practitioner list. This only supplements a still-bookable schedule—it can't replace it, so clients can still book directly below the note.
If clients should be told to call instead of seeing any schedule, use the first option. If you just want to add context under a practitioner who stays bookable online, use the second.
❓ Can I set Earliest Time Clients Can Book or Limit How Far Clients Can Book differently for each practitioner?
No. Earliest Time Clients Can Book and Limit How Far Clients Can Book are set once in your Client Portal online booking settings and apply to every practitioner's online booking slots. To limit how soon or how far ahead clients can book with one specific practitioner, go to that practitioner's availability and turn Online Bookings on only for the timeslots that fall inside the window you want for them.
❓ Can prospective clients book a phone or telehealth appointment, complete an intake form, and provide card details before their first session?
Yes. Set up Phone and Telehealth Video Call locations, create the services you want new clients to book, assign those services under Client Portal > Available Services, and make sure the practitioner's availability has Online Bookings enabled for the relevant times. After the client selects a service, practitioner, and time, Zanda confirms the booking when the client completes the booking flow, or when any required portal payment is completed.
Zanda does not hold the booking confirmation until an intake form is completed. For intake follow-up, send the intake form through a Client Portal notification, a New Client automation, or a manual message, then use an Incomplete Forms automation to remind clients who still need to complete it. To collect card details without charging at booking, add the Credit Card (Stripe) linked profile field to the intake form. The submitted card details are stored through Stripe for future charges.
❓ Can clients book a recurring or weekly appointment series through the Client Portal?
Not yet. Each Client Portal booking is for one appointment, so booking the same time slot every week means going through the booking flow once per appointment.
To set up a recurring series for a client, a staff member can create it directly from the practitioner's calendar. See Creating, Editing and Deleting Recurring Appointments.
❓ When a client registers in the portal for the first time, which 'calendar contact' is the notification sent to?
- If a client registers on the portal without making a booking, the new client is assigned a primary practitioner. The primary practitioner for the account is set up User Menu > Account Settings > Team > Practitioners > Select the desired practitioner > Settings > Enable "Default for New Clients". The primary practitioner for an individual client can be changed any time by going to the client's profile and navigating to Admin > Manage.
- If the new client then books their first appointment with a different practitioner, that practitioner becomes the client's Primary Practitioner automatically, and the new appointment booked notification is sent to them. This applies to that first booking only. From then on, booking with another practitioner does not change the client's Primary Practitioner, which you update on the client profile under Admin > Manage.
❓ Why are my 50-minute services showing every 50 minutes when I set a 20-minute minimum gap?
This is expected when Display Start Times Every is left as Select and there are no existing appointments blocking the day. The portal uses the selected service duration to create the visible start times, so a 50-minute service can appear at 50-minute intervals.
The Minimum Gap Between Bookings setting is applied around appointments that are already in the calendar. Once a client appointment is booked, Zanda protects the booked appointment time plus the minimum gap before and after that appointment. To show clients fixed hourly start times, set Display Start Times Every to 60 minutes and keep Minimum Gap Between Bookings set to the buffer you need between booked client appointments.
❓ Can I offer clients a specific list of start times instead of a fixed interval?
Not through the Display Start Times Every setting—it only offers fixed minute intervals from a dropdown. You can achieve the same result with your availability setup instead: create a separate availability block for each start time you want to offer, and enable Online Bookings on each block.
The Client Portal offers appointment times starting from the beginning of each availability block, so each narrow block surfaces exactly the start time you set. For this to work as intended:
- Start each block at the exact time you want clients to see.
- Make each block at least as long as the service duration—a block shorter than the service will not show any bookable time for that block.
- Keep each block close to the service length. A longer block can fit additional start times, so extra times you didn't intend may appear.
For steps to create availability blocks, see Setting Up and Editing Availability. If you can't select the exact minute you need when setting a block's start time (for example, a quarter-past or a :50 time), set Minute Increment on Time Picker Dropdown to 5 minutes, the finest increment, which makes every minute value in fives selectable. You'll find this setting under User Menu > Account Settings > Schedule > Calendar Display—see Setting the Time Format of Your Account.
❓ I offer several appointment durations (for example, 30, 45, 60, and 90 minutes) with one practitioner on the same day. Can online booking keep every duration's start times on one neat, shared grid?
Not directly. Display Start Times Every and Minimum Gap Between Bookings are both single settings for your whole account. They apply the same interval and the same buffer to every service, not a separate grid per duration. Each service's available start times are calculated from wherever that practitioner's next free time begins, once existing bookings of any duration (and their gap) are removed. So once a booking of one duration is made, it can shift the starting point the next duration's times are calculated from, off the round grid you intended.
To keep each duration's start times clean, separate the durations into their own time windows instead of offering them all in one shared window. This is the same location-based pattern used to offer different services at different times of day. For example, give your 30-minute service its own morning availability block or location, and your 60- and 90-minute services their own afternoon block, each with Online Bookings enabled. See Setting Up Available Services and Times on Client Portal for the full steps.
If you need multiple durations to stay bookable within the very same window, the availability-block-per-start-time workaround above can help (see "Can I offer clients a specific list of start times instead of a fixed interval?"). It can hold one duration to a fixed start, but you'd need to build and size a separate block for every duration you want to protect. Zanda doesn't have a setting that does this automatically across mixed durations.
❓ Can I turn off portal cancellations for selected clients only?
You can control whether a specific client can book new appointments online, but portal cancellation access is managed at the portal settings level. To stop portal cancellations, go to User Menu > Account Settings > Schedule > Client Portal > Access and Settings and set Cancellation Policy to No Cancellations Via Portal.
If you still want clients to see upcoming appointments, keep Show Upcoming Appointments enabled and choose the cancellation policy window that fits your practice. If you turn off Client can book appointments on the portal in a client profile under Admin > Manage > Allow New Appointments, that client will be blocked from booking new appointments through the portal, but the setting does not separately hide or disable Cancel Appointment for that client.
❓ What does a client see if I turn off their online booking access?
It depends on where they are in the portal when they try to book. Once you turn off Client can book appointments on the portal in Client Profile > Admin > Manage > Allow New Appointments:
- On the portal home page. After the client logs in, the Book an Appointment card (and the group booking card, if you use group bookings) is not shown at all. There is no message, because there is nothing for them to select.
- After following a booking link. If the client opens a booking link and then logs in, they are taken to the portal home page and shown the message: "Your profile is not currently set up to book appointments. Please contact the practice for assistance."
- When confirming a booking. If the client is already logged in and reaches the booking screen, the booking is stopped when they try to confirm it, with the message: "Your account is not enabled for Online Bookings. Please contact us directly to make your booking."
Turning off online bookings does not remove the client's portal access. They can still log in and use everything else your portal offers, such as viewing invoices and receipts, past appointments, and forms.
💡 Contacts see different wording. A contact on a client's profile who does not have permission to book sees "Unable to book. Your profile is not set up for online bookings. Please contact the clinic directly for assistance."
❓ What should I check if a client sees "The selected practitioner is not available for this client"?
This message usually means the portal is limiting the client to their primary or assigned practitioners, and the practitioner they selected is not currently linked to that client. Work through these checks:
- Go to User Menu > Account Settings > Schedule > Client Portal > Access and Settings and review Clients Can Book With Any Practitioner. If this setting is not enabled, clients can only book with their primary or assigned practitioners.
- Open the client profile, then go to Admin > Manage and confirm the correct Primary Practitioner is assigned.
- In the same Admin > Manage area, confirm Allow New Appointments > Client can book appointments on the portal is enabled for that client.
- Confirm the practitioner has portal availability for the selected service, location, and time. For setup steps, see Setting Up Available Services and Times on Client Portal.
- If the message continues after these checks, send Zanda Support the affected client, practitioner, service, location, date, time, and the exact message the client saw so the booking attempt can be investigated.
❓ What should I check if a client receives a booking SMS with no appointment date or time?
Start with the New Appointment Booking notification in your Client Portal settings. The client SMS template should include appointment merge fields so the booking details can populate correctly.
To troubleshoot the message:
- Go to User Menu > Account Settings > Schedule > Client Portal > Notifications.
- Open the New Appointment Booking section.
- In the Client row, confirm the SMS notification is enabled and the correct SMS template is selected.
- Select Edit Template and confirm the template includes appointment merge fields such as {AppointmentDate}, {AppointmentStartTime}, {AppointmentServiceName}, or {AppointmentLocationName}.
- Save the template, then select Save Changes on the Notifications page.
- Test the setup with a test client profile and a new portal booking.
If the client received a booking confirmation but the appointment is not visible in the calendar, search the client's profile and the calendar first, then check the Deleted Appointments report. If the appointment still cannot be found, contact Zanda Support with the affected client, approximate booking date and time, a screenshot of the SMS, and whether the booking was made through the Client Portal.
❓ Can I offer multiple locations with the same availability for online bookings?
Yes, you can. When the available spot is booked in one Location, the other locations are blocked out on the appointment practitioner calendar, to prevent double-booking.
💡 For home visit services, see Setting Up Available Services and Times on Client Portal for guidance on using locations, services, practitioner availability, and payment settings together.
❓ Can I hide or remove the Location step from Client Portal bookings?
No, the Location step is a fixed part of every online booking on Client Portal, and it can't be turned off or removed.
If your account has only one location, clients don't need to do anything at this step: Zanda selects it for them automatically and moves them straight to the next step. The Location step only asks the client to choose when your account has more than one active location.
❓ Can I let existing clients book appointments but prevent new clients from booking until we give them permission?
Yes. Turn off Allow New Clients to Register in User Menu > Account Settings > Schedule > Client Portal > Access and Settings. While it's off, only clients who already have a profile in your account can log in and book; anyone trying to register as a new client instead sees a message asking them to contact your practice directly. Existing clients keep booking normally the whole time. Turn the setting back on whenever you're ready to accept new clients again, which makes this a good fit for a temporary pause. See Client Portal Registration For New Clients for the full registration flow this setting controls.
If you'd rather still let new clients register, but only with a practitioner your team assigns them to first, use the workaround below instead; it adds a practitioner profile to your account, so it suits ongoing new-client triage rather than a short pause.
Workaround Solution:
A possible workaround is to create a dummy practitioner profile that acts as a placeholder for new clients:
- Create a dummy practitioner profile (e.g., "New Client - Pending Review") and set it as the default for new clients, with no availability or services enabled for that profile.
- Navigate to User Menu > Account Settings > Schedule > Client Portal > Online Bookings and disable the option 'Clients can book with any practitioner'. This prevents new clients from booking with other practitioners.
- In the same Online Bookings section, turn on Require Clients to Register/Log in First. Until a client is logged in, the portal shows every practitioner with online availability, so this step is what holds the restriction in place for a new, not-yet-logged-in client.
- Once your team has triaged a new client's file, update the Primary Practitioner (under Client Profile > Admin > Manage) to the practitioner who will be caring for them. This will allow the client to book appointments with their assigned practitioner.
Important: Adding a practitioner profile might increase your subscription price. This workaround suits ongoing new-client triage; for a straightforward pause on new bookings, use Allow New Clients to Register above instead.
❓ Can I restrict just one practitioner to her own existing clients, while every other practitioner stays open to any client?
No. Clients Can Book With Any Practitioner is a single account-wide switch—it applies to every practitioner the same way, on or off. There is no way to turn it on for some practitioners and off for just one.
Turning off that one practitioner's own Online Bookings availability instead doesn't get you there either: it removes her from the online booking list for every client who tries to book with her—including her own existing and assigned clients—not only new ones.
If one practitioner needs to stay limited to her existing caseload while everyone else stays open to any client, the portal can't enforce that split today. Keep her out of online availability and have those clients book with her directly—by phone, in person, or by adding the appointment to the calendar yourself.
❓ Can I limit brand-new clients to certain services or practitioners?
You can limit what new clients book by steering every new registration to one practitioner, and letting that practitioner's enabled services decide what a new client can book:
- Choose the practitioner you want new clients to start with, then go to User Menu > Account Settings > Team > Practitioners > select the practitioner > Settings and turn on Default for New Clients. Only one practitioner in the account can hold this. For the full steps, see Setting The Default Practitioner For New and Existing Clients.
- Go to User Menu > Account Settings > Schedule > Client Portal > Available Services and enable only the services you want new clients to be able to book for that practitioner. Set that practitioner's availability with Online Bookings enabled for the times you want to offer.
- Go to User Menu > Account Settings > Schedule > Client Portal > Access and Settings and turn Clients Can Book With Any Practitioner off, so a client only sees their primary or assigned practitioners.
- In the same Online Bookings section, turn Require Clients to Register/Log in First on. Until a client is logged in, the portal shows every practitioner with online availability and all of their enabled services, so this step is what holds the restriction in place.
Once your team has reviewed the new client, update their Primary Practitioner under Client Profile > Admin > Manage, and they will see that practitioner's services from then on.
These four steps are what achieve the outcome, because the services and practitioners a client sees in the Client Portal come from your service, practitioner, and availability settings, and those apply to everyone booking online rather than to new clients on their own.
Two things to know before you set this up:
- This applies to clients who register first and then book. If a new client registers as part of the booking itself, they are assigned the practitioner they selected during that booking rather than your default practitioner, so the restriction does not apply to them.
- After a new portal client's first appointment, their primary practitioner is updated to the practitioner they booked with. Check the client's Primary Practitioner if you need them to stay with the practitioner you assigned.
💡 If you want to stop new clients booking at all until your team has triaged them, see the question above about preventing new clients from booking.
Troubleshooting inconsistent or unexplained portal communication
If a client reports receiving an email that seems to reference a booking that doesn’t exist, references an empty appointment time, or is just generally unexplained, the first thing to check is the portal notification settings.
Go to User Menu > Account Settings > Client Portal > Notifications and review the notifications that are set to be sent whenever a client performs one of the actions listed. Ensure that there are no misplaced or incorrect templates used in any sections (ie. an appointment reminder template for when a new client registers).